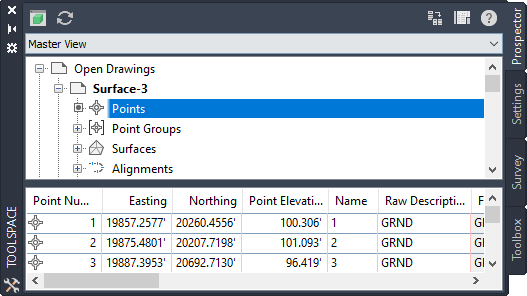
Use the Toolspace item view to display information about an item or the contents of a collection.
The item view is a secondary pane displayed beside or below the tree. To display the item view, click the item name.
When the Toolspace window is floating, you can change the orientation of the item view by clicking the ![]() button at the top of the Toolspace.
button at the top of the Toolspace.
An item view takes one of the following forms, depending on the selected item:
List View
A list view is a table displayed by the Toolspace trees for some items. In some cases, this information can be edited. The following illustration shows a Prospector list view of points:

When the Toolspace is docked, the list view is displayed below the data tree. When the Toolspace is undocked, you can display the item view either below the data tree or to one side of the data tree by clicking the item view orientation button ![]() .
.
Graphical View
A graphical view displays an image of the selected item. The following illustration shows a Prospector graphical view of a parcel.

To view graphical item previews, you first click the Item Preview button ![]() on the Prospector tab. Then right-click the object or object collection and select Show Preview. Then click on the object name in the Prospector tree.
on the Prospector tab. Then right-click the object or object collection and select Show Preview. Then click on the object name in the Prospector tree.
Right-click in the graphical preview to display a context menu that allows you to manipulate the image using commands such as and .
Not all items on the Prospector and Settings, or Survey trees have item views associated with them.