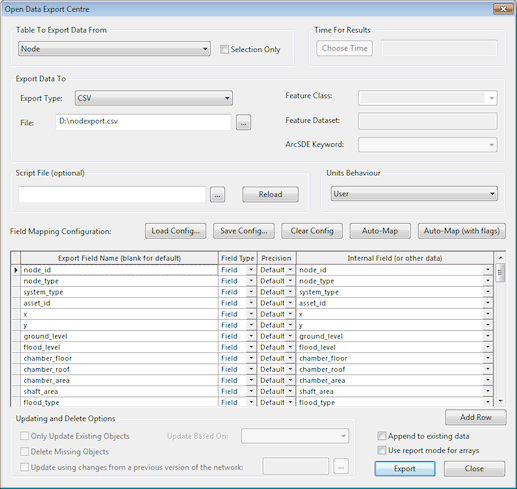
This dialog is used when exporting data to external data sources via the Open Data Export Centre.
It is displayed when you:
- Right-click the
version controlled item and choose Export
 using Open Data Export Centre from the popup menu
- Choose Exportusing Open Data Export Centre from the Network menu when a network is open
- Choose Open Data Export Centre from the Results menu when available
- Right -click a simulation and choose Exportusing Open Data Export Centre from the popup menu
- Right-click a risk analysis simulation or a risk analysis result object and choose Exportusing Open Data Export Centre from the popup menu
Note: Risk analysis simulations or risk analysis result objects are not available for cloud databases
The Open Data Export Centre allows you to export data from InfoWorks ICM in a variety of formats. These are:
- Comma and tab separated files
- Access database (.mdb) format
- Oracle database (if, for export without spatial data, Oracle version 8i or newer is installed, or version 9.2 or newer for the export of spatial data)
- SQL Server database (if the Microsoft OLE DB Provider for SQL Server is installed)
- MapInfo MIF files
- ESRI SHP files
- MapInfo TAB files
- GeoDatabase (if you have the appropriate ESRI licence)
- XML
- File Geodatabase (if you do not have an ESRI licence)
Note: This option is only available with 64 bit versions of InfoWorks ICM.
You can export:
- Data from any version controlled item
- Results from a completed simulation
Open Data Export Centre Options
|
Dialog Section |
Description |
||||||||||||||||||||||||
|---|---|---|---|---|---|---|---|---|---|---|---|---|---|---|---|---|---|---|---|---|---|---|---|---|---|
|
Table to Export Data From |
|
||||||||||||||||||||||||
|
Time For Results |
|
||||||||||||||||||||||||
|
Choose return period |
|
||||||||||||||||||||||||
|
Export Data To |
|
||||||||||||||||||||||||
|
Script File (optional) |
Scripts can be used to refine the export process. This is an advanced option. Contact Innovyze for further information on using a script to control export. |
||||||||||||||||||||||||
|
Units Behaviour |
Select from User Units to export values using the current display units, or InfoWorks ICM Units to export values as InfoWorks ICM native units. |
||||||||||||||||||||||||
|
Field Mapping Configuration buttons |
Use the Field Mapping Configuration buttons to apply saved mappings to the Field Mapping Grid:
|
||||||||||||||||||||||||
|
Field Mapping Grid |
The field mapping grid allows the mappings for individual data fields to be set up. The grid contains a variable number of columns. Some columns only appear for some data types, and some columns will be disabled depending on the values of other columns. See the Field Mapping Grid section below for further details. |
||||||||||||||||||||||||
|
Add Row |
Adds a row to the field mapping grid to allow another field to be specified. |
||||||||||||||||||||||||
|
Export |
Validates the field mapping grid and then does one of the following:
Once the data is exported, any errors encountered are displayed in a dialog |
||||||||||||||||||||||||
| Append to existing data |
This option applies when exporting to comma separated and tab separated files, Access, Oracle, SQL Server and GeoDatabase format only. Exported records are added to an existing table/file instead of creating a new table/file. Cannot be used in conjunction with Updating options. Note: The field mapping configuration used to export the table originally should be used when appending data to the table. The append functionality does not support checks for existing fields and addition of new fields for all formats.
|
||||||||||||||||||||||||
|
Use report mode for arrays |
When exporting a value array, all the data values are exported. There are two methods of organising exported value data, and these are controlled by the Use report mode for arrays check box. When exporting a structure array to XML, the Use report mode for arrays check box controls the format of this exported array. For further information, see the Exporting Array Data topic. |
||||||||||||||||||||||||
|
Updating and Delete Options |
The Updating options apply when exporting to Geodatabase, File Geodatabase, Oracle or SQL Server only. The options will be enabled if an existing Feature Class is selected in the Export Data To section of the dialog (and the Append to existing data option is unchecked). See the Exporting Data to GeoDatabase , Exporting Data to Oracle and Exporting Data to SQL Server topics for further information.
|
 to browse for the file location.
 button).
Field Mapping Grid
The grid allows the mappings for individual data fields to be set up. The grid contains a variable number of columns. Some columns only appear for some data types, and some columns will be disabled depending on the values of other columns.
|
Column |
Description |
||||||||||||||
|---|---|---|---|---|---|---|---|---|---|---|---|---|---|---|---|
|
Export Field Name |
The name used for the column, either in the database or file for GIS or database files, or in the first row for CSV and tab separated data files. If this field is left blank a sensible name will be generated when the file is exported. Therefore you only need to put something in here if you do not like the default value. |
||||||||||||||
|
Field Type |
There are currently 5 field types:
|
||||||||||||||
|
Data Type |
The data type column allows you to override the normal export data type for this data field. This column is hidden for comma and tab separated variable files. Data is always exported to these file types as text. The possible data types are:
By default, fields are exported in the same format as they are held in InfoWorks ICM. These formats are predominantly Text and Double. You can choose to export any field in any format. If you try to export a string that cannot be represented as a number in one of the number formats, you will get a warning message after the export. You will get a warning message for every failure, so if you have a long list of objects it could be a long list. It may be perfectly legitimate for you to export text fields as numbers. For example, if:
If you export a text or numeric field as a Boolean value, the Boolean value will be set to true if:
Otherwise, the Boolean will be set to false. |
||||||||||||||
|
Length |
Applicable to fields of Data Type Text only. This column is hidden for comma and tab separated variable files. The default length for text fields is the maximum length of the field in InfoWorks ICM. If you are exporting something using SQL or Ruby Script into a text field, InfoWorks ICM scans the exported text, and sets the length of the longest string as the default. If you choose a length for a text field and try to export strings that are longer than this maximum, the exported text will be truncated and you will receive a warning for each occurrence. |
||||||||||||||
|
Precision |
Applicable to fields of Data Type Text only. There are two reasons for changing the default precision:
|
||||||||||||||
|
Internal Field (or other data) |
The entry in the Internal Field column will vary depending on the value selected in the Field Type column.
|