Trails are the visible representation of tweak paths and values, whether distance or angular. You can control aspects of trails.
Trails are generated at the time the tweak action is recorded and can be visible immediately or selectively displayed later. Because Trails represent Tweaks, during the edit process you can use trails to edit tweak values.
Generating Trails during Tweak Definition
- In the Presentation tab, Component panel, click
 Tweak Components.
- Select components to tweak.
- To define the tweak, do the following:
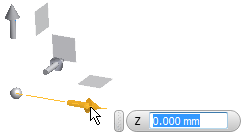
- Select the tweak method, either
 Move or
 Rotate.
- To redefine the triad orientation, click
 Locate and select a face or edge orientation reference.
- In the Trail method list, select your trail preference. You can choose from:
- No Trails
- All Components includes all subassemblies and parts
- All Parts for parts only
- Single to have one trail for all parts participating in the tweak.
Note: By default the first component selected gets the single trail. To display a trail for a different component, click
 Add Trails and select the trail origin position. Use
 Delete Trails to remove the default trail.
- Set the
 Duration to specify the tweak timing.
- Select the tweak method, either
- On the tweak triad, click-drag the manipulator to define direction and distance for a translational tweak or angle for a rotational tweak. You can also enter explicit values in the mini toolbar.
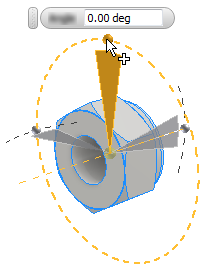 Note: When dragging the rotational tweak handle past 180 deg, the trail reverses directions. Use explicit values, either positive or negative, to control trail directionality.
 - Click OK.
Edit Trails
You can modify the tweak distance or angle by editing the visible tweak trail in the graphics area.
- In the model browser, right-click a tweak node and select Show Trails or Hide Trails. You can also use Edit Tweak to add or delete trails.
- In the graphics display, right-click a trail and select Hide Trail Segment. You can hide the current trail or the whole group.
- In the timeline, right-click a tweak instance and click Edit Tweak. In the Tweak mini toolbar, change the trail setting.
To modify trail visibility
- In the graphics display, select the trail and click-drag the trail end manipulator. All components participating in the tweak are adjusted.
To modify the tweak distance using the trail