After a Model State is created and saved, it can be activated in any consuming assembly.
- The Primary model state in a migrated Level of Detail.
- The Primary or a user-defined model state that is not a substitute.
- A migrated Level of Detail that is not the Primary.
- A migrated or new Substitute model state.
Edit Model States
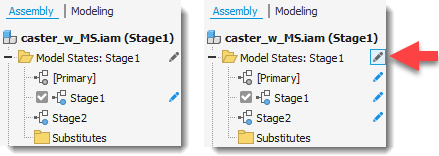
You can edit any Model State including Primary. The Primary model state cannot be renamed or deleted.
Before you begin, set Toggle Edit Scope to apply edits to the active member or to all members.
The following conditions determine if a part is considered open in memory:
- The part is edited and closed without saving.
- The part is already open in a separate window.
- The part is opened in the background using the API.
- Open the part or assembly that contains the Model State you want to edit.
- In the browser, expand the Model States folder.
- If desired, activate a Positional representation or Design View representation.
- Right-click the Model State to edit and select Activate.
- Suppress or unsuppress components and features to exclude or include.
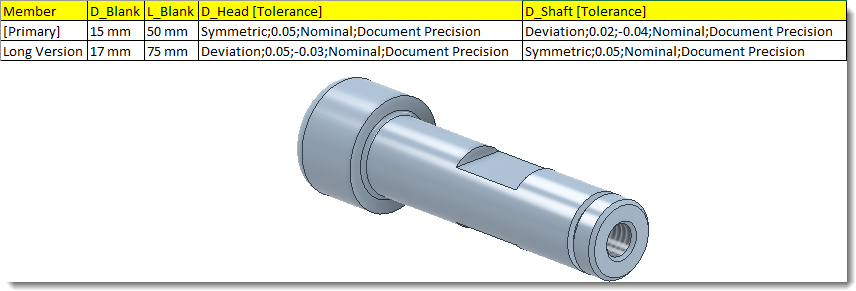
For each Model State you can:
- Add or remove features and components
- Change parameter values
- Change tolerance values
- Change iProperty values
- Optionally, right-click a model state in the browser and select Edit via Spreadsheet to edit the table in Excel.
- When finished, save the file.
Copy Model States
You can copy any Model State, including Primary.
- Open the part or assembly that contains the Model State you want to copy.
- In the browser, expand the Model States folder.
- Right-click the appropriate Model State and select Copy. A copy with the name of the copied Model State is added, incremented by 1.
- Click the copy and rename, if needed.
- Edit the features and components as desired and save the file.
Delete Model States
You can delete any Model State that is not active except Primary.
- Open the part or assembly that contains the Model State to delete.
- In the browser, expand the Model States folder.
- Right-click the Model State to remove and select Delete.
Rename Model States
You can rename any Model State except Primary.
- Open the part or assembly that contains the Model State to rename.
- In the browser, expand the Model States folder.
- Click the Model State to rename and enter a descriptive name.
Create and activate a Model State in a nested assembly
An assembly can associatively call upon a Model State in a nested assembly at any depth in the assembly hierarchy. The designated member drives all Model State settings below the nested assembly occurrence.
Create a Model State in a part or assembly:
- Click File
 Open, and browse to the part or assembly file to open.
- Double-click to open the file.
- Expand the Model States folder.
- Create a new Model State using one of these methods:
- Right-click the Model State folder in the browser and select New.
- Right-click an existing Model State in the browser and select Copy.
If needed, click the Model State in the browser and give it a descriptive name.
- Edit the Model State as needed, and then save the file.
Activate a Model State in a nested subassembly:
- Open the assembly file that contains the nested subassembly.
- Expand the browser and scroll down to the subassembly whose Model State you want to activate and do one of the following:
- Expand the Model States folder and then right-click the appropriate Model State and select Activate.
- Right-click the Representations folder and select Representation in the context menu. Select the desired Model State.