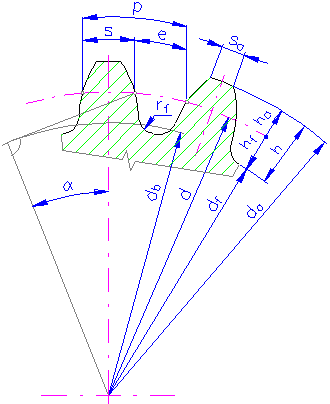
Input Parameters
Gear type - internal or external gear
Gear ratio and tooth numbers
![]()
Pressure angle (the angle of tool profile) α
Helix angle β
Module m (for metric calculation)
Diametral Pitch P (for English units)
Unit addendum a *
Unit clearance c *
Unit dedendum fillet r f *
Gear widths b 1 , b 2
Unit corrections x 1 , x 2
Summary of unit correction Σ x = x 1 + x 2
|
Auxiliary Geometric Calculations |
|
Design According to the Strength Calculation |
|
Design of Gearing Width |
Calculated parameters

Gearing number
|
for i > 1 |
||
|
u = i |
||
|
for i < 1 |
||
|
u = 1 / i |
||
Tangential module
|
|
Normal pitch
|
p = π m |
Axial pitch
|
p t = π m t |
Base pitch
|
p tB = p t cos α t |
Helix angle on the basic cylinder
|
sin β b = sin β cos α |
Axial pressure angle
|
|
Rolling/working pressure angle
|
|
Axial rolling/working pressure angle
|
|
Pitch diameter
|
d 1,2 = z 1,2 m t |
Base circle diameter
|
d b1,2 = d 1,2 cos α t |
Theoretical center distance
|
|
Real center distance
|
|
Feed factor/addendum lowering
|
|
Outside diameter
|
d a1,2 = d 1,2 + 2m (a * + x 1,2 - Δ y ) |
||
|
- for internal gearing the interference check is done as well |
|
|
|
for km > 0 is accomplished by addendum lowering d a2 = d a2 - 2km |
Root diameter
|
d f1,2 = d 1,2 - 2m (a * + c * - x 1,2 ) |
Work pitch diameter
|
|
Virtual Number of Teeth
|
|
Virtual Pitch Diameter
|
d n1,2 = z v1,2 m |
Virtual Base Circle Diameter
|
d bn1,2 = d n1,2 cos(α) |
Virtual Outside Diameter
|
d an1,2 = d n1,2 + d a1,2 – d1,2 |
Tooth thickness (measured normally on the pitch diameter)
|
s 1,2 = p/2 + 2m x1,2 tg α |
Tooth width on the chord (measured normally)
|
s c1,2 = s 1,2 cos 2 α |
Addendum height above the chord
|
|
Unit addendum width (measured normally)
|
where:
|
Operating width of gearings
|
b w = min( b 1 , b 2 ) |
Relative width
|
|
Factor of mesh duration
|
ε = ε + ε |
||
|
Factor of profile mesh duration |
||
|
|
||
|
(the minus sign applies to internal gearing) |
||
|
Factor of step mesh duration |
||
|
|
||
Minimum correction without tapering
|
where: a 0 * = a * + c * - r f * (1 - sin α) |
Minimum correction without undercut
|
|
Minimum correction with the allowable undercut
|
|
Checking chordal dimension
|
W 1,2 = ((z w - 0.5) π + z 1,2 inv α t ) m cos α) + 2 x 1,2 m sin α where: |
|||
|
z w |
is the tooth number across which the measure is performed |
||
Checking size across rollers/balls
|
- for even tooth number |
|||
|
M 1,2 = D s1,2 + d M |
|||
|
- for odd tooth number |
|||
|
M 1,2 = D s1,2 cos(90 / z 1,2 ) + d M where: |
|||
|
d M |
wire (ball) diameter |
||
|
|
diameter of the wire center circle |
||
|
|
wire (ball) contact angle |
||

