Modify text descriptions, precision and tolerance values, leader format, and other details.
|
|
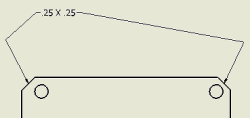
Use the Chamfer command to add a chamfer note to a drawing view. |
|
You can place a chamfer note on a linear model edge or sketch line. A reference line, required for chamfer calculation, must be a linear model edge or sketch line that shares endpoints or intersects with the chamfer. Chamfer notes can be attached to view and sketch chamfers. A chamfer edge and reference edge can be from different bodies, models, or sketches, but must be part of the same view. In the example:
|
 |
 |
If a chamfer edge is cut by a view boundary (broken, break-out, section, or detail view), the chamfer note is based on the full edge. By default, the leader attaches to the midpoint of the visible edge. |
Chamfer note formatting is associated with a dimension style (as well as settings from the text and leader substyles referenced by the dimension style).
Add a chamfer note
- On the ribbon, click
Annotate tab
 Feature Notes panel
Chamfer .
Feature Notes panel
Chamfer .
- On the drawing, select the chamfered model or sketch edge.
- Select a reference line or edge from the model or sketch that shares endpoints or intersects with the chamfer. You cannot select parallel or perpendicular lines.
- Click to place the chamfer note. The default attachment point is the midpoint of the chamfer, but after the chamfer note is created, you can click the attachment point and drag the point to a new location on the same view.
- Continue to create and place chamfer notes, right-click, and then select Done to quit.
 |
Note: For chamfers using model edges, if geometry partially obscures the selected chamfer and reference edge, or the edge is broken, the calculated chamfer distances and edges derive from the model edges, not just the visible portions. The chamfer note is constrained to the visible portion of the selected edge, but can be dragged to a different position.
|
|
|
In this example: |
||
|
A |
Chamfer edge (hidden portion) |
|
|
B |
Reference edge (hidden portion) |
|
|
C |
Reference edge (visible portion) |
|
|
D |
Obscuring body |
|
Edit a chamfer note
Chamfer note formatting uses settings from the Dimension style, Text, and Leader substyles. You can edit a chamfer note to change its content or format.
- Right-click a chamfer note and select Edit Chamfer Note.
- In the Edit Chamfer Note dialog box, click in the edit box to add, delete, or edit text. If appropriate, add stacked text in the note. For more information, see To Stack Text in a Drawing. Type a correct stacking sequence, select it, right-click and choose Stack. If AutoStacking is enabled, fractional numbers with a valid stacking trigger followed by a neutral character are stacked automatically as you type.
- In the Values and Symbols box:
- Click a chamfer type to add the parameters in the edit box. For example, the Distance/Angle chamfer adds <DIST1> X <ANGL> in the edit box.
- Click the arrow to add a symbol from the list.
- Click Precision and Tolerance to change settings. In the Precision and Tolerance dialog box, modify settings as needed, and then click OK to close the dialog box.
- Click OK to close the Edit Chamfer Note dialog box.
 |
Note: You can click the chamfer text and drag to a new location, but you cannot detach the chamfer note from its edge. The extension line offset and overshoot format is specified by the leader style associated with the active dimension style.
|
Add a vertex or leader to a chamfer note
|
 |
Edit chamfer note text
The Format Text dialog box provides more text editing capability than the Edit Chamfer Note dialog box.
- Right-click a chamfer note and select Text.
- In the Format Text dialog box, use text commands to modify the note, such as:
- Change font, size, bold, italic, and underline attributes.
- Change line spacing, justification, or stretch.
- Change note content.
- If appropriate, add stacked text in the note. For more information, see To Stack Text in a Drawing. Type a correct stacking sequence, select it, right-click and choose Stack. If AutoStacking is enabled, fractional numbers with a valid stacking trigger followed by a neutral character are stacked automatically as you type.
- Click OK to close the dialog box.
Display or hide alternate unit dimensions
Chamfer notes can display dimension values both in primary and in alternate measurement units. Edit the Dimension Style to change the settings.
How does a dimension style affect chamfer note formatting?
|
The default format of the note is determined by settings on the Notes and Leaders tab of the associated dimension style. As described in Style and Standard Editor - Dimension Style, some settings on the Notes and Leaders tab are specific to chamfer notes. In addition, the following settings on dimension style tabs also specify chamfer note formatting: |
||||
|
Units tab |
Display tab |
Text tab |
Tolerance tab |
Notes and Leaders tab |
|
Units Linear |
Gap (C) |
Primary Tolerance Style |
Display options - Zero tolerance display |
Leader style |
|
Units Decimal Marker |
Tolerance Text Style |
Display options - Zero Arc/Min/Sec display |
Leader text justification |
|
|
Linear Format |
Tolerance Justification |
Leading zero |
Leader text orientation |
|
|
Linear Precision |
Tolerance Text Size |
Trailing zero |
Leader text alignment |
|
|
Angular Format |
Prefix |
|||
|
Angular Precision |
Suffix |
|||