What's New: 2024
Recommended prerequisites, these help with the authoring and continuity of the tutorial:
- Have in mind the tutorial Type. Will it be a Quick Start (onboarding tutorial), Basic, or Intermediate tutorial.
- Create a script that reflects the tutorial Type. Outline each task and its steps. For example, if the tutorial is about assemblies, it might include tasks for adding and then constraining components, and so on. Each task can include multiple steps.
- Prepare a thumbnail image of the model showing what the tutorial is about. You add the image on the About tab.
- Optionally, include video of each task. More about videos below.
Guided Tutorial Interface
The tutorial interface has two main sections separated by tabs, Tasks and About.

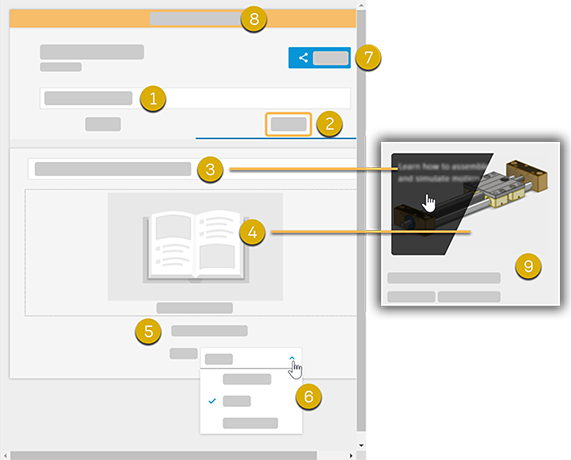
- Tutorial Title - can be entered on either tab.
- About tab
- Tutorial description - enter a description that helps the audience know what they will learn from the tutorial. The description displays when the cursor is over the tutorial in the gallery.
- Thumbnail image - click to add the image to the tutorial.
- Author - the active user name. Not editable.
- Tutorial Type - choose from Quick Start, Basic, and Intermediate.
- Share - click to share the tutorial.
- Share status - status is both textual and color coded to make it easy to know whether or not the tutorial is shared.
- Tutorial gallery - the tutorial thumbnail, title, description, release and download count display in the gallery.
- Same as item 1.
- Task description
- Browse to add an overview video.
- Add a step to the task.
- Add the starting file or add the current model if one is open.
- Add a task.
To Create a Guided Tutorial
- Click the Home tab and at the lower left, click Tutorials.
- Click Create in the gallery pane, upper right.
- Click the About tab and enter the following information:
- Tutorial title, if not already entered
- A tutorial description providing a brief, but clear idea for what will be learned
- Thumbnail image to identify the tutorial
- Specify the tutorial Type.
- Click the Tasks tab.
- Enter the task and its steps. See the Tips below for how the tutorial editor works
- When you finish you can share the tutorial publicly or privately.
Tips
- Plan your tutorial so it has up to 10 tasks and each task with no more than 10 steps. Why? Tutorials should be simple and easy to learn, too many tasks or steps complicates the tutorial. Ask yourself if the tutorial is complicated. If the answer is yes, then try to break it into multiple tutorials.
- To reorder a task: Press the bar
 to the right of the task title and drag the task to a new location.
- To delete a task: Select the task and click the trash can
 on the right.
- To delete a step: Clicking the step selects all the text. Use Ctrl+X or press backspace. Because the first click in the text box selects all the text you should take care in editing the text. If you press enter you will delete the highlighted text.
- To increase visibility of the text while editing: Increase the panel width.
- Click a task title to expand or collapse a task.
- To include video with the tutorial, record the video using a screen capture software and save, or convert, the video to .webm format. Then, use the authoring tool to import the video into the tutorial.
- Because you cannot undo an action, it is best to use discretion when you edit. For example, if you remove text, a starting file, or a video, there is no undo option.
- Use cut, copy, or paste in the task or step context menu, or use Ctrl + X, Ctrl + C, or Ctrl + V.
- There is no option to reorder steps or insert a new step between existing steps. We suggest that you insert a new step and then use cut, copy, paste to rearrange the text as needed.
Important:
Video Process
For each task in the tutorial, do the following:
- Using the video capture software of your choice, capture a video of all steps defined for the task.
- Output the video to .webm format. If the video capture software doesn't output to .webm, save it as mp4 and then use an online converter. They are readily available.
- When authoring, browse to and add the video for the specific task.
Important: Your tutorial in the gallery is visible to everyone when you choose
Share in public gallery
, so be sure to share Test tutorials privately first. To remove a shared tutorial, choose Share and then
Remove Share
. This action removes a tutorial from the gallery.
We'd like to hear what you think. Use this email address if you want to provide feedback to the team: Guided.Tutorials.Feedback@autodesk.com