Display & Interface Settings
This page configures display and interface settings for the current user.

User Name
Enter your user name in this field. This name appears in the list of users after the user profile is saved.
Grade List Sort Order
Sets the sort order of the Grade List:
- Ascending: From grade 001 and up (this is the default option).
- Descending: From the last grade to grade 001.
Collapsed Frame Count
Sets the numbering of the counter used when working in Collapse mode:
- Timeline: Displays the counter numbering (record timecode / frame count / feet+frame) relative to the current uncollapsed timeline. This is the default option when creating a new user.
- Collapsed: Displays the continuous counter numbering (record timecode / frame count / feet+frame), based on the record timecode of the first selected shot. Frame counters start at frame 1. This is the default option used in previous versions.
Cursor Type
Use to select cursor type. You can also toggle the cursor type with the Ctrl+Enter keyboard shortcut.
| Select: | Cursor: |
|---|---|
| Normal | Displays the default yellow crosshair cursor. |
| Micro | Displays a yellow dot as cursor. |
| Transparent | Displays a transparent cursor. |
Gain
Sets the white point value in the user interface.
Gamma
Sets the gamma in the user interface.
Background
Sets the background grey in the user interface.
Colour Circle Angle
Sets the colour circle angle of the grading colour wheels.
Reset button (Interface group)
Reverts to default the gain, gamma, background, and colour circle angle.
GPU Auto Switch
Disables the GPU processing when using features not supported by the GPU.
Default Group Mode
Sets the default state of the Solo / Gang Group mode.
Keep Image Position
Maintains the image position in the display when you access the Player. When disabled, the image centres itself in the Player when you hide the user interface.
Centre Storyboard View
Enables centering the selected shot in the Storyboard.
Centre Big Storyboard
Enables centering the selected shot when you are viewing the Storyboard in the large Storyboard view.
Update Storyboard
Enables the automatic update the Storyboard thumbnails whenever you make changes to your shot.
Grade Bin Magnifier
Enable to magnify the thumbnail in the Grade bin when the mouse cursor is over a storage container.
Show Render Flag
Enable to display the render flag in the upper-left corner of the screen. You can use the Render Flag hotkeys ( [ & ] )to enable or disable, respectively, any selected flag. In the Flag List, a [ ] icon is located next to the Flag Visibility. By default, this icon is set on the Render Flag but clicking on the left of any Flag Visibility will set the Flag on/off keys to the Select Flag.
Grade-Based Flags / System-Based Flags
Use to define if the flags of a grade are propagated to the system-level flags system.
The two choices are:
- System-Based Flags: When loading a grade that contains flags, these flags are automatically added to the system-level flag file (located in the home of the application). This means that all projects have access to the flags. This is the default state when creating new user settings.
- Grade-based Flags: When loading a grade that contains flags, these flags are only available when using this grade or when creating a new version of this grade.
Second Screen / Second Screen Proxies
Lustre Second Screen enables the broadcast to a web browser on another device so that clients attending a grading session can follow what the colorist is doing. It displays currently-loaded grade and cut metadata (text only), updated storyboard thumbnails (when Second Screen Proxies are enabled) and view shot metadata. Lustre Second Screen can also display the metadata of a single shot, regardless of whether it is the current shot or not. It is also possible to display the current shot in Shot View by clicking the Follow Current Shot link. This displays the current shot in Shot View. Notes information can also be viewed. Clicking a thumbnail displays shot information, including notes. Clicking Back To Storyboard, brings you back to the main page.
To use Lustre Second Screen:
- Point a browser to http://
:8888. - When prompted, enter the username and password ("lustre" without quotes, in both cases).
- The client must be on the same network as the Lustre web server.
- On iOS devices, to make sure the web page is properly refreshed.
- The web server is managed by Lustre, so when you start or exit Lustre, the web server starts / stops.
Second Screen Proxies enables the display of storyboard thumbnail, alongside the text metadata. It is disabled by default. When enabled, the frame used in the Lustre Storyboard is shown and any modifications are automatically reflected in the storyboard.
Notes
Enable the display of Notes for On-Screen Display.
Flags
Enable the display of Flags for On-Screen Display.
Size menu
Select the size of displayed elements for On-Screen Display.
Location menu
Select the location of displayed elements for On-Screen Display.
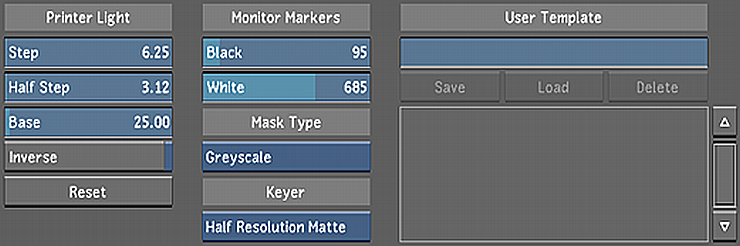
Step
Use to set the value for one lab light.
Half Step
Use to change the value for half a lab light.
Base
Sets the default value for your printer light settings (i.e. red, green, blue (RGB) values).
Inverse
Enable this button in the Printer Light group to invert the printer light density mode.
Reset button (Printer Light group)
Click to revert the step, half step, base, and inverse settings to their default value.
Black
Defines the values of the lines set in the histogram and waveform monitor for black.
White
Defines the values of the lines set in the histrogram and waveform monitor for white.
Mask Type option box
Defines the default display mode for the F11 hotkey and the Matte (M) button in the View mode panel.
| Select: | To display mattes: |
|---|---|
| Greyscale | In Greyscale mode. This Mask Type is referred to as Matte view. |
| Overlay | In Overlay mode. The matte is displayed in its original colour and the unselected region of the matte is overlayed with a uniform colour. This Mask Type is referred to as Secondary view. |
Keyer Matte Resolution option box
Select the default Keyer matte resolution. Your options are:
- Full Resolution Matte
- Half Resolution Matte
User Template
Enter the name for the template you are creating. See Working with Templates.
Save
Click this button to save the user settings to the template named in the User Template field.
Load
Loads the user template selected in the User Template list.
Delete
Deletes the user template you have selected in the User Template list.
User Template list
Displays a list of all the user templates which have been created for Lustre.