Display the Data Table for any layer. Filter the Data Table to show a subset of parcels—in this case, only parcels on Villa Drive.
Note: This exercise uses the
build_map1.dwg map you created and modified in the previous exercises.
To use the Data Table to filter features
- If it is not still open, open your finished map from
Lesson 4 Create Map Features.
- Click

 OpenDrawing.
- Locate the build_map1.dwg file.
- Select it and click Open.
- Click
- In the Task Pane, switch to Display Manager.
- In Display Manager, select the Parcels layer and click Table.
- In the Data Table, in the Filter By list, select the STNAME field and enter
VILLA DR into the field.
Do not spell out the word “Drive.”
- Click Apply Filter to show only parcels on Villa Drive.
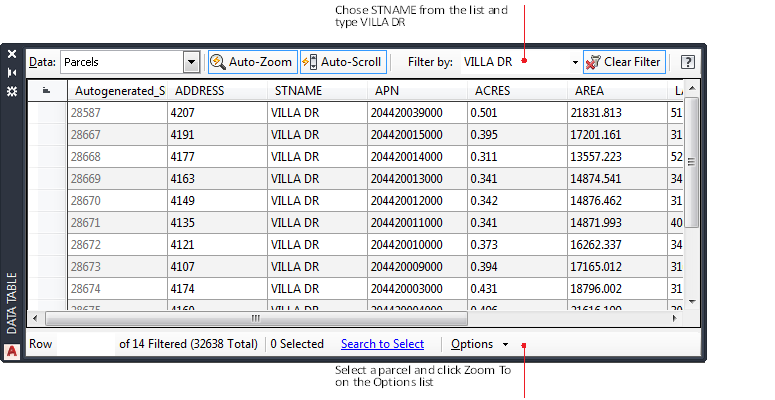
Use the Data Table to filter the parcels you see.
- Make sure Auto-Zoom is on.
This button is outlined when it is on.
- Click in the dark-gray, left-most field for a parcel to select that parcel.
Note: Scroll the Data Table to the left to see the left-most fields.
AutoCAD Map 3D toolset zooms to the selected parcel.
- Make a note of the number in the Autogenerated_SDF_ID field, because you will need it again later.
Note: You can do a more sophisticated search. Click. Find That option lets you query a layer with a Boolean condition—for example, ACRES > 1 to find parcels that are larger than an acre. The map then shows only the objects that match your query.
- Save your map, but leave it open for the next exercise.
To continue this tutorial, go to Exercise 2: Check out and edit a feature.