Scripting Editor Overview
The following topic describes the highlights of the Scintilla-based Scripting Editor.
The Scripting Editor provides the following main features:

Tabbed Display - multiple Editor Windows can be opened in the same time within the same user interface.
By default, up to 10 files can be opened either one by one or by selecting multiple files in the Open File dialog. The Editor supports up to 100 files opened at once - it can be customized to do so, but only the first 10 tabs will be directly accessible via the Alt+number key described below.
The first 10 tabs are numbered as 1,2,3,4,5,6,7,8,9 and 0 - you can switch to a tab directly by holding down the Alt key and pressing the number of the tab from 1 to 0.
If there are more opened tabs than possible to fit in the tab bar at the same time, two scroll arrows will appear at the right side of the tab strip allowing you to scroll the tabs. Also, clicking on the left-most or right-most tab will attempt to center it and thus shift the tabs to reveal more tabs that might be eventually outside the view.
You can cycle the tabs using the CTRL+Tab keys or CTRL+SHIFT+Tab for cycling backwards.
Scripts that require saving because of editing changes will be marked with a * star in both the tab and in the title bar.
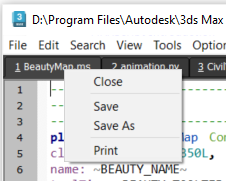
Right-clicking a tab displays a context menu with the options to Close, Save, Save As and Print the document represented by the tab.

Middle-clicking a tab closes it immediately if the file does not require saving or prompts for saving if it has been modified.
Full file name display - by default, the full path of the currently edited script will be displayed in the title bar of the window. This feature can be disabled and enabled by setting the system global variable
editorShowPathintroduced in 3ds Max 9 tofalseortrue.Line Numbering - all code lines will be numbered, making it easier to debug errors which are reported with a line number in the Scripting Listener and MAXScript Debugger. Pressing CTRL+G opens the Go To dialog (the keyboard shortcut for this feature in the legacy Editor in 3ds Max 8 and 9 was Ctrl+J) which allows a jump to a line or character offset.

Automatic Dynamic Syntax Coloring - the full list of reserved keywords, built-in methods, global variables, special values and many more are passed directly from MAXScript to the Editor, enabling it to correctly highlight almost every word understood by MAXScript. In addition, all colors can be customized to match the user preferences and support local directory overrides, so different MAXScripting projects can use different color schemes.The color coding is extremely fast compared to the legacy editor and is performed over the whole document over the fly. Thus, if an opening quotation mark does not have a closing one, the complete file after the opening quote will be dynamically painted in the current string color and signal that a closing quote is missing.
Automatic Indentation - new lines will be automatically indented based on the context. For example, typing the code
for i = 1 to 10 doand pressing Enter will indent the following line automatically, expecting a single line of body code. But if you type in an opening parenthesis to start a multi-line body, the indentation is automatically removed to align to the for loop's head.Automatic Bracket Balancing - the opening and closing parentheses, brackets and braces will be automatically highlighted by simply clicking near either the opening or the closing one.
Visual guides (dotted lines) also help with balancing parentheses.
If a closing or opening parenthesis, bracket or brace is missing, the existing one will turn red as a warning.
Pressing CTRL+B near a bracket, brace or parenthesis will jump the cursor to the other one in the pair if existing.
Pressing CTRL+SHIFT+B while near a bracket, brace or parenthesis will select the code block enclosed by it and its counterpart.

Folding Code Blocks - portions of the code between parentheses can be collapsed by clicking on the minus sign to the left of the opening parenthesis. Alternatively, press Ctrl+SHIFT+Plus on the top numeric row (next to the Backspace key) to toggle the folding of the code block the cursor is currently in.

Bookmarks - an arbitrary number of bookmarks can be placed at any number of lines using CTRL+F2. To jump to the next bookmark, press F2 , for the previous bookmark, press SHIFT+F2.

Multiple Status Bars - multiple status bars can be customized to display various aspects of the loaded code like word and character count, file modification time, current time and more. To switch between the multiple status bars, simply click the status bar at the bottom of the Editor.See Scripting Editor - Defining Custom Status Barsfor details.


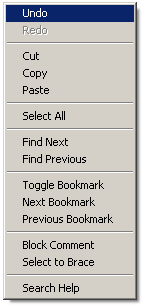
Right-click context menu - some often used commands are hard-coded in the context menu which appears when right-clicking in the Editor window. This menu is customizable and can be extended by the user - See Scripting Editor - Defining Custom Context Menu Items for details.

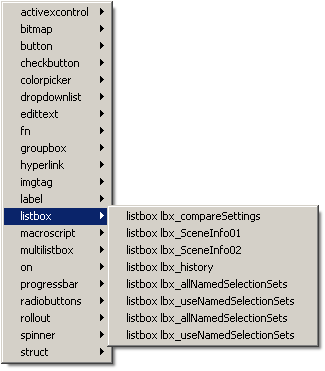
Jump to code blocks - like in the legacy Editor, holding down the CTRL key and right-clicking in the Editor opens a context dialog listing various code blocks like function definitions, rollout definitions, event handlers, UI controls and so on. Selecting any of them repositions the cursor to that definition:

Freely Resizable Fonts - like in the legacy Editor, holding down the CTRL key, pressing the mouse wheel and turning the wheel will change the font size. Alternatively, use the CTRL++ key and CTRL+ - key on the Numpad to increase and decrease the font size.
Auto-Complete and Abbreviation Support - already used words from the same document can be expanded manually or automatically thanks to the Auto-Complete feature. Abbreviations can be defined by the user and expanded into full words or even whole pieces of prototype code.
Powerful Search including Regular Expressions support - the Find and the Replace features support Regular Expressions for ultimate flexibility.
Extremely Customizable - the Editor can be extensively customized by the user to fit a specific workstyle or visual appearance.
Side-by-Side Views - you can open a second view of the current script (a "cloned view") to edit different areas concurrently, which can be useful when working on longer scripts. You can also have two tabs side-by-side, for example to compare two similar scripts. To do so, drag the tab to an empty spot in the editor, and pick either Move to another view or Clone to another view.
For Details on Usage, Commands, Customization etc. see: