Mirror Across
Select one of the following options.
- XY
- Specifies mirroring weights about the global XY plane (the default).
- YZ
- Specifies mirroring weights about the global YZ plane.
- XZ
- Specifies mirroring weights about the global XZ plane.
- Direction
- Positive to Negative (+Z to -Z) specifies direction of the mirroring along the specified Mirror Across plane.
Surface Association
Determines hClosest point on surfaceow the surface components on opposite halves of the skinned object correlate to each other.
- Closest point on surface
- Finds the closest points between the source and target surfaces and smoothly interpolates the skin weights at those points. This is the default setting.
- Raycast
- Uses a raycasting algorithm to determine sample points between the two surface meshes. This was the default smooth association in pre-8.5 versions of Maya.
- Closest component
- Finds the closest vertex component (polygons) or control vertex (NURBS) at each sampling point and uses its skin weight value without interpolation. This was the default non-smooth association in pre-8.5 versions of Maya.
Influence Association
Determines how the components that influence the skinned objects (that is, skeleton joints, influence objects, and so on) correlate between the source and destination objects.
The Influence Association occurs in a maximum of two iterations in order to determine the best correlation. You set the Influence Association type for each iteration from a drop-down list beside each level. Set the Influence Association type based on your knowledge of the two skinned objects being compared. As each iteration is completed, the next iteration continues using its specified Influence Association type on any remaining joints. If you are confident that only one iteration is required, you can set the other Influence Association level to None and it will not be occur.
- Closest joint
- Associates the joints that are in closest proximity to one another. This is the default setting for the first Influence Association.
- One to one
- Associates the joints in situations when the skinned objects have identical skeleton hierarchies.
- Label
- Associates the joints based on their pre-defined joint label. Joint label attributes can be set and edited in the Attribute Editor.
- None
- Specifies that no comparison will occur for that level of
Influence Association.
Note: Reflection is disabled for the Paint Skin Weights Tool. You can use Skin > Mirror Skin Weights as an alternative method to do reflection of the skin weights.
- Normalize
- Normalizes skin weights proportionally so that the weight values of all influences added together total 1.0 for each vertex. For example, if a vertex has influence weights of 1.2 and 0.8, the values are modified to 0.6 and 0.4, respectively.
- Skin Cluster list
-

-
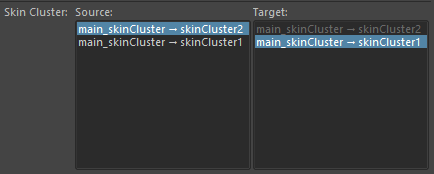
The Skin Cluster area lets you control individual skin clusters on geometry that has more than one skin cluster applied.

The Skin Cluster list contains a Source and Target column.
- Click geometry to update the list of skin clusters for the selected geometry, below.
- Skin Cluster list
- Skin clusters on the selected geometry appear here.
Note: If no skin cluster is selected this list remains empty. Select the geometry to update the list.
- The most recently added skin cluster appears at the top of the list.
-
- Source
- Select the skin cluster to be copied/mirrored.
- Target
- The skin cluster to which the copied/mirrored attributes apply.