The lookdevKit plug-in provides a Simplex Noise node, as well as a set of math and utility nodes most useful for creating procedural networks in the Hypershade.
To create the Simplex Noise node, ensure that the lookdevKit.mll plug-in is enabled in the Plug-in Manager ().
See LookdevKit shading nodes for information on other nodes you can create with the plug-in.
This node creates a procedural noise. Select from among three noise patterns:
- Fractal: similar to the Fractal 2D texture, but never has tiling artifacts, and is fast to evaluate. Useful for natural variation of textures, dirt, and landscape effects.
- Cellular: can be used to create dotted patterns, for example, honeycombs, pores, lizard skin, and so forth.
- Ridged: can be used to create electric or lightning effects that glow, vein patterns, or landscape erosion effects.
The noise pattern can be repeated by adjusting the Repeat UV attribute on the place2dTexture node, or by adjusting the Scale attribute on the noise node. This node can be repeated without any tiling artifacts.
The noise can be distorted by connecting a single color channel to the Distortion U and Distortion V inputs. You can also distort a noise with another noise. See additional examples below.
This node can be connected to the Uv Coord input of a Ramp texture node to drive the selection of the colors along the ramp using the noise values.
Sample applications
You can combine and layer noise nodes. For example, you can do as follows:
- Create a Color Composite node to combine two Simplex Noise nodes using the Mix Operation mode, and adjust the intensity of the effect using the Factor attribute.
-
Use one noise to distort a second noise. Create two Simplex Noise nodes, then connect the Out Color R output of simplexNoise1 to both the Distortion U and Distortion V inputs of simplexNoise2.
Create a third Simplex Noise and connect its Out Color R output to the Distortion Ratio input of simplexNoise2.
By combining various noise nodes, you create an irregularity that produces a more natural pattern.
Note: You must connect Out Color R or Out Alpha to Distortion U and Distortion V in order to distort one noise with another.
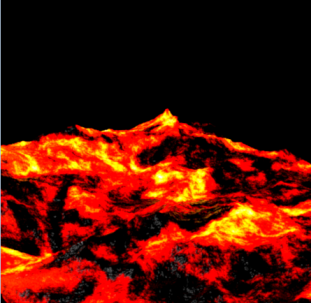
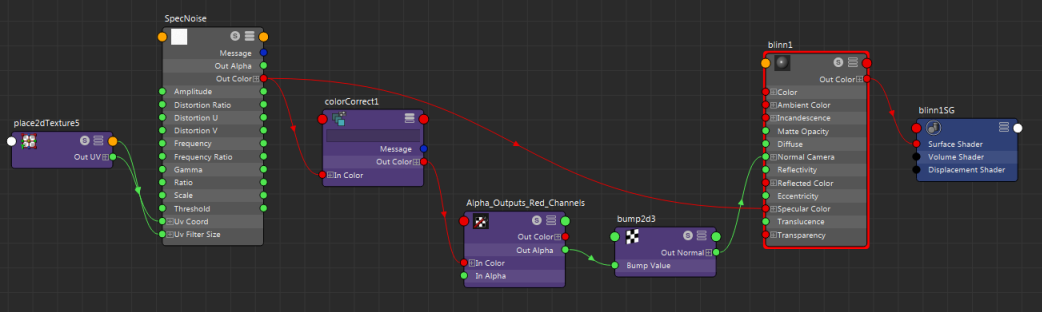
Example shader network: lava
The following shader network creates a lava material and uses the following Lookdevkit nodes:
- Simplex Noise
- Color Constant
- Color Composite
- Color Correct

Diffuse
To create the diffuse color, a Simplex Noise is created and its Out Color R channel used to drive the Distortion U and Distortion V of a second Simplex Noise, while the alpha channel of a Color Constant drives the Scale attribute of the two noises. Having one noise node distort another creates a more organic, realistic pattern, while having one Color Constant drive two Scale attributes means you have one less control to be concerned with. The Scale attribute determines the frequency at which the noise pattern is repeated.
The result of the second noise is then connected to the Uv Coord input of a Ramp to drive the selection of the colors along the ramp using the values of the noise. The Ramp color values are all set to greater than 1 to give illumination, which simulates lava in real life. This Ramp result is used as the diffuse color for the mia_material_x_passes shader.
Bump and displacement
The first and second noise nodes are added using a Color Composite node to create a more complex bump effect. The red channel is used to create the bump pattern. A Channels node is created, where its Alpha channel outputs the Red channel. This node is convenient as it allows you to use a color output instead of an alpha. This Alpha output is then used as the Overall Bump of the mia_material_x_passes shader via the bump2d node.
To create realistic displacement for a lava material, the black areas of the ramp, representing the cooled lava rock, should be the most elevated part of the surface. The Ramp output is therefore reversed using a Reverse node so that the black areas are the highest points of the surface, and connected as a displacement material to the mia_material_x_passes shader.
Reflectivity
To add realism to the lava, its black areas should be reflective, as it is cooled lava rock. Similar to creating displacement, the reversed output of the Ramp is used again in this case. To add additional interest to the specular, it is multiplied by another Simplex Noise using a Color Composite node. The specularity of shiny objects, for example metals, has a dense noise pattern, and the Simplex Noise allows you to create that pattern by adjusting the scale attribute without tiling artifacts. The alpha output of the Color Composite node is input to the Reflectivity attribute of the mia_material_x_passes shader.
Glow
To add an additional glow, the Ramp result is darkened with a Color Correct node and connected as an input to the Additional Color attribute of the mia_material_x_passes shader. The additional Color Correct node enables you to darken only the amount of glow of your output shader and nothing else. If you had instead changed the color of your ramp, all of your other attributes (Diffuse, Reflectivity, and so forth) would also have changed.
Transparency
Similarly, you can create a Color Correct node to adjust only the transparency attribute. Connect your Ramp output to the Color Correct node, then connect the Out Color R attribute of the Color Correct node to the Transparency input of the mia_material_x_passes shader.
Proceduralism
Your complete shader network is controlled by your noise node. To change the pattern of your lava, change the noise type of your Simplex Noise and all of your downstream nodes update as a result.
Change the density of your lava pattern by adjusting the Alpha value of your Color Constant, and all of your downstream results update automatically. You can now modify your lava pattern by changing one or two nodes, instead of your entire shader network.
Example shader network: plastic
In this example, a realistic looking plastic grey material is created by using the Simplex Noise node to create a bump pattern.
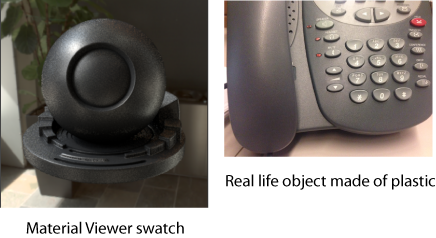
The Simplex Noise node is connected to a Color Correct node. The output of Color Correct is input to a Channels node, which outputs the red channel as alpha (Channel A is set to R). This alpha output value is used as the bump map for the Blinn shader.
To adjust the depth of your bump, adjust the Color Gain of your Color Correct. This network allows you to precisely control the amount of bump in your shader by inserting a Color Correct node in between the Out Color of Simplex Noise and the bump 2d node to keep the bump input separate from the specular input. Otherwise, any adjustments you make to the bump attribute also applies to the specular attribute.