Create a macro
In this task, you will use the Macro Recording menu features to perform a basic remodeling task.
You will then play the Macro and be introduced to the two types of folders used for storing Macro scripts.
 Download the files for this tutorial from Autodesk Knowledge Network - Automating this product - introduction folder.
Enter -5 -20 0 in the
 Rotation Angles box (View tab > Viewpoint panel > Rotation Angle).
Click
 (Tools tab > Automation panel > Record Macro).
Click
 (Geometry tab > Utilities panel > Move) and select
  Translate from the drop-down menu.
The Translate pane opens on the Tools tab.
From the Filter drop-down menu on the Translate pane, select Nearest Node.
Click in the Select text box on the Translate pane.
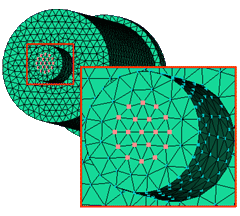
Hold down the Ctrl key and select the nodes shown in the following image:
Click in the Vector (x, y, z) box on the Translate pane. Ignore the Measurements dialog if it appears.
Type 0 0 0.5 (mm) in the Vector (x, y, z) box.
Click Apply, then click Close.
Click
 ( Tools tab > Automation panel > Stop Recording).
The Save Macro dialog appears.
Enter task_extend in the File name box and click Save.
You have just recorded this sequence of actions. You can now reproduce this sequence of actions any time you wish by running the macro that you saved. Reset the model to its original condition, and then run the macro.
Click
 (Undo) on the Quick Access toolbar.
Click
 Front View on the ViewCube.
You have returned the model to its original state.
Click
 ( Tools tab > Automation panel > Play Macro).
The Open Macro dialog appears. Move the dialog to the side so that you can see the model.
Select the macro file you just created and click Open.
The macro plays and extends the nodes. Rotate the model to observe the changes.
Click
(Undo) on the Quick Access toolbar to return the model to its original state.
When you stopped macro recording and saved the macro, you saved it to the scripts directory under your project home directory. This setting can be changed on the Directories tab of the Options dialog  > Options.
In the next task, you will run another type of script from the Command line and be introduced to the commands folder also located in the same directory as your script folder. This is where all the command line scripts are saved. Each script can be activated through the Command Line feature.