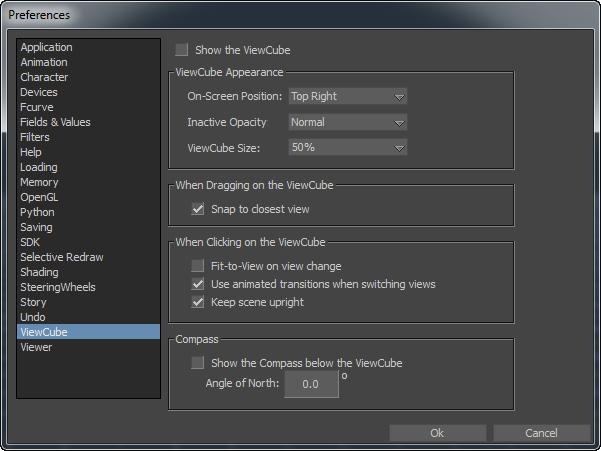
In the Preferences window, the ViewCube preference settings let you specify the default display of the ViewCube.
To access the ViewCube preferences, do either of the following:
- Right-click the ViewCube and choose Properties from the context menu.
- From the menu bar, select Settings > Preferences, and then click the ViewCube preference option. The ViewCube preference settings display.

The ViewCube preference settings enable you to either show or hide the ViewCube in the Viewer window. The ViewCube is displayed by default.
The ViewCube Appearance preference settings lets you set how the ViewCube displays in the Viewer window. The following table describes the ViewCube appearance preference settings.
| ViewCube Appearance settings | Function |
|---|---|
| On Screen Position | Use this menu to choose which corner you can display the ViewCube: Top Right, Bottom Right, Top Left, or Bottom Left. |
| Inactive Opacity | When the cursor is near the ViewCube, the cube is opaque. When the cursor is not near the ViewCube, additional controls (except the Home button) do not display. Use this menu to specify the opacity of the ViewCube when the ViewCube is not in use. There are four options you can choose from the drop-down list: 0%, 25%, 50%, 75%, or 100%. The default inactive opacity is set to 50%. |
| ViewCube Size | Use this menu to specify the size of the ViewCube. There are three options you can choose from the drop-down list: Small, Normal, Large. The default size is set to Normal. |
The ViewCube dragging and clicking preference settings let you set behaviors for how the scene displays when you use the ViewCube.
The following table describes the ViewCube dragging preference setting.
| When Dragging on the ViewCube setting | Function |
|---|---|
| Snap to closest view | When active, the Viewer window snaps to one of the fixed views when it is close to one of the fixed views. |
The following table describes the ViewCube clicking preference settings.
| When Clicking on the ViewCube setting | Function |
|---|---|
| Fit to view on view change | When active, clicking the ViewCube rotates around the center of the scene and zooms out to fit the scene into the Viewer window. When you drag the ViewCube, before the drag, the view changes to look at the scene center (but does not zoom) and continues to use that as the pivot point while dragging. When disabled, clicking or dragging the ViewCube rotates around the current pivot point and does not zoom in or out. |
| Use animated transitions when switching views | When active, an animated transition displays when you click on a section of the ViewCube so you can visualize the spatial relationship between the current view and the selected view. Note: When navigating scenes containing vast amounts of geometry, the application frame rate may drop significantly and make it difficult for the system to smoothly animate a viewpoint transition.
|
| Keep scene upright | When activated, avoids orienting the scene upside-down when you click edges, corners, or faces of the ViewCube. |
The Compass preference settings lets you indicate which direction is defined as North for the scene. The ViewCube compass North direction is based on the North and Up directions defined by the scene or set in the Angle of North field. The following table describes the Compass preference settings.
| Compass settings | Function |
|---|---|
| Show the compass below the ViewCube | Activate this option show or hide the compass. |
| Angle of North | Enter a value (in degrees) in the field to set the angle between the ViewCube FRONT face and the Compass directionNorth. |