You can rename prefixes in any hierarchy at any given time during your project creation. However, keep in mind that if you change an object’s or branch’s namespace, this may affect the merge-back of the animation as the process is based on the name of the objects.
To replace or rename an object’s namespace in a hierarchy:
- Select in the Scene browser or Viewer window the object(s) with prefixes you want to replace or rename. Tip: If you want to replace or rename namespaces at the top of an element’s branch to include all objects in the branch via the Viewer window, switch to the Schematic view by pressing Ctrl-W, or by selecting Schematic from the View menu. To switch back to the camera view, press Ctrl-W.
- From the MotionBuilder menu bar, select Edit > Add/Remove Namespace. Note: You can also right-click objects (or nodes) or a branch and choose Add/Remove Namespace from the context menu.
The Add/Remove Namespace dialog box appears, displaying in numeric alpha order the namespaces in the scene.
- Click the “Replace” tab.
The selected object’s or branch’s namespace is highlighted.
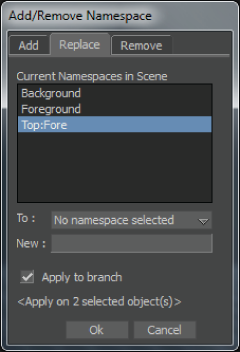
Selected object’s namespace highlighted in Add/Remove Namespace
- Click in the “New” field and enter a prefix. Note: You can enter multiple prefixes by separating them with a colon (:). For example, enter Leg:Arm to create a search for both Leg and Arm prefixes.Danger: Replacing namespaces for objects or branches may affect the merge-back of the animation as this process is based on the names of objects and branches.
- Click OK.
The namespace for the selected object is replaced with the name specified in the Add/Remove Namespace “New” field.
Note: If you selected a name that is identical to a name of object(s) in the current scene, a Name clash warning dialog appears, enabling you to proceed with the action or cancel the action. If you choose to proceed with the action, a prefix is prepended to the name to ensure the object carries a unique name.
To replace or rename a branch’s namespace in a hierarchy:
- Follow the preceding procedure (for replacing or renaming an object’s namespace in a hierarchy) up to step 5.
- Enable the “Apply to branch” option.
Applying a prefix to a branch enables you to search for every instance of the prefix(es) occurring on the selected object(s).
Danger: Replacing namespaces for objects or branches may affect the merge-back of the animation as this process is based on the names of objects and branches. - Click OK.
The namespace for the selected branch is replaced with the name specified in the Add/Remove Namespace “New” field.
Note: If the result of the change requested gives a name that is identical to a name of object(s) in the current scene, a Name clash warning dialog appears, enabling you to proceed with the action or cancel the action. If you choose to proceed with the action, a prefix is prepended to the name to ensure the objects carry unique names.