When a line group change is detected on a line segment, any connected OPCs are disconnected. Following are typical scenarios.
To reassign a connected line group to a new line group
- Click to select the line you want to reassign. For example, select this line:

- On the ribbon, click Home tab
 P&ID panel Assign Tag.
 - In the Assign Tag dialog box, enter the values of the new line group. For example, you might enter the following:
- Service: UA
- Number: 99
- Size: 4"
- Spec: CS150
And here is the result:

To reassign a portion of an assigned connected line group
- Click to select the portion of the line group you want to reassign. (Or you can window select for multiple segments.)
For example, select the bottom line segment in this scenario:

- On the ribbon, click Home tab P&ID panel Assign Tag.
- In the Assign Line Number Tag dialog box, check the box labeled Update the Pipe Line Group of Selected Segments Only, and enter the values of the new line group. For example, enter the following:
- Service: UA
- Number: 99
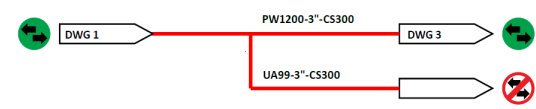
That portion of the line now belongs to the new line group.
To place inline equipment on an assigned connected line group (in an ISO standard project)
- Place the ISO equipment on the existing line.
- When prompted, select the line you want to become the new line group and press Enter. The result looks like this, the selected line segment becomes a new unassigned group:
 Note: If, instead of pressing Enter as indicated in step 2, you press C at the command line, you can change the line number. The Assign Line Number Tag dialog box is displayed and you can enter new values, for example:
- Service: UA
- Number: 99
Here is the result:
