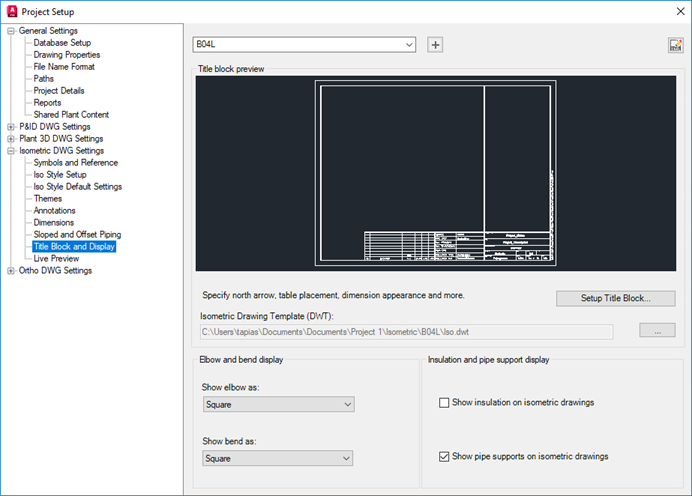
Specify the location of the tables and the reports (for BOM, cut piece, weld, and spool lists) that you want to include. You can also customize the columns and grouping in the report.
Configure a table layout
- Click Home tab
 Project panel
 Project Manager
 Project Setup.
- In the Project Setup tree view, expand Isometric DWG Settings. Click Title Block and Display.

- On the Title Block display pane, next to Iso Style, select a style from the drop-down list.
- Under Title Block Preview, click Set Up Title Block.
- On the Title Block Setup ribbon contextual tab, click Table Placement & Setup panel
 Table Setup.

- In the Table Setup dialog box, Table Layout tab, do the following:
- Next to Table Type, select a type from the drop-down list.
- (Applies to BOM only) Next to BOM Layout Template, select a template from the drop-down list. Choices include Simple BOM, Grouped with Category Titles, or Grouped with Independent Columns.
- Select or clear the check boxes to specify which fields to include in the BOM or list.
- Right-click to rearrange rows in table. You can also drag and drop columns.
- To add a column, click Add Column. In the Select Class Property dialog box, select a property for inclusion as a column header. Click OK.
- Select Include Instruments in BOM to show instruments into the BOM table in isometric drawing.
- Select Use a Single Column for Schedule and Pressure Class to combine schedule and pressure class properties in one column.
- Make further changes to the title block as needed, using the contextual ribbon commands.
- When finished, on the Title Block Setup ribbon contextual tab, click Close panel
 Return to Project Setup.
Configure BOM settings
- Click Home tab
 Project panel
 Project Manager
 Project Setup.
- In the Project Setup tree view, expand Isometric DWG Settings. Click Title Block and Display.

- On the Title Block display pane, next to Iso Style, select a style from the drop-down list.
- Under Title Block Preview, click Set Up Title Block.
- On the Title Block Setup ribbon contextual tab, click Table Placement & Setup panel
 Table Setup.

- In the Table Setup dialog box, Settings tab, do the following:
- Under Sort BOM By, select a sort order.
- Select or clear the Create Separate Fabrication and Erection Table Sections. If you select the check box, you can also select the section order from the drop-down list.
- Select or clear the Show Cutback Elbows as Separate Line Items. If you select the check box, you can then add a prefix or suffix to further distinguish the elbow for a standard elbow. You can also see a preview of the resulting display.
- Select or clear the Use Custom Description check box. If you select the checkbox, click the [...] button to locate the AutoCAD Plant 3D toolset Long Description Style (.lds) file you want. This file will set the format for all descriptions in the BOM. Click OK.
- Make further changes to the title block as needed, using the contextual ribbon commands.
- When finished, on the Title Block Setup ribbon contextual tab, click Close panel
 Return to Project Setup.