Follow these steps to integrate a macro into a Revit macro project.
You can skip this topic if the samples described in Using the Revit Macro Samples from SDK meet your needs.
This topic explains where to create folders in the IDE projects that correspond to resources on the file system, how to add required references, and how to define properties. Those steps were done for you in the macros that were built into Revit_Macro_Samples.rvt, which is provided on the SDK.
Add Required References
If your macro presents a user interface, you will need to add required references to your project. For example, in the SDK SampleRooms macro, we need to reference:
- System.Windows.Forms
- System.Drawing
Starting in the Macro Manager, select the project type and click Edit.
In the IDE, go to the Project Explorer. By default, it is docked on the right side of the display.
For the macro project (example: AppCSharp), right-click on the References section and select Add Reference from the menu.
In the Add Reference dialog, find and select System.Drawing and System.Windows.Forms on the list. Hold down the Ctrl key for the multi-select operation. For example:
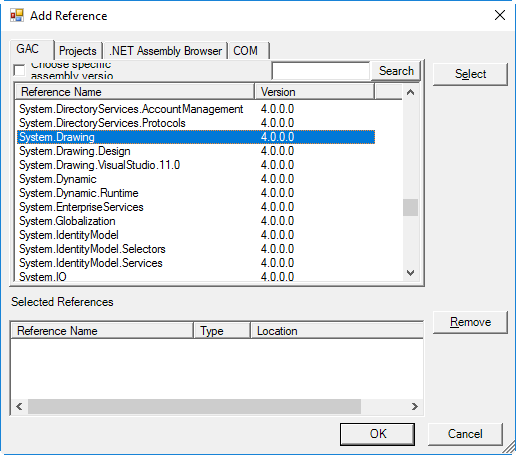
When you are ready, click OK.
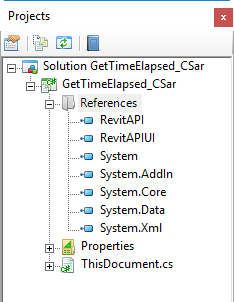
The IDE's Project Explorer is updated with the references:
Create Folders in Revit IDE
In the IDE's Project Explorer, right-click on the macro project, and select Add  New Folder from the menu. For example:

Name the folder. In this example, we call it Samples. Then right-click on the Samples folder entry, and click Add New Folder again to add a secondary folder, such as Rooms.
Outside of the IDE, use Windows Explorer to navigate to the Revit installation folders, and find the AppHookup folder. Notice that the corresponding \Samples\Rooms subfolders have been created in this location.
Copy Your Macro to File System Folder
Still outside of the Revit IDE, copy your macro's files to the subfolder you created.
Add Existing Files to Macro Project in IDE
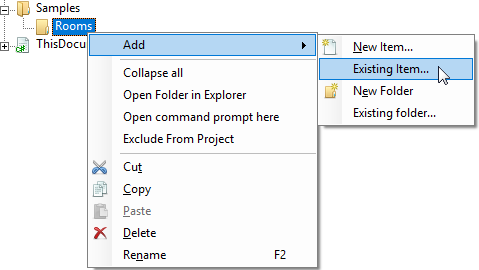
Return to the Revit IDE. In the Project Explorer (to continue this example), right-click on the folder you created for your macro, and select Add Existing Item from the menu. For example:
In the resulting IDE dialog, browse to the corresponding subfolder on the file system (such as the Revit SDK Macro Sample directory), under your Revit installation folder, select all the files that comprise the macro, and click Add.
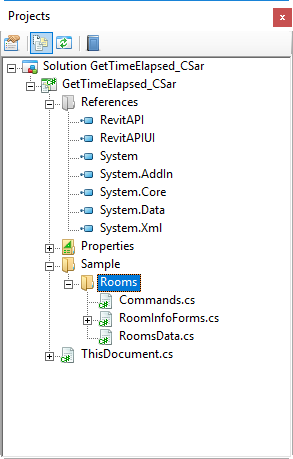
In this example, the refreshed IDE Project Explorer for GetTimeElapsed_CSharp contains:
Create and Build Your Macro
Once the files have been added to your project, you can write a method that runs the macro. For example, in C#:
///
Sample Rooms testpublic
void RunSampleRooms(){SamplesRoom
sample = new SamplesRoom(this);sample.Run();
}
Be sure to add a using directive for the macro's namespace. For example:
using Revit.SDK.Samples.Rooms.CS;
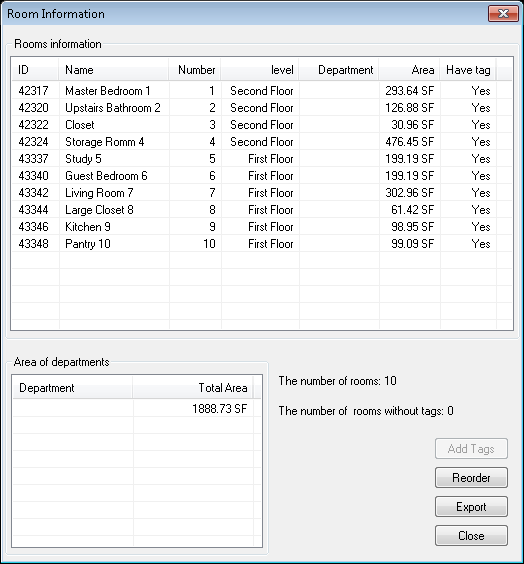
Save the project and then click Build from the IDE toolbar menu. In Revit, launch Macro Manager and select your macro from the categorized list. On the SDK, the Rooms sample may be coded as a document-level macro, in which case code changes would be needed to run it in the AppCSharp project shown in this section's screens.
When run from Macro Manager, the macro collects data from your model and presents summary information. Here is an example:
Resources.resx Properties
Note that one of the Revit macro samples, GridCreation, has a dependency on a resources.resx file. Before experimenting with the GridCreation sample, set the ResX file in the Revit macro IDE. This was already done for you in the document-level samples built into Revit_Macro_Samples.rvt (from the SDK). However, for macros you develop yourself, you may need to define properties in the project's resources.resx file. This section shows an example.
In the Project Explorer, navigate to the Properties folder for your macro. For example: YourMacro Samples GridCreation Properties.
Highlight the resources.resx file.
In the Properties pane, select the Custom Tool property, and enter ResXFileCodeGenerator in the value column.