Explore sample project in Revit.
This document will explain what you need to know to get the most out of your exploration of this project.
Background
This is an example of a mixed-use project incorporating commercial, residential and retail in an existing downtown area of a typical small city in the United States. The project is located in Brownsville, PA, USA. It began with a Point Cloud of several existing structures that were present on the site. These buildings fallen into a state of disrepair and sadly were demolished in November 2020. The sample project you are viewing now imagines what might have been done to incorporate the façades of those existing structures into a new design had they been saved.
Special thanks to: Fayette County, Pennsylvania, Brownsville Borough, Pennsylvania and The Perennial Project for allowing the point cloud and likeness of the site to be used in the project.
Program
|
Retail: |
4,921 SF total in three separate tenant spaces on the street level |
|
Office: |
6,984 SF in three office tenant spaces on upper levels |
|
Restaurant: |
2,600 SF restaurant on the street level and including upper-level mezzanine dining space |
|
Residential: |
18,235 SF of residential loft units. 21 units total in a mix of studio and one and two-story units on levels 2 and above. |
|
Outdoor Public Space: |
8,571 SF of outdoor public space including a pocket park at street level and a green roof with bandstand and bleacher seating. |
|
Parking Garage: |
10,281 SF of parking on the lower level complete with 20 parking spaces |
RevitModels
The project is distributed across several Revit models in keeping with industry standard best practices. If you wish to see the entire project, you can open each model individually or you can link them all together.
- Snowdon Towers Sample Architectural.rvt
- Snowdon Towers Sample Site.rvt
- Snowdon Towers Sample Façades.rvt
- Snowdon Towers Sample Structural.rvt
- Snowdon Towers Sample Plumbing.rvt
- Snowdon Towers Sample HVAC.rvt
- Snowdon Towers Sample Electrical.rvt
- Brownsville.rcp (Point Cloud)
All models use the same coordinate system and are stored in the same folder by default. View templates have been saved and applied to views within the models to help ensure that geometry displays correctly both in your host model and any linked models.
To attach a link, do the following:
- Open a floor plan view, such as: Floor Plan L1.
- Click the Insert tab of the ribbon.
- Click the Link Revit (or Point Cloud) button.
- Select the file that you wish to link.
- Ensure that Positioning is set to: Auto – Internal Origin to Internal Origin and then click Open.
Note: Alternatively, you can choose: Auto – By Shared Coordinates. This is optional as all files use the same internal origin.
Important Features Showcased
The goals of this model were simple: Create a compelling sample project that was both interesting from the architectural and engineering perspectives, and showcase many of the most commonly used Revit features.
- Complete Architectural, Structural and MEP models at a level of detail appropriate to the early construction documents phase of a typical project.
- Simple site model that incorporates Civil design originally completed in Civil 3D.
- Landscape Architectural design in the Pocket Park and roof garden.
- Commercial kitchen design in the café.
- Model uses most of the standard toolsets.
- Architecturally this includes Walls, Doors, Windows, Floors, Ceilings, Roofs, Columns, Fixtures, Stairs, Railings, Ramps, Furniture, Equipment, Rooms, Site items, Sweeps and Shafts.
- Structurally both steel and concrete systems are showcased.
- MEP: Electrical fixtures, equipment and conduits are all featured. Plumbing fixtures, piping, roof drains, sanitary, domestic water and other systems are featured. HVAC systems use equipment, ducts, pipes and spaces.
- A point cloud file was the basis for the façades model. The file is included.
- Phasing is used in the façades model to differential the existing to remain and demolition of the building elements from the point cloud.
- The façades model uses custom fill patterns to represent the existing historical bricks utilized in the existing buildings. Sweeps and custom families are used to model many of the masonry features.
- All work in the architectural, structural and MEP models is in the New Construction phase.
- Level 1 occurs along a sloped street with a 6-foot total drop from east to west. Therefore, setup of L1 is complex and involves three separate view ranges and the Plan Regions necessary to convey this in the plans.
- The building has three egress stairs and two elevators. Egress stairs utilize the stair tower functionality and carefully modeled stair and railing types meant to more closely align with industry best-practices.
- Groups have been used for repeating items like residential cores and the balconies on the north façade.
- Design Options are showcased on the roof at the bandstand canopy and the bandstand bleacher design.
- The bandstand canopy design in the primary design option uses a custom adaptive component family and has walls applied by face to the geometry in this adaptive component.
- Floor shapes are customized with shape editing tools at the green roof.
- The solar panel design incorporates custom tapered wall types and a custom sloped curtain wall type.
- Toposolids have been incorporated into the site design in the site model. Including solid cut functionality to represent the ramp and tunnel down to the parking garage.
- Many views have been added emulating those found in typical projects and as required to showcase Revit’s extensive documentation features.
- Custom view types coupled with view templates have been used to ensure consistency in graphical settings.
- All view types are included in the models: Plans, Ceiling plans, Sections, Elevations, Callouts, Details, 3D Views, even a Walkthrough.
- There are Area Plans both the Gross Building and the Rentable schemes.
- Many “Working” views have been left in the project. These are used internally by the project team and not shared to outside recipients on sheets or other formal presentations.
- A Variety of Schedules are included showcasing both reports needed for sheets and documentation and working schedules used for internal queries and analysis.
- A complete set of sheets is included.
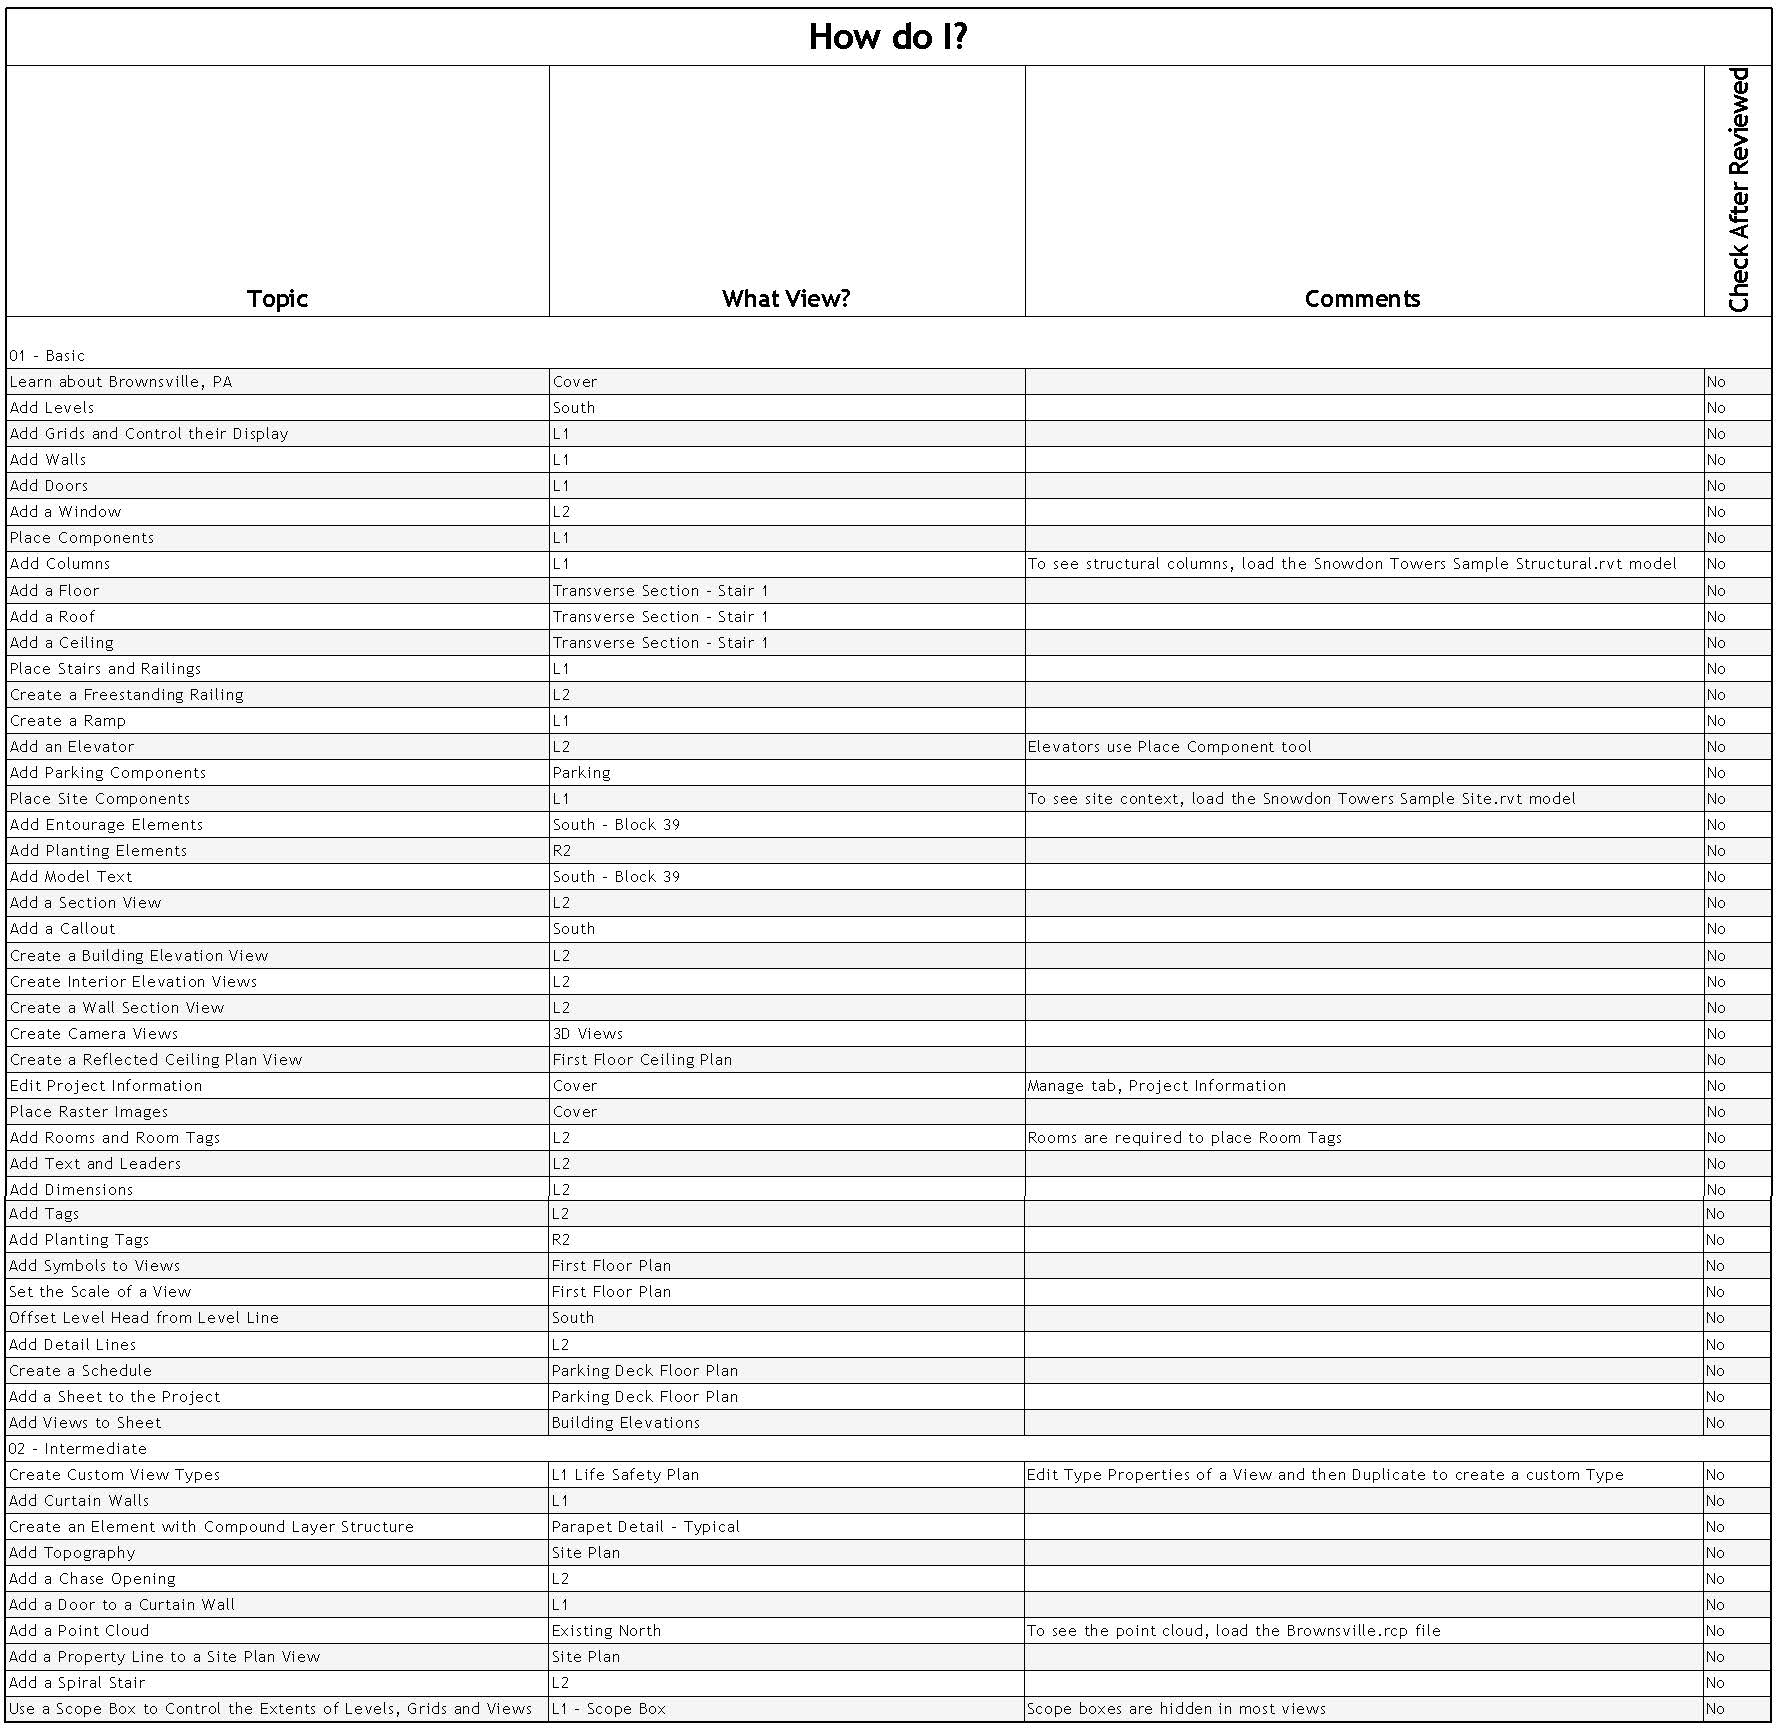
Take a Guided Tour of the Project
To learn more about the contents of the sample project look for the Help Icon
 near any element. Select the icon and then select the Learning Link parameter on the Properties palette. Use the browse icon: "..." to connect to the related wiki topic. (This will open externally in your default web browser). Once you have reviewed the topic click the “Content Reviewed” check box on the Properties palette.