Cuts an element (such as a wall or pipe) at a selected point, or removes a segment between 2 points.
Split Linear Elements
- Click Modify tab
 Modify panel
 (Split Element).
- If desired, on the Options Bar, select Delete Inner Segment. When you select this option, Revit removes the segment of the wall or line between selected points.
- If desired, on the Options Bar, select Delete Inner Segment. When you select this option, Revit removes the segment of the wall or line between selected points.
- Click the element at the point you wish to split. If you selected Delete Inner Segment, click at another point to remove a segment.

When you split a wall, the resulting parts are individual walls that can be worked on independently. When you split an MEP element, such as a pipe, the individual segments are no longer connected.
When you split a pipe, a fitting is added according to the settings in the routing preferences. Revit uses the contents of the Union field. If a Union is not defined, then Revit uses the contents of the Flange field. If both a Union and a Flange are defined, the contents of the Flange field are used. When you split a duct, Revit uses the contents of the Union field. When you split a cable tray or conduit, Revit uses the contents of the Union field in the Type Properties.
See Specify Routing Preferences for Duct.
Note: For MEP Fabrication parts, the Split tool does not insert a coupling. To place a coupling, select the desired coupling from the MEP Fabrication Parts palette, and use the Insert Part tool. See Tools for Placing Fabrication Parts in Revit.
Split Toposolid
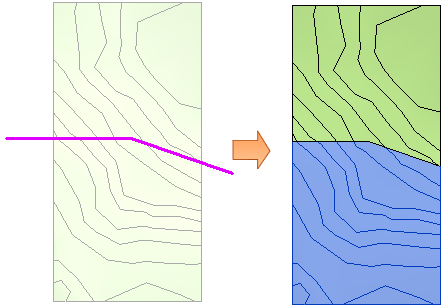
You can split a toposolid into two distinct elements and then edit them independently.
After splitting the element, change the toposolid type to depict roads, lakes, plazas, or hills.
You can also delete entire portions of the toposolid. For example, you can use the Split tool to remove unwanted portions of a toposolid generated by an imported file, when the imported file fills unsurveyed areas with unwanted artifacts.
To split a toposolid
- Open a plan view or 3D view where the toposolid is visible.
- Click Modify tab
 Modify panel
 (Split Element).
- In the drawing area, select an edge of the toposolid to split.
Revit enters sketch mode.
- Click Modify | Edit Profile tab
 Draw panel
 (Pick Lines), or use other sketch tools to split the toposolid.
- Sketch closed loops, or sketch open loops. Both ends of an open loop must intersect the boundary of the element.
Examples Closed Loop Open Loop 

- Click
 (Finish Edit Mode).