 Camera Editor
Scene > Camera Editor
Use the Camera Editor to create and manipulate cameras, modify camera properties, and list all cameras within a scene. The Camera Editor makes all camera-related property settings accessible, such as exact camera lens characteristics, custom projections, and camera properties.
For information on using the Camera Editor, see the following:
Another way to access the Camera Editor is to right-click the empty space next to the Quick Access Bar and select it from the list.
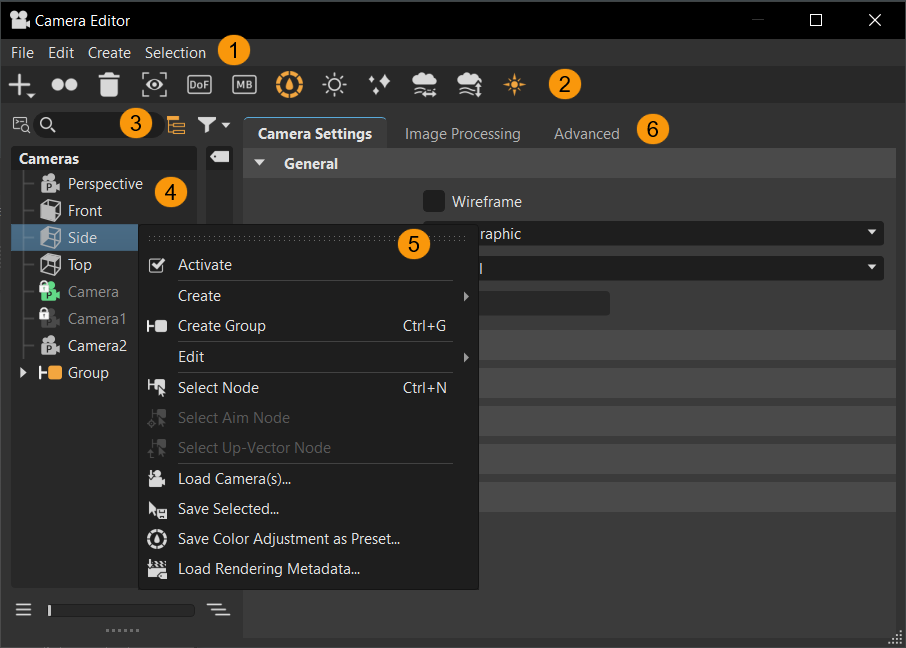
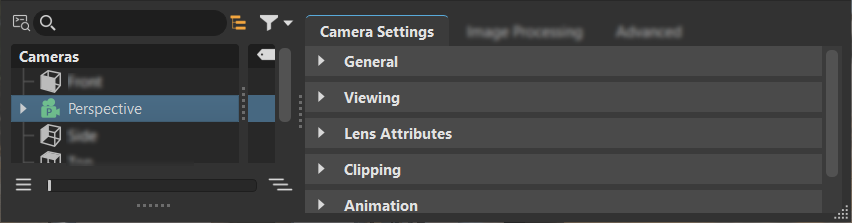
The Camera Editor has a left and right side. The left houses the Menu Bar, Tree List and Expansion Column, Search field, and filtering. The right contains three tabs, Camera Settings, Image Processing, and Track View when a track is selected in the tree. Along the bottom of the editor is the QuickActions Bar.
 Menu Bar
The menu bar contains the following menus:
File
Find the following options in the File menu:
 Load Camera(s) - Reads stored data from disc. The loaded data is added as new cameras or viewpoints. For instructions on use, see Loading Cameras.
 Save Selected - Writes selected data to disc. Save Selected supports saving a camera and viewpoints. The .osb file format supports saving a camera with camera tracks and viewpoints. XML only supports saving the selected camera or viewpoint. For instructions on use, see Saving Cameras.
 Save Color Adjustment as Presets - Saves all the modifications made in the Color Grading sections as a preset. The default file location for the custom preset is
 C:\ProgramData\Autodesk\[VREDPro-17.3]\data\OpenColorIO\Presets, with it saved as a.jsonfile, which can be shared and reused on other projects. To change the default location, see the Preset Folder preference. Load Rendering Metadata - Loads settings from a rendered image (.jpg, .png, .tiff, .exr) that includes metadata and applies it to the selected camera or viewpoint. For instructions on use, see Loading Render Metadata.
Edit
Find the following options in the Edit menu:
 Activate - Activates the selected camera and connects it to the Render Window. For instructions on use, see Activating a Camera.
 Rename (Ctrl+R) - Renames the selected content. For instructions on use, see Renaming a Camera.
 Copy (Ctrl + C) - Copies the selected content to the clipboard.
 Paste (Ctrl + V) - Pastes copied content from the clipboard to the selection.
Paste Attributes - Provides the following pasting options. For instructions on use, see Pasting Attributes.
 All - Pastes all attributes.
 Viewing - Pastes only the camera view attributes.
 Camera Attributes - Pastes the general camera attributes.
 Tonemapping - Pastes only the camera tonemapping attributes.
 Color Correction - Pastes only the camera color correction attributes.
 Glow - Pastes only the camera glow attributes.
 Glare - Pastes only the camera glare attributes.
 Blending - Pastes only the camera blending attributes.
 Duplicate (Ctrl+D) - Duplicates the currently selected root items.
 Delete (Del) - Deletes the currently selected camera, viewpoint, or track.
Mirror - Pastes only the X, Y, or Z mirror reflection of the camera. For instructions on use, see Mirroring a Camera.
 Set To Current View - Updates selected viewpoint with the current position and orientation. For instructions on use, see Setting the Current View.
 Reset View - Resets the view to its initial settings.
Create Menu
Find the following options in the Create menu. For instructions on use, see Creating Cameras.
 Camera - Creates a camera with a perspective view. Perspective View is similar to the view of human eyes. Objects further away seem smaller than objects right in front.
 Camera with Aim - Creates a separate node for the camera and aim. Each node is selectable and can be moved in the Render Window.
 Camera with Aim and Up - Creates a separate node for the camera, aim, and up. Each node is selectable and can be moved in the Render Window.
 Track - Enables you to use the camera animation within the Clip Maker. To do so, create an animation block inside the Curve Editor. Drag the camera block into the Clip Maker to use it.
 Viewpoint - Creates a bookmark for the viewpoint, capturing the position and orientation of the camera(s). A camera track, which stores the viewpoints, is created below the camera.
 Create Group (Ctrl+G) - Creates a node for grouping cameras, tracks, and viewpoints.
Selection Menu
Find the following options in the Selection menu. For instructions on use, see Selecting Camera Nodes.
 Select Node (Ctrl + N) - Selects camera node in the Scenegraph.
 Select Aim Node - Selects camera aim node in the Scenegraph.
 Select Up-Vector Node - Selects camera up-vector node in the Scenegraph.
 QuickActions Bar
Use these tool shortcuts to create, duplicate, or delete a camera, viewpoint, track, or group, as well as toggle different camera, fog, and viewpoint attributes. For instructions on use, see Using the QuickActions Bar Tools.
![]() Create - Creates the selected item. Choose from a camera, camera and aim, camera, aim, and up, orthographic camera, viewpoint, track, or group.
Create - Creates the selected item. Choose from a camera, camera and aim, camera, aim, and up, orthographic camera, viewpoint, track, or group.
![]() Duplicate - creates a copy of the current selection.
Duplicate - creates a copy of the current selection.
![]() Delete - Deletes the selection from the Scenegraph.
Delete - Deletes the selection from the Scenegraph.
![]() Set Current View - Updates selected viewpoint with the current position and orientation.
Set Current View - Updates selected viewpoint with the current position and orientation.
![]() Depth of Field - Toggles to depth of field effect on or off. When on, choose Stillframe to enable the depth of field only for stillframe rendering or Always to enable the depth of field for real-time and stillframe rendering.
Depth of Field - Toggles to depth of field effect on or off. When on, choose Stillframe to enable the depth of field only for stillframe rendering or Always to enable the depth of field for real-time and stillframe rendering.
![]() Motion Blur - Toggles to motion blur effect on or off. When on, it creates the streaking that appears due to the rapid movement of an object or long exposure. The shutter setting controls the strength of the effect.
Motion Blur - Toggles to motion blur effect on or off. When on, it creates the streaking that appears due to the rapid movement of an object or long exposure. The shutter setting controls the strength of the effect.
![]() Toggle Color Grading - Toggles the color grading effects on or off. When on, all color grading settings, including the Primary, Tone, RGB Curve, and LUT settings, are allied to the image in the viewport. When disabled, these effects are not applied to the image in the viewport.
Toggle Color Grading - Toggles the color grading effects on or off. When on, all color grading settings, including the Primary, Tone, RGB Curve, and LUT settings, are allied to the image in the viewport. When disabled, these effects are not applied to the image in the viewport.
![]() Toggle Glow - Toggles the glow effect on or off.
Toggle Glow - Toggles the glow effect on or off.
![]() Toggle Glare - Toggles the glare effect on or off.
Toggle Glare - Toggles the glare effect on or off.
![]() Toggle Distance Fog - Toggles the distance fog on and off, which defines the characteristics of fog as it gets farther away. As it travels further into the scene, objects become less visible and the fog gets thicker, just like in real life. So, if you want your object to stand out against your background, this is an elegant way to achieve this.
Toggle Distance Fog - Toggles the distance fog on and off, which defines the characteristics of fog as it gets farther away. As it travels further into the scene, objects become less visible and the fog gets thicker, just like in real life. So, if you want your object to stand out against your background, this is an elegant way to achieve this.
![]() Toggle Height Fog - Toggles the fog height on or off. It helps you simulate effects like ground fog or fog at the top of high buildings. Like Distance fog, Height fog depends how far away things are and where they are inside the fog. See Fog for more details.
Toggle Height Fog - Toggles the fog height on or off. It helps you simulate effects like ground fog or fog at the top of high buildings. Like Distance fog, Height fog depends how far away things are and where they are inside the fog. See Fog for more details.
![]() Toggle Lens Flare - Toggles the lens flare effect on or off.
Toggle Lens Flare - Toggles the lens flare effect on or off.
 Search Bar and Filtering
Video captions: You can also use now the new filters for a faster and easier search.
Search Bar
The Search Bar provides a live-search. When used, the matching search content is highlighted in the tree. Search by name or use a search term. Only single search terms are supported. Click the X to clear the search.
Use the following tools to aid your search:
 Selected Hierarchy
Selected Hierarchy restricts the search to a selected hierarchy. It searches the selected branch for nodes containing the search string. You can also use the shortcut, Ctrl + F (Find) to set the search bar in focus, where you can enter a string, and click Enter, enabling ![]() and searching the selected branch only for content matching the string.
and searching the selected branch only for content matching the string.
 Toggle Search Depth
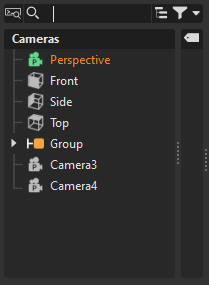
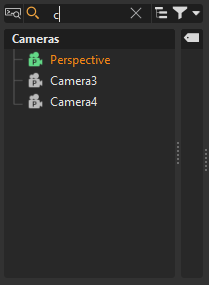
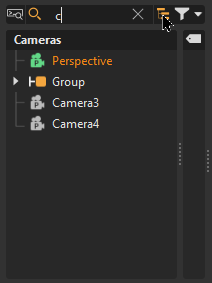
Toggle Search Depth toggles between flat and recursive matching. When disabled, only top-level matches appear. When enabled, matches deeper in the hierarchy appear.
| Original | Flat Match | Recursive Match |
|---|---|---|
 |
 |
 |
Filtering
The filter provides filtering capabilities within the Camera Editor. When used, only the content that meets the filtering criteria is displayed in the tree. Entering one character hides all cameras with names that don't include that character.
 Toggle Type Filter
This is activated once a filter is performed. The cameras displayed are the result of this filter. It is automatically deactivated when the Select none filtering option is selected.
 Filter Selection menu
Use these options for configuring the filter settings. Use it, for example, to toggle between displaying all cameras and only aim and up cameras.
The menu contains all the ways you can filter cameras, from type to the following. Use these filtering options in conjunction with a search term to further define a search.
Select All - Displays all items, which is the default.
Select None - Clears the filtering selection, reloading all items in the tree list.
Invert Selection - Displays all previously unselected items only.
Camera - Displays only all cameras.
Camera with Aim - Displays only all cameras with an aim.
Camera with Aim and Up - Displays only all aim and up cameras.
The remaining options display only that specific viewpoint.
Advanced Search
The advanced search is more powerful than our basic search. Use ![]() to help search and navigate large amounts of data and deep graphs. It provides the ability to search both scene data and metadata, together in combination or seperately. For information on advanced searches, various options, and how to do an advanced search, see Advanced Searches.
to help search and navigate large amounts of data and deep graphs. It provides the ability to search both scene data and metadata, together in combination or seperately. For information on advanced searches, various options, and how to do an advanced search, see Advanced Searches.
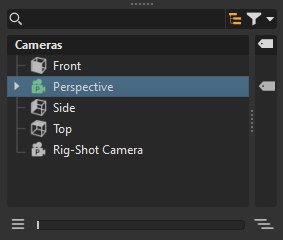
 Tree List
The Tree List on the left lists all scene-contained cameras, tracks, and viewpoints, which can be grouped.
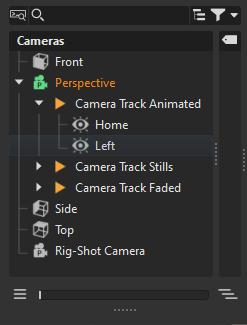
Your selection determines what is loaded to the right. Cameras and viewpoints will load attributes, whereas the selection of a track will load the Track View. When a track or viewpoint is selected, its parent node text is highlighed blue.
Double-clicking a camera activates and connects it to the Render Window and loads its attributes.
For working with multiple cameras, try multi-selection, along with the context menu, to create and/ or mirror tracks or viewpoints, or set the view for multiple cameras at once. Since multiple viewpoints can be selected, use this for unifying transformations, building viewpoint transitions, and setting the same time for a transition.
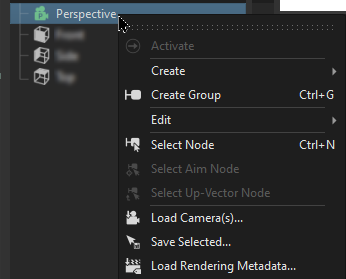
Right-clicking a camera accesses a context menu with options for creating, editing, activating, selecting, saving, and loading. For information on these options, see the Context Menu.
Tree List Controls
Drag the slider at the bottom of the tree or click its buttons to expand and collapse the tree list.
Click-drag ![]() to expose a second tree list.
to expose a second tree list.
One tree list can display search and filter results, while the other is unaffected. Drag and drop cameras from one tree into the other.
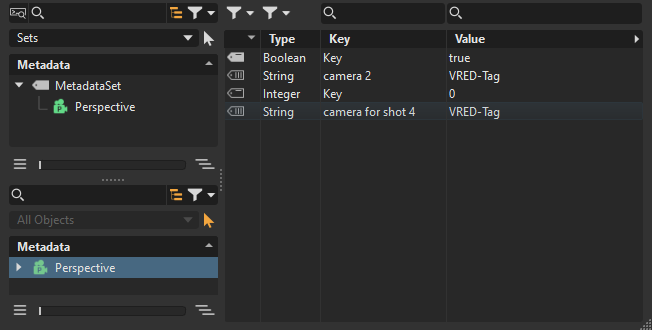
Expansion Column
The Expansion Column displays icons showing which nodes contain metadata. The column is tucked into the Tree List. Pull the grip to expose it. Double-clicking an icon opens the Metadata Editor, loading the node into the lower list.
 Context Menu
Right-click within the Tree List to access the context menu, which contains the following options:
- Activate - Activates the selected camera and connects it to the Render Window.
Create - When an entity is created, its node is in name edit mode, ready to be renamed. Provides the following creation options:
- Camera - Creates a camera with a perspective view. Perspective View is similar to the view of human eyes. Objects further away seem smaller than objects right in front.
- Camera and Aim - Creates a separate node for the camera and aim. Each node is selectable and can be moved in the Render Window.
- Camera, Aim, and Up - Creates a separate node for the camera, aim, and up. Each node is selectable and can be moved in the Render Window.
 Track - Enables you to use the camera animation within the Clip Maker. To do so, create an animation block inside the Curve Editor. Drag the camera block into the Clip Maker to use it.
- Viewpoint - Creates a bookmark for the viewpoint, capturing the position and orientation of the camera(s). A camera track, which stores the viewpoints, is created below the camera. Viewpoints are displayed in the Track View.
- Create Group - Creates an empty group. Drag and drop cameras into the group.
Edit - Provides the following editing options:
- Rename (Ctrl+R) - Renames the selected content.
- Duplicate (Crtl + D) - Duplicates the selected camera, view point, track, or group.
- Delete - Deletes the selected camera, view point, track, or group.
- Copy (Ctrl + C) - Copies the selected content to the clipboard.
 Paste (Ctrl + V) - Pastes copied content from the clipboard to the selection.
Paste Attributes (sub menu) - Provides the following pasting options:
- All - Pastes all attributes.
- Viewing - Pastes only the camera view attributes.
- Camera Attributes - Pastes the general camera attributes.
- Tonemapping - Pastes only the camera tone mapping attributes.
- Blending - Pastes only the camera blending attributes.
- Basic Color Correction - Pastes only the camera basic color correction attributes.
- Color Grading - Pastes only the camera color grading attributes.
- Glow - Pastes only the camera glow attributes.
- Glare - Pastes only the camera glare attributes.
- Blending - Pastes only the camera blending attributes.
Mirror X, Mirror Y, and Mirror Z - Pastes only the X, Y, or Z mirror reflection of the camera.
- Set to Current View - Updates selected viewpoint with the current position and orientation.
- Reset View - Resets the view to its initial settings.
- Select Node - Selects camera node in the Scenegraph.
- Select Aim Node - Selects camera aim node in the Scenegraph.
- Select Up-Vector Node - Selects camera up-vector node in the Scenegraph.
- Load - Loads cameras and settings from an .osb/.vpe/.vpb file.
- Save Selected - Saves the selected camera to an .osb file.
- Save Color Adjustment as Presets - Saves all the modifications made in the Color Grading sections as a preset. The default file location for the custom preset is
C:\ProgramData\Autodesk\[VREDPro-17.3]\data\OpenColorIO\Presets, with it saved as a.jsonfile, which can be shared and reused on other projects. To change the default location, see the Preset Folder preference. - Load Settings from Rendering - Loads settings from a rendered image (.jpg/.png/.tiff) including the metadata.
 Camera Parameters
This section of the Camera Editor has three tabs. Select a camera to load its parameters.
- All parameters for camera settings are listed in the Camera Setting tab.
- Image processing parameters are in the Image Processing tab.
- Advanced settings are in the Advanced tab.
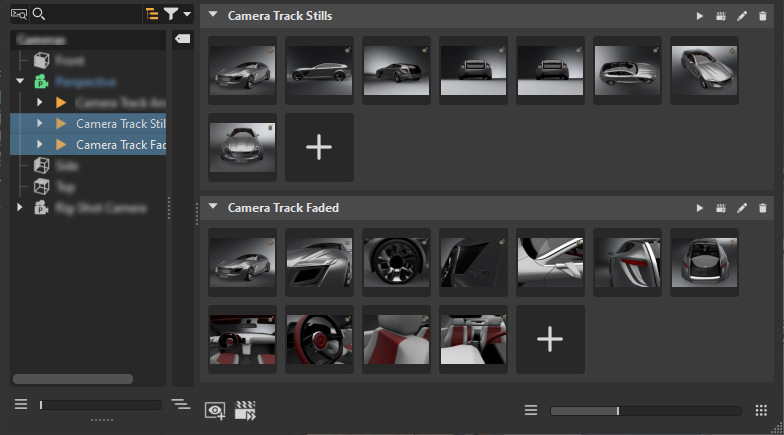
Track View
Once a track is created, expand the camera in the tree to access it. Click the track to load it into the Track View.
As of version 2023.2, the number of tracks selected in the tree determines the number of tracks displayed in the Track View.
| One Track Selected | Multiple Tracked Selected |
|---|---|
 |
 |
Before 2023.2, all tracks where listed, regardless of tree list selection.
Viewpoints and settings for the animation interpolation in-betweens are stored in the Track View. To add a fade-in, set the length a viewpoint is played and paused, plus more, see Setting Animation Properties. For setting these for the entire track, see Working with Camera Track Settings.
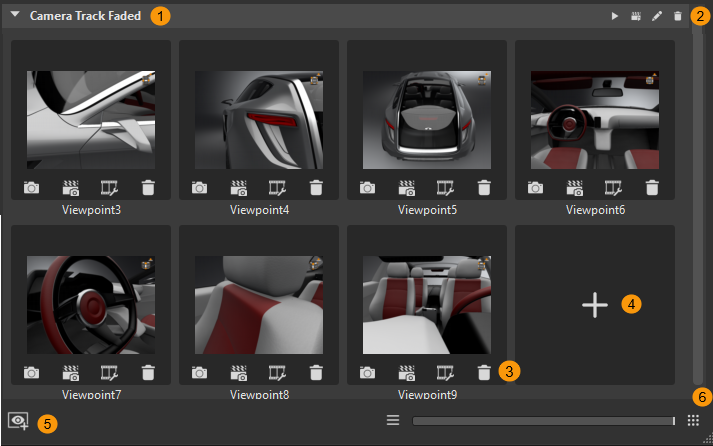
Track Controls
These controls affect the track and all its viewpoints.
![]() Play/Stop Camera Track - Plays the track viewpoints in the Render Window. For how to use it, see Playing and Stopping Track Playback.
Play/Stop Camera Track - Plays the track viewpoints in the Render Window. For how to use it, see Playing and Stopping Track Playback.
![]() Show Camera Track Settings - Opens the Camera Track Settings dialog for renaming a track, setting the fade-in time, animation duration, and pause time. For how to use it, see Working with Camera Track Settings.
Show Camera Track Settings - Opens the Camera Track Settings dialog for renaming a track, setting the fade-in time, animation duration, and pause time. For how to use it, see Working with Camera Track Settings.
![]() Render All Previews Inside Track - Rerenders all viewpoints with the current scene settings. Use this when changes have been made. For how to use it, see Re-rendering All Viewpoints.
Render All Previews Inside Track - Rerenders all viewpoints with the current scene settings. Use this when changes have been made. For how to use it, see Re-rendering All Viewpoints.
![]() Delete - Deletes the track and all its viewpoints. For how to use it, see Deleting a Viewpoint.
Delete - Deletes the track and all its viewpoints. For how to use it, see Deleting a Viewpoint.
Viewpoint Controls
These controls affect the specific viewpoint.
![]() Recapture - Changes the viewpoint to the current one of the active camera. For how to use it, see Recapturing a Viewpoint.
Recapture - Changes the viewpoint to the current one of the active camera. For how to use it, see Recapturing a Viewpoint.
![]() Update Preview - Makes the active camera adopt its position and orientation from the viewpoint. For how to use it, see Changing the Active Camera's Viewpoint.
Update Preview - Makes the active camera adopt its position and orientation from the viewpoint. For how to use it, see Changing the Active Camera's Viewpoint.
![]() Show Animation Properties - Opens the Animation Properties dialog for setting the name, fade-in time, animation duration, pause, overriding track settings, and defining a hotkey for the viewpoint. For how to use it, see Setting Animation Properties.
Show Animation Properties - Opens the Animation Properties dialog for setting the name, fade-in time, animation duration, pause, overriding track settings, and defining a hotkey for the viewpoint. For how to use it, see Setting Animation Properties.
![]() Delete - Deletes the viewpoint from the track. For how to use it, see Deleting a Viewpoint.
Delete - Deletes the viewpoint from the track. For how to use it, see Deleting a Viewpoint.
Create Viewpoint
Click to create a viewpoint of the active camera. For how to use it, see Creating a Viewpoint.
 Add Track
Creates a new empty track in the Track View and tree list. For how to use it, see Adding a Track.
 Update Preview
Only available when multiple tracks are selected. Rerenders and updates all previews for the selected tracks in the tree list. For how to use it, see Re-rendering All Viewpoints.
Slider
Adjusts the size of the viewpoints, changing the layout in the Track View. For how to use it, see Changing the Viewpoint Preview Size.
Keyboard Shortcuts
There are several hotkeys available for the Camera Editor:
Ctrl + CCopyCtrl + DDuplicate Camera or ViewpointCtrl + GCreate GroupCtrl + NSelect NodeCtrl + RRename Camera or ViewpointCtrl + VPasteDelDelete Camera or Viewpoint