Varjo
The Varjo uses HTC Vive Controllers. VRED supports the Varjo Aero and VR-3 for VR and the Varjo XR-1, and XR-3 for MR.
There are differences in the supported functionality for the XR-1 and XR-3.
- XR-1 supports hand depth estimations and marker tracking.
- XR-3 supports hand depth estimations, marker tracking, native foveated rendering, and hand tracking (gestures) in MR. To manually fix slow hand-tracking initializing in 2023, follow these instructions.
We recommend using native runtimes over compatibility ones to achieve the best performance.
| Controller | Bindings |
|---|---|
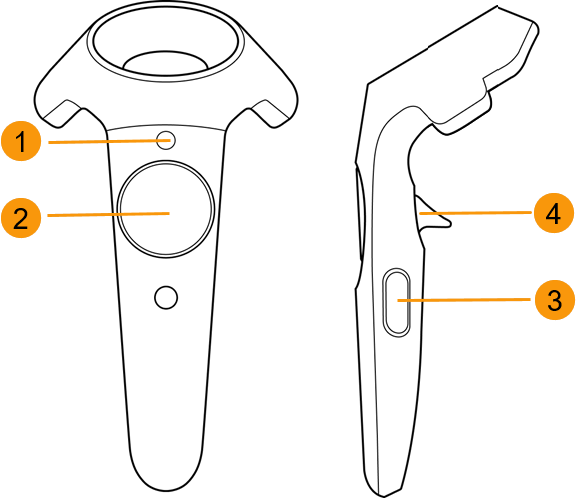 |
 VR Menu (Menu button) VR Menu (Menu button)  Teleport (Trackpad) Teleport (Trackpad)  Tooltips (Grip) Tooltips (Grip)  Pointer (Trigger) Pointer (Trigger) |
See the following topics for information on hands in VR and MR, gestures, markers, and the VR Menu and its options:
For using Quad View, Native Foveated Rending, or Eye Tracking, see Setting Your View.
How to Set Up and Activate Your Varjo with VRED
The Varjo hardware uses the Varjo HMD mode, which goes through SteamVR. An internet connection is initially required for the VRED controller bindings (controller button mapping). Once the controller bindings are loaded, the internet is not required.
Before continuing, you will need a NVIDIA Quadro graphics card or better. Next, the Varjo software must be installed and Varjo hardware set up.
- Load a scene into VRED.
- From the menu bar, select View > Display > Varjo HMD to activate the device.
How to Start the VR Experience at a Certain Point in a Scene
If you need to start the VR experience at a certain point in your scene, such as 1 meter in front of an object, do the following:
Create a viewpoint (Scene > Camera Editor, right-click and select Create > Viewpoint) on the floor of the scene, where you want to stand in VR.
Note:See Viewpoints for how to create this viewpoint.
Activate Varjo.
Activate the pre-defined viewpoint.
For more of a detailed explanation on the coordinate systems, see Camera.
Fixing the Varjo XR-3 Camera Offset
In XR, there can be an offset between your real world view and what is seen in VRED through your Varjo XR-3 HMD. This occurs due to the installed lenses. The offset between VR and XR is triggered by the Varjo API due to the existing offset between the XR-3 camera and real world view.
This offset can be disabled using the Python command:
vrHmdService.setMixedRealityEyeOffsetPercentage(0.0)
The purpose of the offset is to render the image from the same position as the real world camera of the HMD. Please note, the rendering will no longer match the camera image, if the offset is turned off.
Instructions for Fixing Slow Hand-Tracking in 2023
In 2023, there is a slower initialization of the tracked hands, which can take up to 10 seconds when starting VRED for the first time. This workaround manually fixes this issue. After these adjustments made, the hand initialization will work immediately. Here is the LeapC.dll file needed for the workaround.
Option 1
- In
C:\Program Files\Autodesk\VREDPro-<internalVersion>\bin\WIN64, deleteLeapC.dlldated as last modified 09/27/2021. - Replace it with
LeapC.dllthat has a date last modified of 02/17/2022, which you can get here.
Option 2
- Go to https://developer.varjo.com/downloads and download Varjo XR-3 & VR-3 Ultraleap SDK for Custom Engines.
- Install
LeapC-SDK-relwithdebinfo-v5.4.3-ab422fa1-CI506955. - Go to
C:\Program Files\Ultraleap\LeapSDK\lib\x64. - Copy and paste
LeapC.dllto:\Program Files\Autodesk\VREDPro-<internalVersion>\bin\WIN64to overwrite it.