Note: Debugging is not available in AutoCAD LT.
How you configure the AutoLISP Extension for debug depends on which version you are using. The following steps explain how to identify which version of the extension you are using:
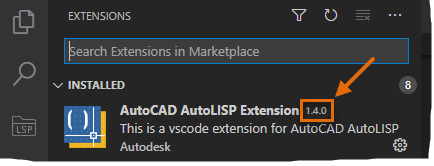
- In Visual Studio Code, click File menu > Preferences > Extensions.
- In the Extensions view, clear any text from the Search box.
- Under the INSTALLED section, locate AutoCAD AutoLISP Extension in the list.
The version number of the extension will be next to its name.

Setting up attach and launch configurations (Version 1.3.2 and Later)
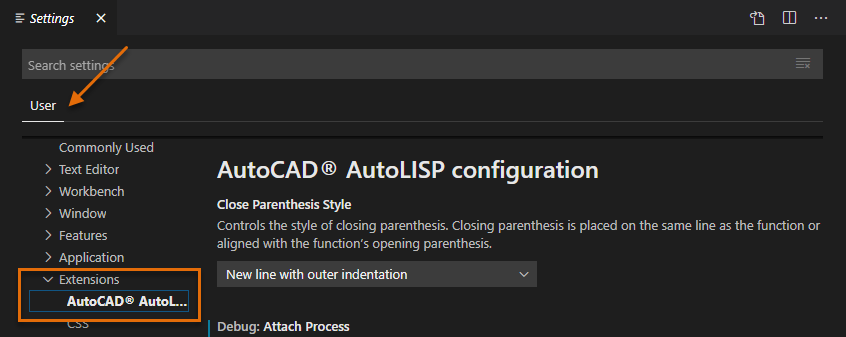
- In Visual Studio Code, click File menu > Preferences > Settings.
- On the User tab, expand Extensions and click AutoCAD AutoLISP Configuration.

- In the Debug: Attach Process text box, enter one of the following values in bold:
- (Windows) acad
- (Mac OS) AutoCAD
 Note: The process name is case sensitive, so acad or AutoCAD isn’t the same as ACAD or autocad.
 - In the Debug: Launch Program text box, enter the absolute path to the AutoCAD executable.
The absolute path varies based on the release and platform on which AutoCAD was installed.
- (Windows) "C:\Program Files\Autodesk\AutoCAD 2024\acad.exe"
- (Mac OS) "/Applications/Autodesk/AutoCAD 2024/AutoCAD 2024.app/Contents/MacOS/AutoCAD"

- Optionally, in the Debug: Launch Parameter text box, specify any command line switches during the launch of the AutoCAD application.
Setting up attach and launch configurations per folder (Version 1.3.2 and Earlier)
Note: A folder must be opened before debug configurations can be added, and debug configurations should not be added to a workspace but to a folder only. See
To Open a Folder for steps on opening a folder.
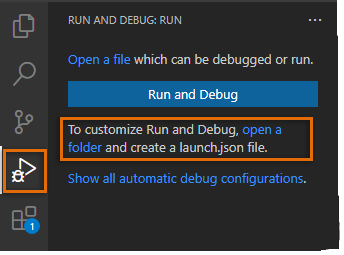
- In Visual Studio Code, on the Activity Bar, click Debug and then click Create a launch.json File (or click Debug menu > Open Configurations).

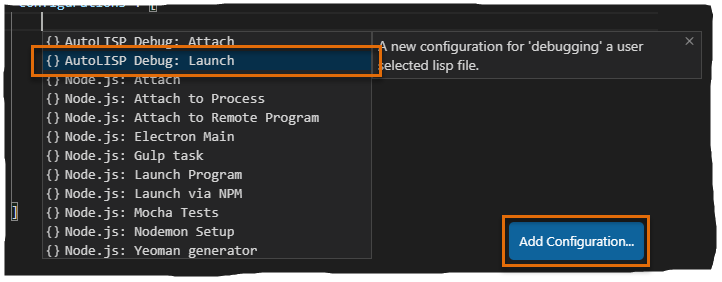
- On the Configurations menu, choose AutoLISP Debug: Attach.

A new file named launch.json that contains the AutoLISP Debug: Attach configuration should now be open in the current editor window.
- In the editor window, lower-right corner, click Add Configuration and then choose AutoLISP Debug: Launch from the list that is displayed.

- In the
launch.json editor window, make the following changes (example edits show in bold) based on your installed OS.
- Path attribute of the AutoLISP Debug: Launch configuration needs to be updated to the absolute path to the AutoCAD executable.
- Process attribute of the AutoLISP Debug: Attach configuration should be updated to the process name of the AutoCAD application.
Note: The process name is case sensitive, so acad or AutoCAD isn’t the same as ACAD or autocad.
- Optionally, the Params attribute of the AutoLISP Debug: Launch configuration can be updated to specify any command line switches to use when the AutoCAD application is launched.
- launch.json file on Windows
-
{ "configurations": [ { "type": "launchlisp", "request": "launch", "name": "Autolisp Debug: Launch", "attributes": { "path": "C:\\Program Files\\Autodesk\\AutoCAD 2024\\acad.exe", "params": "" } }, { "type": "attachlisp", "request": "attach", "name": "Autolisp Debug: Attach", "attributes": { "process": "acad" } } ] } - launch.json file on Mac OS
-
{
    "configurations":
    [
        {
            "type": "launchlisp",
            "request": "launch",
            "name": "Autolisp Debug: Launch",
            "attributes": {
                "path": "/Applications/Autodesk/AutoCAD 2024/AutoCAD 2024.app/Contents/MacOS/AutoCAD",
                "params": ""
            }
        },
        {
            "type": "attachlisp",
            "request": "attach",
            "name": "Autolisp Debug: Attach",
            "attributes": {
                "process": "AutoCAD"
            }
        }
    ]
}
- Click File menu > Save to save the changes to the launch.json file.