Learn the steps to install SQL databases for Advance Steel on a shared location.
- Install SQL Server Express 2019 on the computer where you will have the shared databases.
- Access Microsoft® SQL Server® 2019 Express.
- Click the Download button.
- Execute SQLServer2019-SSEI-Expr.exe.
- During installation, when creating the new instance in the Instance Configuration section, give it a meaningful name, such as "ADVANCESTEEL" in the Named instance field.
- After you install SQL Server Express and create the "ADVANCESTEEL" SQL instance, verify that the SQL server is configured to be accessible through a network. Start with these steps:
- Open the SQL Server Configuration Manager (type " SQLServerManager15.msc" in the Windows Start Search field).
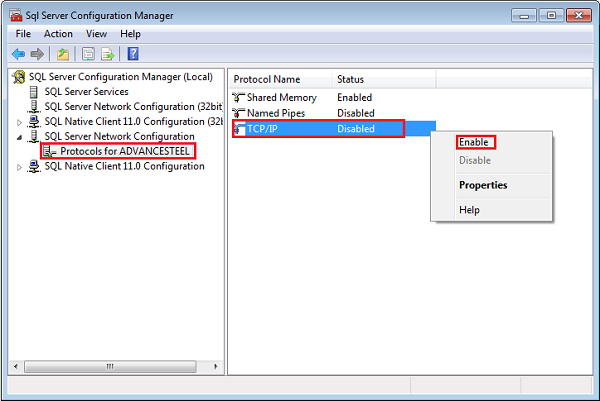
- Go to SQL Server Network Configuration
 Protocols for ADVANCESTEEL. On the right side of the window, check if TCP/IP is enabled. If it is disabled, right-click and select Enable from the contextual menu.

- Restart the SQL Service.

- Verify that the
firewall ports for SQL communications are open.
Note: You may want to discuss this with the IT person, to add the necessary rules in Windows Firewall.
- After you install SQL Server Express and create the "ADVANCESTEEL" SQL instance, verify that the SQL server is configured to be accessible through a network. Start with these steps:
- Install Microsoft SQL Server 2019 Management Studio on the same computer (server machine):
- Access Microsoft® SQL Server 2019 Management Studio.
- Click the Download button.
- Execute SSMS-Setup-ENU.exe.
- After installing SQL Server 2019 Management Studio (SSMS) on the server machine, add the user(s) to the login list. Here is a general method:
- Open SSMS and connect to the ADVANCESTEEL instance.

- Go to Object Explorer
 Security folder
  Logins, right-click and select New Login... from the contextual menu.

- On the General tab: search for the user to add, using the Login name field. Select the Windows authentication option.

- On the Server Roles tab, select the roles for the user. You can select the sysadminrole - the most permissive role.

- Open SSMS and connect to the ADVANCESTEEL instance.
- Create a dedicated folder for Advance Steel databases and add them there. It is highly recommended to include the version number in the folder name, to be clearer for future versions. For example, you could use a folder name like "Shared SQL AS 2024".
- Verify that the folder is shared with and available to all users who want to use the databases, with full control rights. One method is to use the Windows Explorer on a user computer to access and open the folder, then copy any file there.

- Open SQL Server 2019 Management Studio and connect to the SQL Server Express instance you created ("ADVANCESTEEL").
- Go to Object Explorer
 Databases folder, right click and select Attach… from the contextual menu to attach the Advance Steel databases to this instance.
Note: Use the full network path.

- Modify the DatabaseConfiguration.xml file from each individual computer where Advance Steel is installed, to point to this server and instance and to this new location.
The general format for a network path is:
<DataSource Value="Server=[computer name],[port]\ADVANCESTEEL;Integrated Security=true;AttachDbFileName=\\[computer name]\[path to folder]\Data\AstorProfiles.mdf" Name="AstorProfiles"/>
Example:
<DataSource Value="Server=CUSJWFHZY1,1433\ADVANCESTEEL;Integrated Security=true;AttachDbFileName=\\CUSJWFHZY1\Network MDF\en-US\Steel\Data\AstorProfiles.mdf" Name="AstorProfiles"/>
The requirements to install the SQL Server Express 2019 on a machine can be found here: Hardware and Software Requirements for Installing SQL Server 2019
Additional Notes
To share the Advance Steel databases with other users, from a shared location or machine:
- The machine should run SQL Server Express 2019. Because of that, the machine must comply with the Microsoft requirements for installing the SQL Server.
- SQL Server Express 2019 is supported on almost all Windows operating systems. It is NOT mandatory to install it on a Windows Server operating system.
- The machine hosting the shared databases can be any machine from the network, not necessarily the server. However, if it is the server itself, then the server should run a supported operating system - one of the Windows Server operating systems from the supported list.
- Microsoft generally recommends that you use a Storage Area Network (SAN) or a locally attached disk for the storage of your Microsoft SQL Server database files. However, you can configure SQL Server to store a database on a network server or NAS server. Servers that are used for this purpose must meet SQL Server requirements for data write ordering and write-through guarantees. See the More options section of this article: Description of support for network database files in SQL Server
- Please discuss the settings and the available options with the IT department for the specific requirements that the server must meet. To fully use all Advance Steel features, the connection string in the DatabaseConfiguration.XML file has to be AttachDbFileName.