To display the measurement details of geometric items in the CAD view, click View tab > Labels panel > Geometry. The labels that are displayed depend on the state of the Sequence Tree: if the Tree is displaying the Definition level of the inspection sequence, all measured items are shown in the CAD view; if a group is open in the Tree, only the labels of items in that group are shown.
To display labels for geometric items:
- Select the Definition level as the Active Group in the Sequence Tree.
- Click View tab > Labels panel > Geometry & Form > Horizontal Labels.
Labels are displayed for all the items that can be seen in the CAD view. For example:
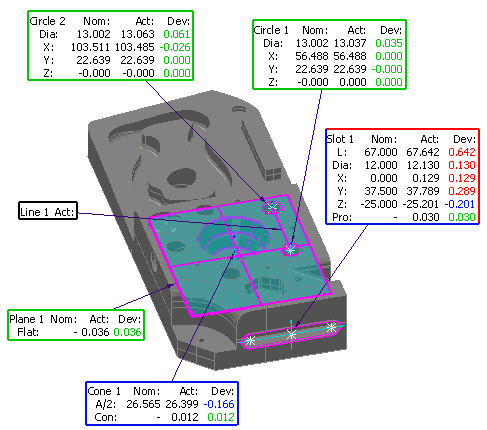
The measurements associated with each item are displayed in labels, together with an arrow that identifies the feature the item refers to. If you have chosen to compare an item's measurements with its nominals, the labels can also display the nominals, and the values are colour coded to indicate each measurement's status:
- Green indicates the value is within tolerance.
- Red indicates the value is above tolerance.
- Blue indicates the value is below tolerance.
- Black indicates the value is not measured (such as for constructed items) or the value has not been compared with its nominal.
The label borders are also colour coded. When some of an item's measurements are above tolerance and some of the measurements are below tolerance, the label border is displayed as a mixture of colours.
- To position the labels manually:
- Click View tab > Labels panel > Geometry & Form > Interactive Labels.
- Left-click and hold a label, drag it to a new position, and release the mouse button.
- In Interactive Labels mode, you can also size the labels and choose the columns and rows that are displayed. To do this, click View tab > Labels panel > Settings.
The Session Label Settings dialog is displayed.
- The dialog enables you to select the data that is displayed in labels and to apply limited formatting. Experiment with changing the settings in this dialog, and click Apply to see the effect on the labels.
- When you have finished, click Reset to Default to return the dialog to its original settings, then click OK to close the dialog.