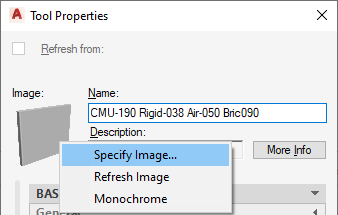
Use this procedure to change the icon of a tool.
When you add a new tool to a tool palette, it displays either the icon of the tool it was copied from or a default icon. You can change the icon by selecting a new one from an image file or from an object in the drawing. You can also choose to display the icon as simple monochrome linework.

Changing the tool icon
You can use the following image formats for tool icons:
- PNG
- GIF
- JPG
- BMP
- TIFF
- Click


 .
. 
- Click the tool palette that contains the tool for which you want to select a new icon.
- Select the tool, right-click, and click Properties.
- In the Tool Properties worksheet, right-click the existing icon, and click Specify Image.

- In the Select Image File dialog box, select the image you want to use as a tool icon, and click Open.
- Click OK.
- To display a tool as simple monochrome linework, in the Tool Properties worksheet, right-click the existing icon, and click Monochrome.
The monochrome option is not available for all tools.
- To create an icon from an object in the drawing, select the tool on the tool palette, right-click, and click Set Image from Selection.
- Select the object in the drawing you want to use as a tool icon, and press Enter.
The tool icon is created with the last view direction and display configuration used in the viewer of any tool of this type. For example, if the tool viewer of the last-used wall tool is set to Top view and the Medium Detail display configuration, any wall you select in the drawing as a tool icon is displayed in Top view and with the Medium Detail display configuration.
You cannot create icons from objects that contain custom blocks, curtain walls, or door/window assemblies with nested styles. If you need to create an icon based on a custom block, specify an external image.