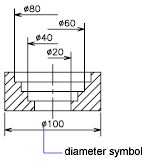
The numeric values of dimensions can be displayed as a single measurement or in two measurement systems. In either case, you can control details of how the numeric values are presented.
The settings for primary units control the display of the dimension values, including the unit format, the numeric precision, and the decimal separator style. For example, you can enter the diameter symbol as a prefix, as shown in the illustration. Any prefix you specify replaces the prefixes normally used for diameter and radius dimensions (unicode 2205 and R, respectively).

These settings are available on the Modify/New Dimension Style dialog box, Primary Units tab.
Control the Display of Alternate Units
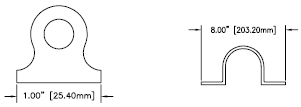
You can create dimensions in two systems of measurement simultaneously. A common use of this feature is to add feet and inches dimensions to drawings created using metric units. The alternate units appear in square brackets ([ ]) in the dimension text. Alternate units cannot be applied to angular dimensions.
If alternate-units dimensioning is on when you edit a linear dimension, the measurement is multiplied by an alternate scale value that you specify. This value represents the number of alternate units per current unit of measurement. The default value for imperial units is 25.4, which is the number of millimeters per inch. The default value for metric units is about 0.0394, which is the number of inches per millimeter. The number of decimal places is specified by the precision value for alternate units.
For example, for imperial units, if the alternate scale setting is the default value, 25.4, and the alternate precision is 0.00, the dimension might look like the following figure.
