In this exercise, you will use the Traverse Editor to create survey data.
The Traverse Editor is used to edit the observations of an existing named traverse or to enter traverse observations for a new traverse.
This exercise continues from Exercise 1: Creating Survey Data Using the Toolspace Survey Tab.
Create a new survey database
- Open Survey-4B.dwg, which is located in the tutorials drawings folder.
- In Toolspace, on the Survey tab, right-click Survey Databases. Click New Local Survey Database.
- In the New Local Survey Database dialog box, for the name, enter Survey 3. Click OK.
- In Toolspace, on the Survey tab, right-click the database Survey 3. Click Edit Survey Database Settings.
- In the
Survey Database Settings dialog box, under
Measurement Type Defaults, specify the following parameters:
- Angle Type: Angle
- Distance Type: Horizontal
- Vertical Type: None
- Target Type: None
- Click OK.
Create a survey network
- In Toolspace, on the Survey tab, expand the Survey 3 database. Right-click the Networks collection. Click New.
- In the Network dialog box, for Name, enter Survey Network 3.
- Click OK.
Set up a traverse and define control points
- In
Toolspace, on the
Survey tab, expand the
Survey Databases
 Survey 3NetworksSurvey Network 3. Right-click the
Traverses collection. Click
New.
Survey 3NetworksSurvey Network 3. Right-click the
Traverses collection. Click
New.
- In the New Traverse dialog box, for Name, enter Traverse 3. Click OK.
- On the Survey tab, select the Traverses collection. In the list view, right-click Traverse 3. Click Edit Traverse.
- In the
Specify Initial Setup dialog box, specify the following parameters:
- Initial Station: 1
- Initial Backsight: 4
- Click OK.
- A message is displayed indicating that initial station point 1 is not defined. Click Yes to define it.
- In the
New Control Point dialog box, specify the following parameters:
- Point Number: 1
- Easting: 1000
- Northing: 1000
- Description: STA 1
- Click OK.
- A message is displayed indicating that backsight point 4 is not defined. Click Yes to define it.
- A message is displayed indicating that a backsight direction must be created. Click Yes to create it.
- In the
New Direction dialog box, specify the following parameters:
- Direction: 45
- Direction Type: Azimuth
- Click
OK.
The Traverse Editor is displayed.
- In the right side of the editor, for
Station 1, Backsight 4, specify the following parameters:
 p
p
- (point number): 2
- Angle: 90
- Distance: 100
- Description: STA 2
- For
Station 2, Backsight 1, specify the following parameters:
- (point number):
3
- Angle: 90
- Distance: 100
- Description: STA 3
- For
Station 3, Backsight 2, specify the following parameters:
- (point number):
4
- Angle: 90
- Distance: 100
- Description: STA 4
-
For
Station 4, Backsight 3, specify the following parameters:
- (point number):
1
- Angle: 90
- Distance: 100
Note: If you do not see an entry option for Station 4, Backsight 3 in the Traverse Editor, save the traverse information by clicking and then close and reopen the Traverse Editor.
- Click
to save the traverse information.
- On the
Survey tab, right-click
Survey Network 3 and click
Insert Into Drawing.
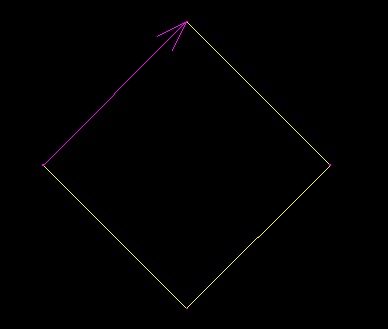
The new survey data is displayed in the drawing.
The following illustration shows what the network should look like.
To continue this tutorial, go to Exercise 3: Creating Survey Data Using the Survey Command Window.