Material Node Settings
The Material node creates a central hub to control the specular, ambient, diffuse, transparency, and shininess of a geometry's children maps and substances.
Flame automatically creates a Material node when you insert a Substance Texture or when you import 3ds Max or FBX models with textures. You can also manually add a material node to any geometry or surface in the Action schematic.
You can also use the Material node to can create a light wrap effect on the following objects: Surface, 3D Text, 3D Shape, and Geometry. It automatically identifies the objects behind the light wrapped object, using the 3D scene to define the background pixels. Using the light wrap on these keyed elements or 3D assets, you to wrap the object with the pixels from the background, making them appear like they truly belong to the scene.
Material Menu Settings
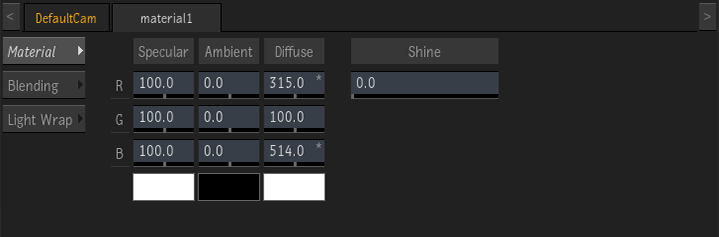
Red Specular field
Displays the red specular highlight value. Editable.
Green Specular field
Displays the green specular highlight value. Editable.
Blue Specular field
Displays the blue specular highlight value. Editable
Specular colour pot
Displays the colour of light reflected by the 3D model's surface. To enable the specular highlight, the Shine value must be larger than 0. Editable.
Red Ambient field
Displays the red ambient colour value. Editable.
Green Ambient field
Displays the green ambient colour value. Editable.
Blue Ambient field
Displays the blue ambient colour value. Editable.
Ambient colour pot
Displays the colour of the area of the 3D model that is not illuminated by a direct light source. Editable.
Red Diffuse field
Displays the red diffuse colour value. Editable.
Green Diffuse field
Displays the green diffuse colour value. Editable.
Blue Diffuse field
Displays the blue diffuse colour value. Editable.
Diffuse colour pot
Displays the diffuse colour. Editable.
Shine field
Displays the intensity value of the specular highlight. When this value is zero, the specular highlight is disabled. Shine affects both size and intensity. Editable.
See Creating a Specular Highlight on a Model.
Blending Menu Settings
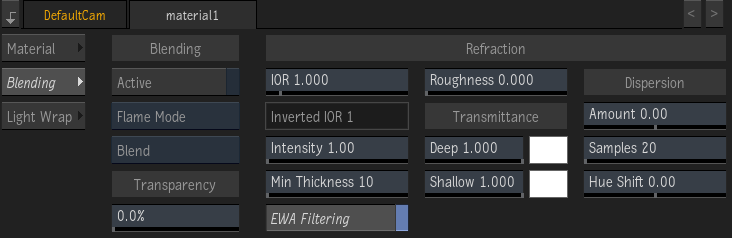
Blending Settings
Activate Blending button
Activating Blending in the material node overrides any blending settings set in the parent node.
Blend Type box
Select the type of blending modes available from the Blend Mode box.
Blend Mode box
Select how the front and matte clips or the front and back clips are combined.
Transparency field
Displays the transparency level of the 3D model. Editable.
Refraction Settings
Index of Refraction field
Set the index of refraction of the material. This value is an approximation of real world material refraction. For example, use 1.5 for glass, 1.333 for water.
Inverted Index of Refraction field
Calculates the inverted index for refraction value defined in the IOR field. Use this value to recreate the current IOR in an attached substance material. Not editable.
Intensity field
Control the intensity of the effect. A high enough value flips the background.
Minimum Thickness field
Define the minimal thickness of the object. Use it with a geometry without thickness (a plane) or very thin to ensure refraction, but without altering its actual thickness.
EWA Filtering button
Apply filtering to the result of the refraction.
Roughness field
Blur out the refraction result. The higher the Roughness, the blurrier the refraction.
Deep Transmittance field
Colour the refraction result, with an intensity proportional to the thickness of the geometry. Define the colour using the colour pot.
Shallow Transmittance field
Colour the refraction result, with an intensity proportional to the thinness of the geometry. Define the colour using the colour pot.
Dispersion Amount field
Control the dispersion of the RGB channels, and is similar to chromatic aberration.
Dispersion Samples field
Control the coarseness of the dispersion: the greater the value, the smoother the dispersion.
Hue Shift field
Shift the colours.
Light Wrap Menu Settings
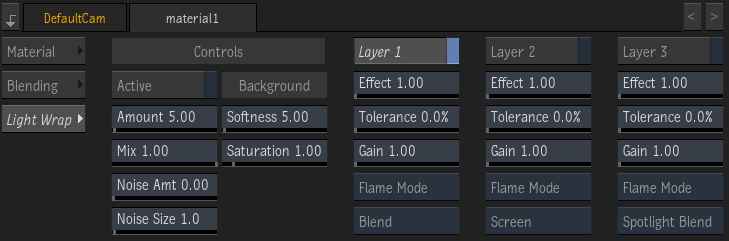
Controls Settings
Active button
Enables the Light Wrap effect.
Amount field
Sets the size of the Light Wrap effect.
Mix field
Mixes the result of the Light Wrap with that of the source.
Noise Amount field
Blends a noise pattern in the region set by the Amount control. This noise creates a non-uniform gradient for the Light Wrap effect.
Noise Size field
Sets the size of the noise pattern blended in the Light Wrap region.
Background Softness field
Blurs the background pixels, keeping the Light Wrap from looking like a half-transparency effect.
Background Saturation field
Affects the colour saturation of the background pixels used by the Light Wrap effect.
Layers Settings
Layer 1 button
Tweaks the look of the light wrap using the controls below. The three layers are blended together; Layer 1 blends the Background pixels with the pixels from the object.
Layer 2button
Tweaks the look of the light wrap using the controls below. The three layers are blended together; Layer 2 blends the Background pixels with the pixels from Layer 1.
Layer 3 button
Tweaks the look of the light wrap using the controls below. The three layers are blended together; Layer 3 blends the Background pixels with the pixels from Layer 2.
Effect field
Controls the coverage of the Matte created by the Amount field, growing or reducing the edge of the light wrap matte.
Tolerance field
Reduces the light wrap coverage based on the luminance of the pixels of the object: only pixels with a luminance value over the Tolerance threshold are used. Tolerance is a percentage luminance values.
Gain field
Sets the intensity of the blending between the layer and the Background.
Blend Type box
Selects the type of Blending modes available.
Blend Mode box
Sets the type of blending used to blend the Background with the Layer.