Axis Menu Settings
When accessing Action as a Timeline FX, you have access to a quick menu with some of these Axis settings. To see the full Axis menu, click the Editor button to enter Action.
Axis Tab
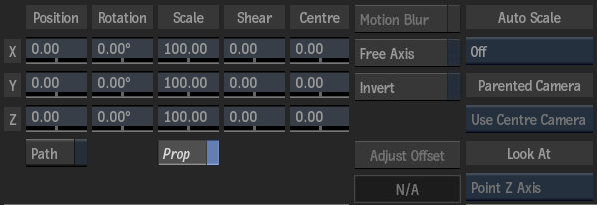
X Position field
Displays the position of the X axis. Editable.
Y Position field
Displays the position of the Y axis. Editable.
Z Position field
Displays the position of the Z axis. Editable.
Motion Path button
Enable to animate the position of the axis using a spline drawn in the scene. Disable to animate the position of the axis using explicit animation.
X Rotation field
Displays the rotation of the X axis. Editable.
Y Rotation field
Displays the rotation of the Y axis. Editable.
Z Rotation field
Displays the rotation of the Z axis. Editable.
X Scale field
Displays the scale of the X axis. Editable.
Y Scale field
Displays the scale of the Y axis. Editable.
Z Scale field
Displays the scale of the Z axis. Editable.
Proportional button
Enable to change the fields proportionally.
X Shear field
Displays the shear of the X axis. Editable.
Y Shear field
Displays the shear of the Y axis. Editable.
Z Shear field
Displays the shear of the Z axis. Editable.
X Centre field
Displays the centre of the X axis. Editable.
Y Centre field
Displays the centre of the Y axis. Editable.
Z Centre field
Displays the centre of the Z axis. Editable.
Motion Blur button
Enable to use a motion blur effect for the selected axis (can only be used once the global Motion Blur is enabled in the Setup menu).
Free Axis button
Enable to ignore transformations from parent axes.
Invert button
Enable to invert numerical Axis menu settings. This does not affect settings of nodes connected to the Axis.
Adjust Offset button
Enable to set the current frame as a reference frame that has no transformation data.
Reference Frame field
Displays the frame number of the reference frame that has no transformation data. Non-editable.
Autoscale option box
Select whether to autoscale when Position settings are changed relative to the camera (On Position Changes), or when Position, Rotation, Shear, or Centre settings are changed (On All Transforms).
| Select: | To: |
|---|---|
| Off | Not use autoscaling on the image. |
| On Position Changes | Preserve the projected size of the image by automatically scaling when changing any Position parameters that affect the depth of the image relative to the camera. |
| On All Transforms | Preserve the projected size of the image by automatically changing Position, Scale, and Centre parameters (when any Position, Rotation, Shear, or Centre parameters are changed). |
Parented Camera box
Select which camera is used for the parenting offset when the immediate parent is a stereo camera. Choose left, right, or center camera. Active only when there is exactly one parent that is a stereo camera, or if a look-at connection is attached between the axis and the stereo camera.
Point Axis box
Select which axis is pointed to the attached look-at object. Available only when objects are attached with a Look At connection.
See Applying Look-At Connections.
Tracking Tab
Common Settings
Tracking Mode box
Select the tracking mode.
Enter Tracker button
Click to open the Tracker menu to apply tracking data for the selected tracking mode.
Rotation button
Enable to apply rotation data to the track.
Skew button
Enable to apply skew data to the track.
Scale button
Enable to apply scale data to the track.
Perspective button
Enable to apply perspective data to the track.
Camera box
Specify which camera to take into account when tracking or viewing in Action Object view (F8).
Use Media field
Displays the number of the media associated with the analysis. To track the Back media, select 0.
Tracking View box
When the media associated to the analysis is a Source node, select to track the media in the Source Front, Source Matte, or Source Result view.
Media FX button
Enable to take into account blur and colour correct settings from the Action Media list in the analysis.
Display Tab
Shape Reference button
Enable to display an overlay of the reference frame when tracking in Object view (F8).
Shape Current button
Enable to display an overlay of the current frame when tracking in Object view (F8).