Track Indicators and Tools
On the left side of the timeline, in the Patch Panel area, you can find indicators and other tools for working with tracks and versions.
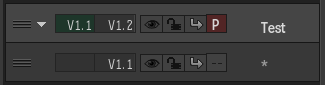
In the example above, the upper track (version 1 track 2) is highlighted, and therefore selected. To highlight a track and select all clips on the track, click in an empty space in the Patch Panel area for that track.
The track indicators and tools for this track are (from left to right):
Tack handle
Grab the track handle to move and reorder a track or group of tracks. As you drag the track, a message explains the operation being performed.
Track Collapse/Expand arrow
Click to collapse or expand all tracks within a version. You can collapse tracks to remove clutter from your timeline.
Patch Identifier (Source track)
Indicates which source track is patched to the track (in green).
Track Identifier (Destination or Sequence track)
Displays the version and track number (in dark grey).
Track Visibility icon
Displays or hides the track.
Track Lock icon
Enable track lock to prevent editing operations from being performed on the track. A locked track displays grey diagonal lines.
Sync Lock icon
Enable to maintain sequence sync on a track or tracks.
Video Track indicator
Indicates if a track is the primary or secondary track. The primary track can also be set by moving the focus point on the positioner.
Track Name
Drag the area between the Patch Panel area and the timeline to display the track name area. By default, tracks are named *. Right-click a track, and select Rename Track to add your unique track name.