Media Export Window Settings
Basic Options
Export Type box
Select the type of export to use with the selected files.
Preset Selection box
Select the export preset to apply to the exported files. Autodesk presets are built-in presets that you can still modify using the Advanced Options. An asterisk indicates that the preset's advanced options were modified.
Exported File Name field
Displays the name given to the exported file, as defined in the Advanced Options. Editable when exporting a single clip.
Use Top Video Track button
Enable to export the top video track of the current version. When disabled, exports the track currently set as the primary video track.
Export Between Marks button
When enabled, sequences are exported between the In and Out marks: the marked frames are not exported. Disable to export the whole sequence, without considering the marks.
If there is only an Out mark, only frames from start to Out are exported. If there is only an In mark, only frames from In to end are exported. In both cases, the In and Out frames are not exported.
Export in Foreground button
Enable to render sequences directly to destination files, without first writing frames on the framestore, saving space and time. When exporting as Sequence Publish, some elements might be rendered to fit the exported timeline structure.
For File Sequence and Movie, foreground export lets you export media without requiring you to re-render. You do not allocate frames on your framestore because content is streamed directly to the exported file, reducing the time to export.
For Sequence Publish export, when the media needs to be packaged, the application performs the required rendering before exporting. For example, using the Flattened tracks option with Timeline FX requires rendering prior exporting, as do segments with a BFX or Resize.
Advanced Options button
Enable to display the advanced options to customize existing presets, or create new ones.
Include Metadata Overlay button
Enable to burn in the overlay from the Metadata Overlay Preset box on the exported media.
Metadata Overlay Preset box
Select the Metadata Overlay preset to use on export.
Sequence Options Tab
Sequence Format box
Select the format of the sequence. Media Only exports the segments of the sequence as individual clips, but does not export the sequence itself.
Include Video button
Enable to include in the published sequence the video tracks information. Required to export the video media.
Include Audio button
Enable to include in the published sequence the audio tracks information. Required to export the audio media.
Sequence Filename field
Displays the sequence filename based on the Pattern field. Each type of exported file has its own filename defined in the relevant tabs. Non-editable.
Sequence Filename Pattern field
Displays how to name the exported media files. Build a dynamic naming scheme using Add Token, or characters normally allowed in a file name. Create folder structure using / . Add '#' to numerical tokens to define padding. The file extension is automatically appended. Editable.
Add Token box
Inserts a token in the Pattern field to build a dynamic filename.
Composition field
Optional. The composition name for the published AAF or FCP XML sequence. Third-party applications sometimes use this composition name in place of the filename.
Export Video button
Enable to export the segments of the sequence as files of the type specified in Video Format.
Video Format box
Select the type of video file to create. For movie, select the wrapper and codec in the Movie Options tab. For file sequence, select the file type in the Video Options tab.
Media Source box
Select Use Original Media to export the original source referred by the exported sequence, without any modifications. Select Use Media with FX to export the rendered media.
Video Tracks and Transitions box
Select Keep All Tracks to export a clip for each segment of the sequence. Select Flatten Tracks to export commit every transition and flatten the sequence. Select Flatten with Transitions to flatten the sequence and commit every transition except dissolves, creating a single clip.
Include Video Handles button
Enable to add head and tail frames to the exported video segments.
Video Handles field
Displays the amount of head and tail frames. Editable.
Export Audio button
Enable to export the audio tracks of the sequence.
Audio Source Selection box
Select Use Original Media to export the original source referred by the exported sequence, without any modifications. Select Use Media with FX to export the rendered media.
Audio Track State box
Select Flatten Tracks to commit all transitions and create one audio clip per track. Select Flatten Tracks with Transitions to create an audio clip per track but keep live transitions. Select Keep All Tracks to export one audio clip per audio segment.
Include Audio Handles button
Enable to add head and tail frames the exported audio segments. Audio segments with Timeline FX applied are exported with 0 handles.
Audio Handles field
Displays the amount of head and tail frames. Editable.
Movie Options tab
Movie Format box
Select the container for the exported media.
Compression box
Select the codec to apply to the exported movie file. The available codecs depend on the selected Movie Format.
Codec Profile box
Select a video compression codec profile.
ColorSync Compatible
Fixes gamma-shift in QuickTime or MP4 Rec.709 playback in macOS ColorSync applications. Has no impact on formats other than QuickTime or MP4.
Filename field
Displays the result of the pattern displayed in the Filename Pattern field. Non-editable.
Filename Pattern field
Displays how to name the exported media files. Build a dynamic naming scheme using Add Token and characters normally allowed in a file name. Create folder structure using / . The file extension is automatically appended. Add '#' to numerical tokens to define padding. Editable.
Add Token box
Inserts a token in the Pattern field to build a dynamic filename.
Include Audio button
Enable to include audio tracks within the exported file. Available only if Export Type set to Movie.
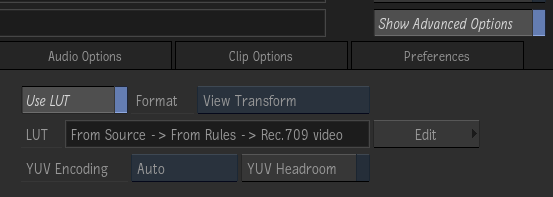
LUT Activation button
Enable to apply the LUT or colour transform displayed in the Applied LUT field to the clip.
Format box
When Importing: Select Colour Transform unless you're applying a legacy format 1D or 3D LUT. When Exporting: View Transform applies viewport colour management to the export; Input Transform applies import colour management (or its inverse) to the export; Colour Transform is for CTF and most other formats except a legacy 1D or 3D LUT; Tag Only overrides the colour space written to an OpenClip XML file.
Applied LUT field
Displays the type of conversion LUT applied to the clip, either imported using Import, or edited using Edit.
Colour Management Access button
Click to configure colour management settings.
Video Range box
Select between exporting a Full range or Legal range clip. Unless you have specific requirements, consider keeping the default value.
YUV Encoding box
Select the clip's YCbCr colour encoding matrix. The application uses this to translate native RGB values into YUV ones. The Auto setting selects the colour encoder based on the resolution of the clip: Rec. 601 for clips with a resolution lower than 720 lines, Rec. 709 for everything else.
Flame works in an RGB colour space: it needs to translate RGB information back into YUV. This setting ensures that the right encoder is used for this. Specifying the wrong option will result in colour problems upon decoding. Per Recommendation BT. 2020, UHD media should use the Rec. 2020 colour space. But this is rarely the case at the moment: UHD clips still use Rec. 709. The Rec. 2020 option is there is case you need the new standard.
See also: Applying Colour Management to Clips
Video Options tab
Video Format field
Select the format for the exported media.
Compression box
Select the image compression for the exported file sequence. The selected Video Format determines the available compressions. An asterisk (*) marks the compression matching the currently selected Preferred Format for Cache and Renders. Select this compression with the Link Media (Compression) option to help to export cached and rendered frames as links.
Multi-Channel button
Enable to export every video channel from selected clips in exported files. Available only with some file formats such as OpenEXR.
Include Alpha button
Enable to include, in the output, any Alpha present in the clip or sequence. Only available to formats that support alpha channels.
Link Media button
Link Media attempts to minimize both storage and time required to export the clip by reusing the original media files when they match, in file format, the exported files. Each Link Media option adds to the previous' matching criteria, culminating with Link Media (Compression) requiring matches in format, resolution, bit depth, and compression. Use Generate Media to always create new files or when the exported files' metadata, such as timecode, must be accurate.
DPX Transfer Characteristics box
Select an option to identify the attributes associated with a particular film or video format, such as resolution, frame rate, or colour space. Available when Video Format is set to DPX.
When exporting DPX files, you can choose a DPX Transfer Characteristic. A DPX Transfer Characteristic is information that is stored in the DPX image file header. It identifies the attributes associated with a particular film or video format, such as resolution, frame rate.
Setting a Transfer Characteristic in no way changes the image information stored in the DPX file. The Transfer Characteristic simply indicates the attributes of the DPX file read by another device or application. Some devices or applications may take advantage of this information to improve workflow. For example, selecting Logarithmic can allow a film recorder to adjust its parameters to print film-originated DPX files with the correct densities.
| Select: | For: |
|---|---|
| Z depth homogeneous, Z depth linear, PAL, NTSC, CCIR 601 (525), CCIR 601 (625), CCIR 709-4, SMPTE 274M | Images that you want to identify as one of these types. Although the SMPTE 274M standard defines these DPX Transfer Characteristics, it does not provide usage specifications for them. As a result, these Transfer Characteristics are not generally used in the industry. |
| Unspecified | Images where the format is not specified. |
| Logarithmic | Negative film scanners recording status M densities. |
| Linear | Video images which have built-in gamma correction. This refers to images having a true linear quantization scheme (such as CG-originated material). |
| Printing Density | Negative film scans which use the SMPTE Printing Density settings. SMPTE Printing Densities use status M density measurements with a higher gain in the red component. |
| Academy Density Exchange (ADX) | Images at 10- and 16-bit film density encoding, in which colour information is encoded using a logarithmic scale. Usually used in the context of an Image Interchange Format workflow. |
DPX Colorimetric Specification box
Select an option to identify the colorimetric specifications used to encode the DPX files. Available when Video Format is set to DPX.
Setting a Colorimetric Specification in no way changes the image information stored in the DPX file. The Colorimetric Specification simply indicates the attributes of the DPX file read by another device or application. Some devices or applications may take advantage of this information to improve workflow. For example, selecting Academy Density Exchange (ADX) can allow a film recorder to adjust its parameters to print film-originated DPX files with the correct densities.
JPEG Quality field
Specifies the degree of quality versus compression. A value of 0 gives the lowest quality (and highest compression), while a value of 100 gives the best quality (but applies no compression). Available when File Format is set to JPEG.
LUT Activation button
Enable to apply the LUT or colour transform displayed in the Applied LUT field to the clip.
Format box
Select View Transform to apply viewport colour management to the export. Select Input Transform to apply import colour management (or its inverse) to the export. Select Colour Transform for CTF and most other formats except a legacy 1D or 3D LUT. Select Tag Only if you want to override the colour space written to an OpenClip XML file.
Applied LUT field
Displays the type of colour management applied to the clip, either imported using Import, or edited using Edit.
Import button
Browse and select a colour transform.
Colour Management Access button
Click to open the Colour Management editor.
Filename field
Displays the result of the pattern displayed in the Filename Pattern field. Non-editable.
Filename Pattern field
Displays how to name the exported media files. Build a dynamic naming scheme using Add Token and characters normally allowed in a file name. Create folder structure using / . The file extension is automatically appended. Add '#' to numerical tokens to define padding. Frame identifiers are automatically added to image sequence files. Editable.
Add Token box
Inserts a token in the Pattern field to build a dynamic filename.
Frame Padding field
Define the padding of the frame identifiers appended to each file of an image sequence. Only used with image sequences.
For example, a frame pad of 6 indicates that each frames's file name has its frame identifier padded with a number of zeroes required to make it a 6-digit number: frame 1 is written as 000001, frame 22 as 000022, frame 55555 as 055555, and so on.
Frame Index box
Use Preference for the Start Frame from Preferences > General. Use Timecode for the source timecode converted in frame index. Use Start Frame for the Start Frame of the clip. Custom Start Frame to set the start frame.
If you enable Include Handles (in Sequence Publish), the handles are taken into account, with the frame index starting at the first exported frame. In the case of Use Start Frame, this means that if the clip has a head of 10 frames and a clip Start Frame of 1001, the frame index starts at 991.
Start Frame field
Enter Start Frame used to number the exported sequence of image files.
Export a Poster Frame button
Enable to export a poster frame. If you enable Poster Frame when exporting a sequence, you will export one frame per segment.
Poster Frame field
The position of the frame used as the poster frame. If you also Include Handles, the frame position count starts with the handles.
Resolution Mode box
Select Resolution List for camera resolutions, Adaptive to set the width and height based on the Frame Aspect Ratio, Scaling Presets for resolution fraction.
Resolution Presets box
Select a resolution. Select Custom Resolution to specify a non-standard resolution.
Adaptive Resolution box
With Width Based on Ratio, Width equals Height multiplied by Ratio. With Height Based on Ratio, Height equals Width divided by Ratio.
Scaling Presets box
Select a resolution as a fraction of the clip.
Fit Method box
Select a fit method option to be applied to the exported clip.
| Select: | To: |
|---|---|
| Centre/Crop | Fit the source image, centred, over the destination frame. If the source is larger than the destination, it is cropped. If the source is smaller than the destination, it is surrounded by a black border. |
| Crop Edges | Fit one edge of the source into the destination frame without stretching or squashing the frame. Excess parts of the source frame after resizing are cropped. If the source—after the one edge is resized—is wider than the destination, its overhanging left and right edges are cropped. If the source is taller than the destination, the upper and lower edges are cropped. |
| Fill | Fit the source, width, and height, into the destination frame. If the source and destination frames do not have the same aspect ratio, the image can become distorted. |
| Letterbox | Fit the source to the destination frame without squashing or stretching it, and without cropping the source. If the source is wider than the destination, black bars fill the top and bottom of the destination frame. If the source is narrower than the destination, black bars fill the right and left sides of the frame. In all cases, the entire source frame is contained within the destination frame. |
Resize Filter box
Select the filter option to determine the quality of the interpolated resize result. The Resize Filter box is active only if Fit Method is set to Crop Edges, Fill, or Letterbox.
| Select: | To get: |
|---|---|
| Impulse | Quick, low-quality results. |
| Triangle | Moderate results with little processing overhead. |
| Mitchell | Best results when resizing a clip to a higher resolution. |
| Bicubic | Very good results for resizing soft-looking images. Use to sharpen the image. |
| Quadratic | Good results for resizing simple images with straight edges. Similar to Gaussian but with more blurring. Use to soften the image. |
| Gaussian | Excellent results when resizing a clip with no patterns and numerous straight edges to a lower resolution. Useful for softening some detail. |
| Shannon | Excellent results when resizing a clip to a lower resolution. Very similar to Lanczos, but results are a little softer. |
| Lanczos | Best results when resizing a clip containing a variety of patterns and elements to a lower resolution. It is the most complex with the longest processing time. |
Frame Width field
Displays the frame width of the selected clip. By clicking it you activate the field, allowing you to enter the frame width value that you want to use on export.
Frame Height field
Displays the frame height of the selected clip. By clicking it you activate the field, allowing you to enter the frame height value that you want to use on export.
Aspect Ratio Presets box
Select a standard frame aspect ratio. Select the Set to w:h option to set the clip to use square pixels. Select Custom to define a custom frame aspect ratio in the Aspect Ratio field.
Aspect Ratio field
Displays the aspect ratio defined by Aspect Ratio Presets. Editable.
Bit Depth box
Select a bit depth to be used on export. Some file formats support multiple bit depths. Bit Depth is active only when Resize is enabled.
Scan Mode box
Select an option to set the order in which the fields of interlaced material are scanned.
For interlaced material, you can specify whether the resize needs to be done from both fields or just from one of the two. In the latter case, the result is a progressive clip made from the same two fields.
| Select: | To resize: |
|---|---|
| From Clip | Using the scan mode of the source clip. |
| Progressive | A frame-based clip to another frame-based clip. |
| Field 1 | A clip by drawing Field 1 followed by Field 2. |
| Field 2 | A clip by drawing Field 2 followed by Field 1. |
Note that in the case of IMX exports, the Scan Mode box is ignored: NTSC clips are always exported as F2 dominant, while PAL clips are always exported as F1 dominant.
Audio Options Tab
Audio Format box
Select the audio format of the exported audio tracks. If Export Type is Movie, the audio is embedded within the video file. Any other Export Type outputs a separate audio file.
Audio Bit Depth box
Select the bit depth of the exported audio file.
Audio Compression field
Select the compression for the exported audio file. The available options depends on the Audio Format.
Audio Sample Rate box
Select the sample rate of the exported audio.
Audio Mixdown box
Select a mixdown to apply to the audio tracks, if any are included with the source clip.
| Select: | To mix down: |
|---|---|
| No Mixdown | Nothing |
| Mixdown As Is | With the current output strip assignments. |
| Mixdown To 4 tracks | To four tracks. The output strips are assigned sequentially in fours to the mixed-down channels (where M1 goes to 1, M2 to 2, M3 to 3, M4 to 4, M5 to 1, and so on). |
| Mixdown To Stereo | To one stereo track. The output strips are assigned sequentially in twos to the mixed-down channels (where M1 goes to 1, M2 to 2, M3 to 1, M4 to 2, and so on). |
| Mixdown To Mono | To one mono track. |
Filename field
Displays the result of the pattern displayed in the Filename Pattern field. Non-editable.
Filename Pattern field
Displays how to name the exported media files. Build a dynamic naming scheme using Add Token and characters normally allowed in a file name. Create folder structure using / . The file extension is automatically appended. Add '#' to numerical tokens to define padding. Editable.
Add Token box
Inserts a token in the Pattern field to build a dynamic filename.
Clip Options Tab
Copy Exported Clip in Media Library button
Enable to automatically create a copy of the exported clip in the Media panel, linked to the exported media files. Available when performing a Sequence Publish with a File Sequence, with no resize or bit depth change.This is similar to importing back the exported media with Cache Source Media disabled.
Create Clip Data button
Enable to create a .clip file for the exported sequence. A .clip contains extended metadata about the exported sequence, and enables versioning. The name of the .clip appears in the Filename field.
Clip Versions button
Enable to version the exported sequence. This allows you to track revisions to the sequence.
Clip Filename field
Name of the .clip created for the sequence. It displays the result from the Pattern field below.
Clip Filename Pattern field
The pattern used to name the .clip created for the sequence. Use the Add Token box to use pre-defined tokens to build the name.
Create Shot Setup button
Enable to export a batch setup and a .clip file for every segment with a shot name in the exported sequence. Only segments with non-empty Shot Name generate an associated .batch and .clip. For Shot Publish exports.
Shot Setup Filename field
Example of the names given to the shot setup created each segment with a shot name. It displays the result from the Pattern field below.
Shot Setup Pattern field
The pattern used to name each shot setup file. Use the Add Token box to use pre-defined tokens to build the name.
Shot .Clip Filename field
Example of the names given to the shot .clip created each segment with a shot name. It displays the result from the Pattern field below.
Shot .Clip Pattern field
The pattern used to name each shot .clip file. Use the Add Token box to use pre-defined tokens to build the name.
Output Path field
Example of an output path and name used by the Write File node of a generated Batch setup. Displays the result of the Pattern field below.
Output Path Pattern field
The pattern used to create the Output Path to ensure that the Write File node of each generated Batch setup uses a different path and name. Use the Add Token box to use pre-defined tokens to build the path.
Create Batch button
Enable to create a Batch Group for each shot, back in the application at the location set in the Batch Group Path field.
Batch Group Path field
Location in the application's Workspace where the Batch Group is created. Enabled by Create Batch.
Create Clip Nodes button
The type of media nodes created in the Batch Setup.