To Edit Snapshot Views
Independent snapshot views are fully editable. Editing of linked snapshot views is limited to camera changes.
For linked snapshot views, all model and camera changes are stored on a storyboard timeline. For independent snapshot views, no editing history is available, so previous changes of the model and camera cannot be edited.
To Rename a Snapshot View
In the Snapshot Views panel, right-click the view, and click Rename. Then enter new name.
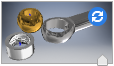
To Update a Linked Snapshot View
When edits in a storyboard affect a linked snapshot view, the view is marked as out-of-date. To update the linked view, in the Snapshot Views panel, click the refresh icon in the top right corner of the view thumbnail image.
To Change Camera Position for a Snapshot View
- In the Snapshot Views panel, right-click the view, and click Edit. The snapshot view opens in the Edit View environment.
- Use navigation tools to display the desired view of the model.
- On the ribbon, click Presentation tab
 Edit View panel Update Camera.
- To exit the Edit View mode, on the ribbon, click Presentation tab Edit View panel Finish Edit View
 .
.
To Edit Component Properties for an Independent Snapshot View
In the Snapshot Views panel, right-click the view, and click Edit. The snapshot view opens in the Edit View environment.
To move or rotate components, on the ribbon, click Presentation tab
Component panel Tweak Components. 
To change visibility for a component, right-click the component in the browser or graphic window, and click Visibility.
To set opacity for a component, select the component, and then on the ribbon, click Presentation tab
Component panel Opacity. 
On the Opacity mini toolbar, use the Opacity slider to set the desired opacity value, and then click OK.
To exit the Edit View mode, on the ribbon, click Edit View tab
Exit panel Finish Edit View .
To Edit Component Properties for a Linked Snapshot View
To edit component positions, visibility, or opacity for a linked snapshot view, edit actions on the storyboard timeline the view is linked to.
When you open a linked snapshot view in the Edit View mode, and start editing component settings, a warning message displays. Choose one of the following steps to continue:
- Click Cancel to cancel the editing operation, leave the Edit View mode, and finish the edits on the animation storyboard the view is linked to.
- Click Break Link to convert the view to a fully editable independent view, and continue the edits. A broken link between a snapshot view and a storyboard timeline cannot be restored.
To Use Storyboard to Edit a Linked Snapshot View
In the Snapshot View panel, select the snapshot view to edit.
The link mark on the snapshot view thumbnail is highlighted.
Locate the linked snapshot view on a storyboard timeline. A highlighted snapshot view mark shows the position of the snapshot view.
Change actions included in the snapshot view:
Edit actions finished or started before the snapshot view mark on the timeline.
Move the playhead before the snapshot view position, and create tweak, visibility, or opacity actions.
Move the snapshot view mark to another point on the storyboard timeline. The model and camera settings stored in the snapshot view change to respect actions finished or started before the snapshot view mark.
Tip: To preview the model and camera settings corresponding to specific points on the timeline, move the playhead along the timeline.
After you finish the edits in the storyboard, update the linked snapshot view. In the Snapshot View panel, click the
 Update View icon in the top right corner of the view thumbnail image. All edits are propagated from the storyboard to the snapshot view.
To Delete a Snapshot View
In the Snapshot Views panel, right-click the view, and click Delete.