To Move or Rotate Components in a Presentation
Create component tweaks to move or rotate parts.
As you tweak components there are several options for committing the tweak and continuing the tweak process. You can:
- Switch between the Move and Rotate tweak types
- Change the selection set, either adding or deleting
- Change the move or rotate direction
- Move the playhead in the timeline
- Click OK
To Create Tweaks
Select one or more components and then activate the tweak command. The tweak triad appears on the component selected first. That location can be changed. When multiple components are tweaked at the same time, that is referred to as a tweak group. The components are not grouped in the timeline.
Changes to component position, orientation, opacity, and visibility are represented in the timeline as actions.
Select or create a storyboard to add the tweaks to.
 To create a storyboard, click Presentation tab
  Workshop panel New Storyboard. Then specify the storyboard type, and click OK.
If appropriate, move the playhead to the desired position on the timeline to specify start time of the tweak actions.
On the ribbon, click Presentation tab
Component panel Tweak Components.  Note: You can also right-click the component you want to tweak and click Tweak Components in the marking menu.
Select a component in the graphics window. The tweak triad displays using the component Local UCS
 . You can choose to use the World (Presentation) UCS
  or define a different direction.
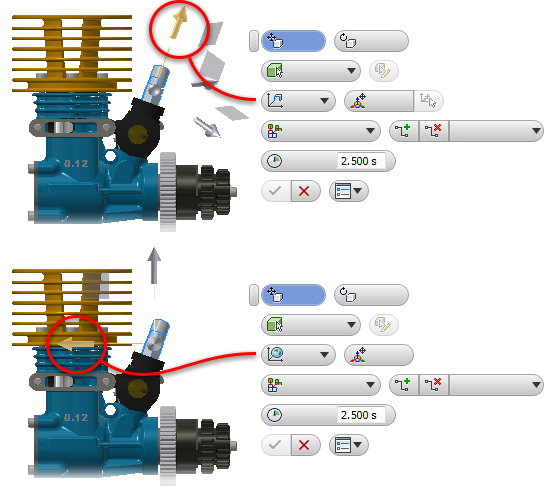 Note: To define a different tweak direction, in the Tweak mini toolbar, click
 Locate and select a face or edge to redefine the vector.
To add components to the selection, hold the Ctrl key, and select more components to tweak. To use Add/Remove Component, first start the tweak motion - distance or angle. Then, Add/Remove Component enables and you add to the selection by clicking more components.
Select the tweak type. On the Tweak Components mini toolbar, click Rotate to create a rotational tweak, or click Move to create a translational tweak.
To create trail lines, on the Tweak Components mini toolbar, select a trail option from the list. All Components is selected by default.
Use the triad manipulators and the mini toolbar to tweak the selected components.
To move
 or rotate
  the selected components to the desired position, drag a triad arrow, plane, sector, or the origin point.
To specify precise tweak distance or angle, in the mini toolbar, enter a value in the edit box.
To change the type of components participating in the current tweak, click
 Part or
  Component.
Drag the selected component to enable the Add/Remove Components command, then click
 and select more components. To remove components from the selection, use CTRL+click and select the component to remove.
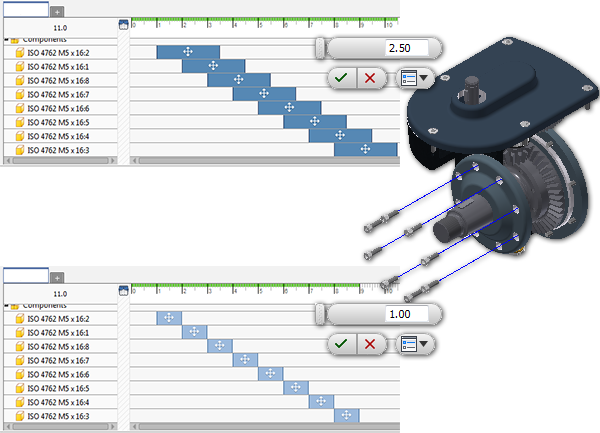
To specify duration of tweak actions added to the storyboard, edit the Duration value.
When finished, click OK to finish the command.
Tweaks are saved both to the storyboard and to the browser.
Tweak Selection
You can select and edit individual tweaks, multiple unrelated tweaks, select members of tweak groups, or all members of a tweak group. Various methods of selection include:
- Individual selection
- Ctrl+click to add to a selection set
- Select All methods that enhance working in the timeline.
Using Select All Before, After, or Group
You can select all actions occurring before or after the playhead position or another action. You can also select all actions in a Group tweak.
Playhead
- Position the playhead in the timeline.
- Right-click the playhead and click Select All Before or All After. All actions matching the select criteria are selected.
- Make your modifications.
Action
- Right-click the action that serves as the selection limit and click Select All Before or All After. All actions matching the select criteria are selected. Note, the select actions use the beginning of the selected action. For All After, this results in the selected action being included in the select set.
- Or, if selecting a group tweak, right-click and click Select Group. All components participating in the group tweak are selected.
- Make your modifications.
To Edit a Tweak
You can edit individual tweaks or multiple tweaks at the same time.
To edit a tweak using the mini toolbar:
- In the storyboard timeline, right-click a tweak,
 Move or
  Rotate.
 - In the graphic window, right-click a trail line that belongs to the tweak you want to edit.
- In the browser, expand the Tweaks folder to display a list of tweaks. Right-click a tweak.
Note: The Tweaks list in the browser is filtered based on the current context. When you work with an animation storyboard, only tweaks belonging to the storyboard are displayed. When you edit a snapshot view, only tweaks that belong to the snapshot view are displayed.- In the storyboard timeline, right-click a tweak,
Right-click and click Edit Tweak. You can double-click a browser tweak node or trail to edit the tweak. Where the selected tweak is a part of a tweak group, all tweaks from the group are selected and edited.
The related components and trail lines are highlighted in the graphic window.
Note: To edit Duration, right-click the tweak timeline instance and click Edit Time.Use the Tweak mini toolbar to change the properties of the tweak. You can change:
- Tweak distance or angle
- Add or remove components participating in the tweak
- Select a different Trail Lines option to add or remove trail lines
Tip: Drag the endpoint of a trail line to change the tweak distance or angle directly in the graphic window. For tweaks participating in a tweak group, the new distance or angle is applied to all tweaks in the group.Click OK to save your edits and finish the command.
To edit the duration of an existing tweak, use the storyboard editing methods or right-click the timeline instance and click Edit Time. Editing time for any tweak action is independent of groups.
Your can:

- Drag multiple move actions in the timeline
- Edit the start, end, or duration of multiple actions
- Align the start or end time for actions and more
You can edit using the context menu or the timeline manipulators.
In the following example the duration is edited for multiple actions. The actions do not require identical values to be edited this way.
Delete Tweaks
You can delete a tweak, affecting all participating components, or you can delete a component from a tweak, effectively, removing the component from the tweak.
To delete a tweak for all participating components:
- In the model browser, right-click a tweak node and select Delete.
To delete a component from a tweak:
- In the model browser, expand the tweak folder, right-click the component you are removing and select Delete Tweak. You can delete the current tweak or the whole group.
- In the storyboard panel, right-click the component and click Delete Actions. All tweaks for that component are deleted returning the component to its original position.
- In the storyboard timeline, right-click a tweak instance, or , and select Delete. You can delete the current tweak or the whole group.