Using Tangent Wave Control Surfaces
The Tangent Wave and Tangent Wave 2 control surfaces is designed to improve interactivity when colour grading film and video footage. You can accomplish all of the main grading tasks you do in the Lustre user interface using the Tangent Wave Control Surface. Its size makes it perfect for On Set grading tasks.
Modules Description
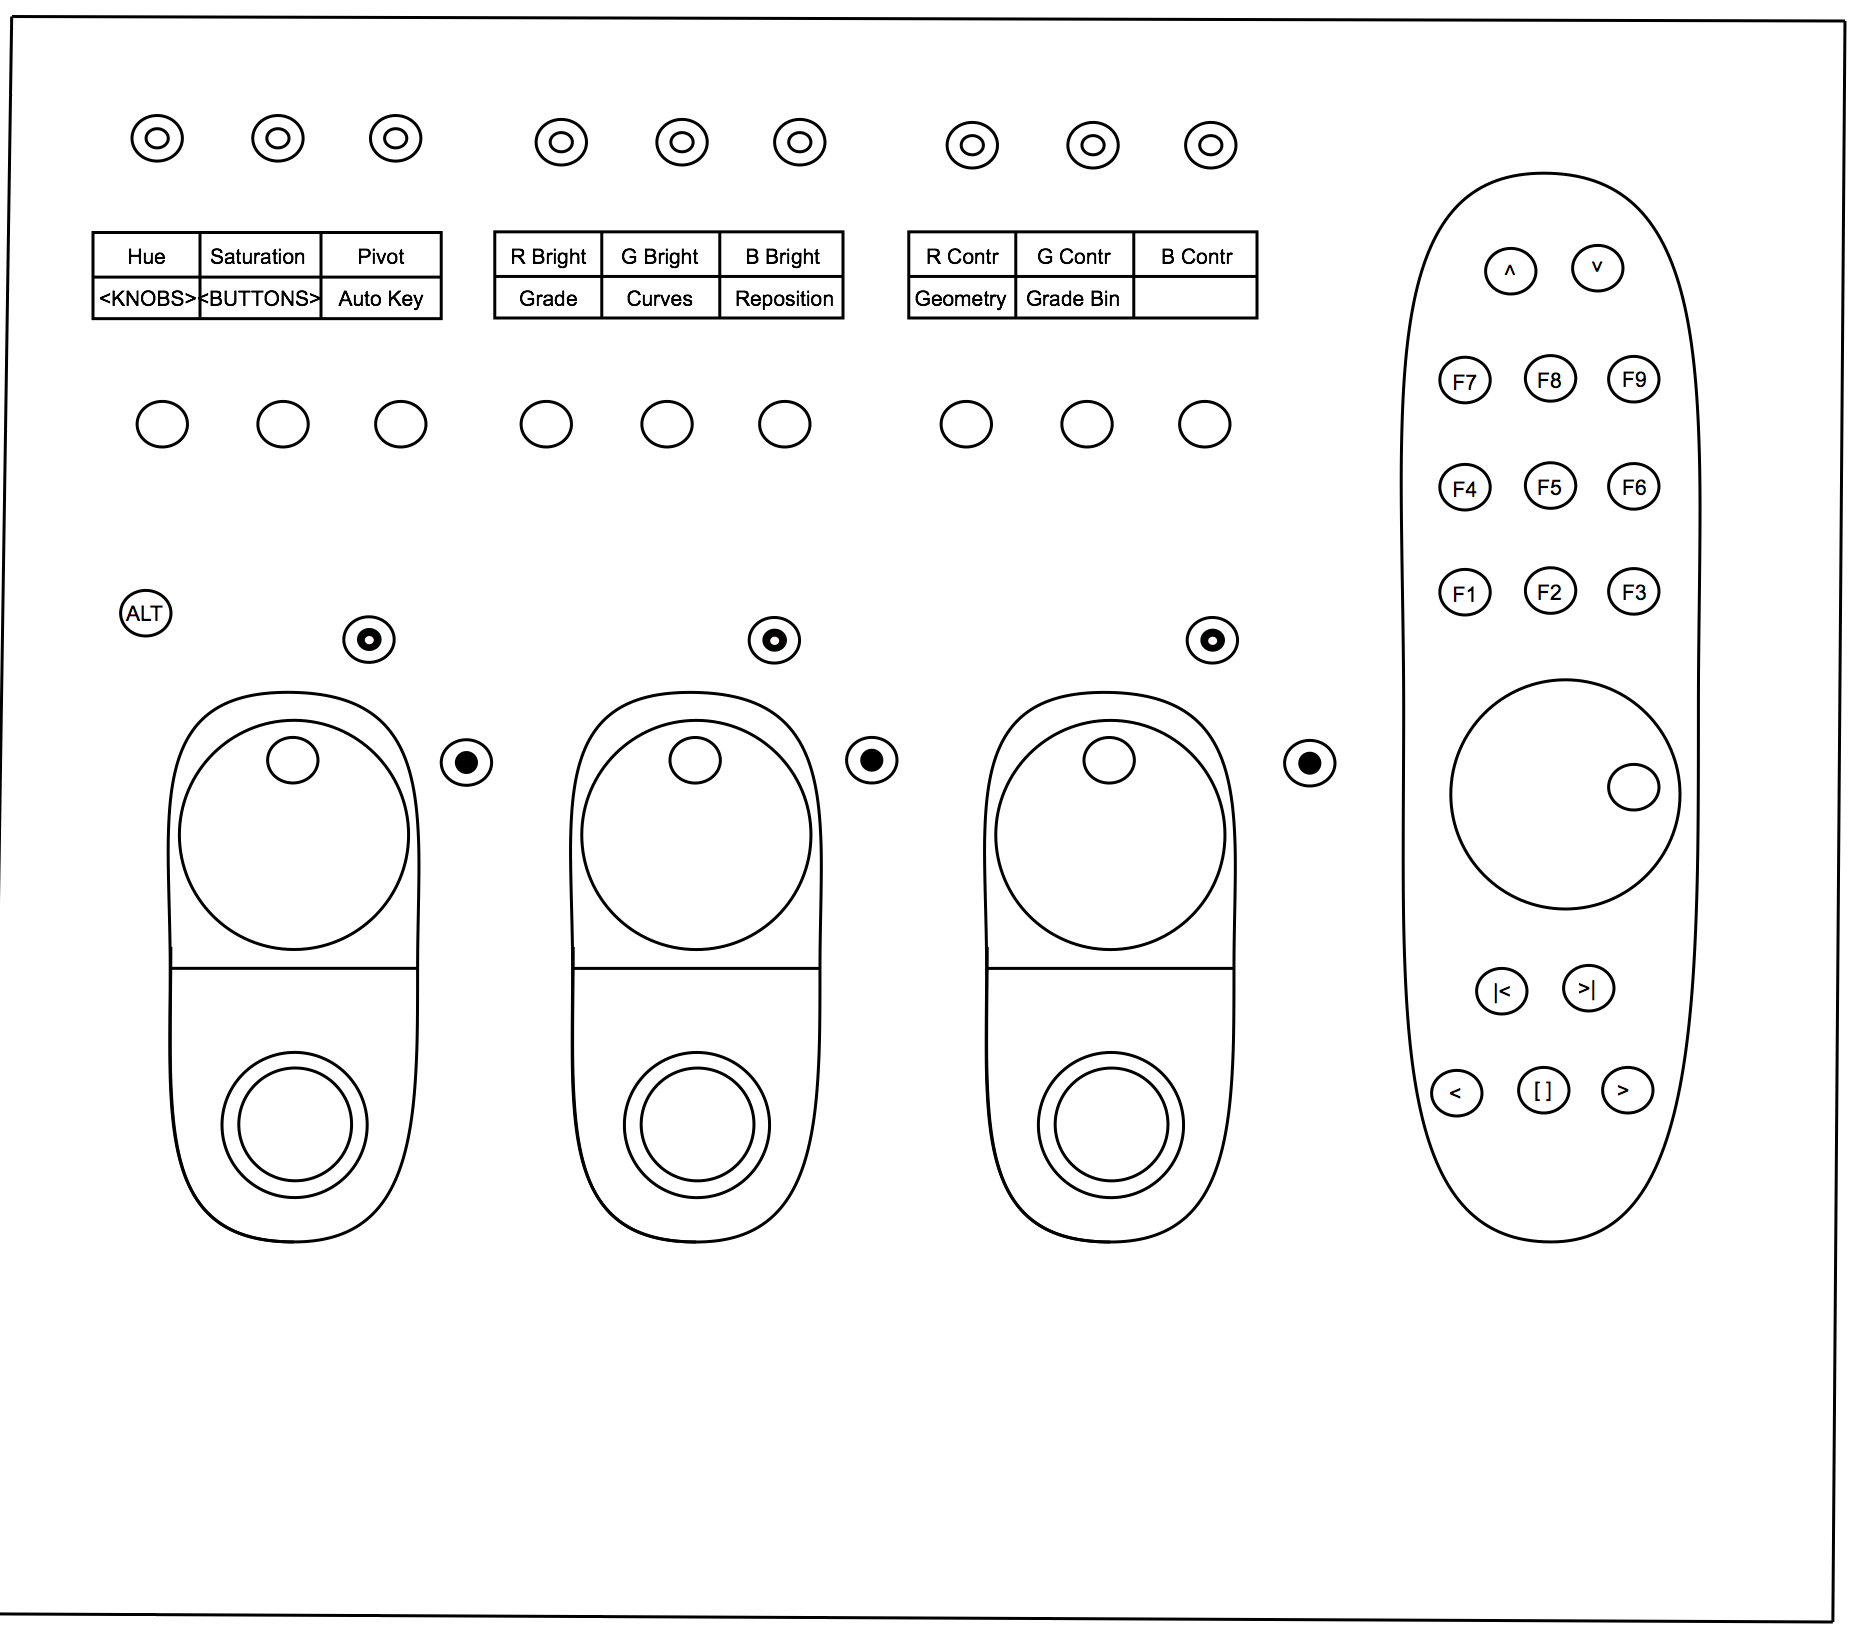
The Tangent Wave is composed of a single modules with knobs, buttons, trackballs a keypad and navigation controls.
For advanced customization, the 32 buttons, the 9 knobs, the 3 trackballs and the navigation wheel can be redefined with the Tangent Mapper application. See Tangent Mapper section for more details.
Visit http://www.tangentwave.co.uk/products/ for more details.
Modes
The basic Tangent Wave workflow is mode based. This means that you set the appropriate mode for the grading tasks you wish to accomplish and the knob, button and trackball functions are dynamically updated.
Each mode consists of multiple pages of parameters that can be cycled through.
To select a mode, press the appropriate button on the Navigation module, as indicated on the module's screen (first row of buttons).
The following modes are supported by the Tangent Wave Control Surface:

If you press the <BUTTONS>, the available controls of the selected mode will be displayed. You can also press the Modes button to go back to the first page of buttons.
If you press the
On the first page of buttons, you also have access to Auto Key mode.
Grade Mode (Linear and Logarithmic)
The available functions in this mode correspond to those in the Colour/Grading menu in the application.
By default, the control surface is in Grade Mode (Linear or Logarithmic, according to your project settings).
Curves Mode
The available functions in this mode correspond to those in the Colour/Grading menu in the application.
Reposition Mode
The available functions in this mode correspond to those in the Image/Reposition menu in the application.
Geometry Mode
The available functions in this mode correspond to those in the Colour/Secondaries menu in the application.
Grade Bin mode
When Grade Bin mode is enabled, it is possible to navigate the grade bin to Load or Save grading decisions.
Grading mode (Linear architecture)
The nine knobs located at the top of the module allow modifying the grading decisions of the current shot with the following controls:
Page 1
- R Lift: Modify the lift of the red channel.
- G Lift: Modify the lift of the green channel.
- B Lift: Modify the lift of the blue channel.
- R Gamma: Modify the gamma of the red channel.
- G Gamma: Modify the gamma of the green channel.
- B Gamma: Modify the gamma of the blue channel.
- R Gain: Modify the gain of the red channel.
- G Gain: Modify the gain of the green channel.
- B Gain: Modify the gain of the blue channel.
Page 2
Hue: Modify the hue value (for Secondary only)
Contrast: Modify contrast value.
Saturation: Modify the saturation value.
Black Clip: Modify the black clip value.
White Clip: Modify the white clip value.
LiftCtOff: Modify the lift cutoff value.
GamCtOff: Modify the gamma cutoff value.
GainCtOff: Modify the gain cutoff value.
If you hold the ALT button, the Black Clip / White Clip knobs are replaced with the following controls:
Black Ref: Modify the black reference value.
White Ref: Modify the white reference value.
The three trackballs and rings allow modifying the grading decisions of the current shot with the following controls:
Master Lift / Gamma / Gain (from left to right)
Lift:
Move the ring left or right to modify the lift of the luminance channel.
Move the trackball right, left, up or down to modify the lift range colour values.
Gamma
- Move the ring left or right to modify the gamma of the luminance channel.
- Move the trackball right, left, up or down to modify the gamma range colour values.
Gain
- Move the ring left or right to modify the gain of the luminance channel.
- Move the trackball right, left, up or down to modify the gain range colour values.
To reset the trackballs and rings, press the buttons located on top of each trackball:
- Reset trackball (dot button)
- Reset ring (ring button)
Hold the ALT button to use the alternate mode (Precise or Turbo) for all controls on the Grading panel. You can also double press on the ALT button to lock the alternate mode for all controls.
Grading mode (Log architecture)
The nine knobs located at the top of the module allow modifying the grading decisions of the current shot with the following controls:
Page 1
Hue: Modify the hue value (for Secondary only)
Saturation: Modify the saturation value.
Pivot: Modify the pivot value.
R Bright: Modify the brightness of the red channel.
G Bright: Modify the brightness of the green channel.
B Bright: Modify the brightness of the blue channel.
R Contrast: Modify the contrast of the red channel.
G Contrast: Modify the contrast of the green channel.
B Contrast: Modify the contrast of the blue channel.
Page 2
- LiftCtOff: Modify the lift cutoff value.
- GamCtOff: Modify the gamma cutoff value.
- GainCtOff: Modify the gain cutoff value.
- Midtones: Modify the Midtone level.
- Midtones: Modify the horizontal value of the Midtone Colour Wheel.
- Midtones: Modify the vertical value of the Midtone Colour Wheel.
- Highlights: Modify the Highlight level.
- Highlights: Modify the horizontal value of the Highlight Colour Wheel.
- Highlights: Modify the vertical value of the Highlight Colour Wheel.
The three trackballs and rings allow modifying the grading decisions of the current shot with the following controls:
Page 1 Shadow / Contrast/ Brightness (from left to right)
Shadow :
Move the ring left or right to modify the luminance of the low range colour values.
Move the trackball right, left, up or down to add colour to low range colour values.
Contrast
- Move the ring left or right to modify the luminance of the contrast ratio.
- Move the trackball right, left, up or down to add colour to the contrast ratio.
Brightness
- Move the ring left or right to modify the luminance of the brightness channel.
- Move the trackball right, left, up or down to add colour to the brightness channel.
To reset the trackballs and rings, press the buttons located on top of each trackball:
- Reset trackball (dot button)
- Reset ring (ring button)
Hold the ALT button to use the alternate mode (Precise or Turbo) for all controls on the Grading panel. You can also double press on the ALT button to lock the alternate mode for all controls.
Grading Location
On page 2 of the buttons row, you can decide on which location the grading decisions will be made on. You also have access to the Set key function.
In Primary
Enable input primary grading mode.
OutPrimary
Enable output primary grading mode.
Secondary
Press to set the Keypad to display the Secondaries.
Inside
When a Shape or a Key is defined on a Secondary, press Inside to affect the region located inside of the isolation. You can also double-press Inside to temporary disable the grading decisions. Double-press Inside to re-enable the grading decisions.
Outside
When a Shape or a Key is defined on a Secondary, press Outside to affect the region located outside of the isolation. You can also double-press Outside to temporary disable the grading decisions. Double-press Inside to re-enable the grading decisions.
Keypad
Use the Keypad to enable or disable a Secondary or Load / Save Grade Bin.
- F7: enable/disable Sec 1
- F8: enable/disable Sec 5
- F9: enable/disable Sec 9
- F4: enable/disable Sec 2
- F5: enable/disable Sec 6
- F6: enable/disable Sec 10
- F1: enable/disable Sec 3
- F2: enable/disable Sec 7
- F3: enable/disable Sec 11
You will need to use the user interface to have access to Secondaries 4, 8 and 12.
Utilities
On page 3 of buttons, you have access to the following Utilities:
- SetKeyAll: Set a keyframe at the current position on all channels.
- Modes: Press to go back to page 1 of buttons for Modes selection.
- Save All: Save cut and grade.
- Bypass: Single press to bypass the current page of controls. Double press to bypass all pages of controls.
- Reset: Press reset to reset the current page of controls. Double press to reset all pages of controls.
- Undo: Undo the last operation performed.
- Redo: Redo the last operation performed.
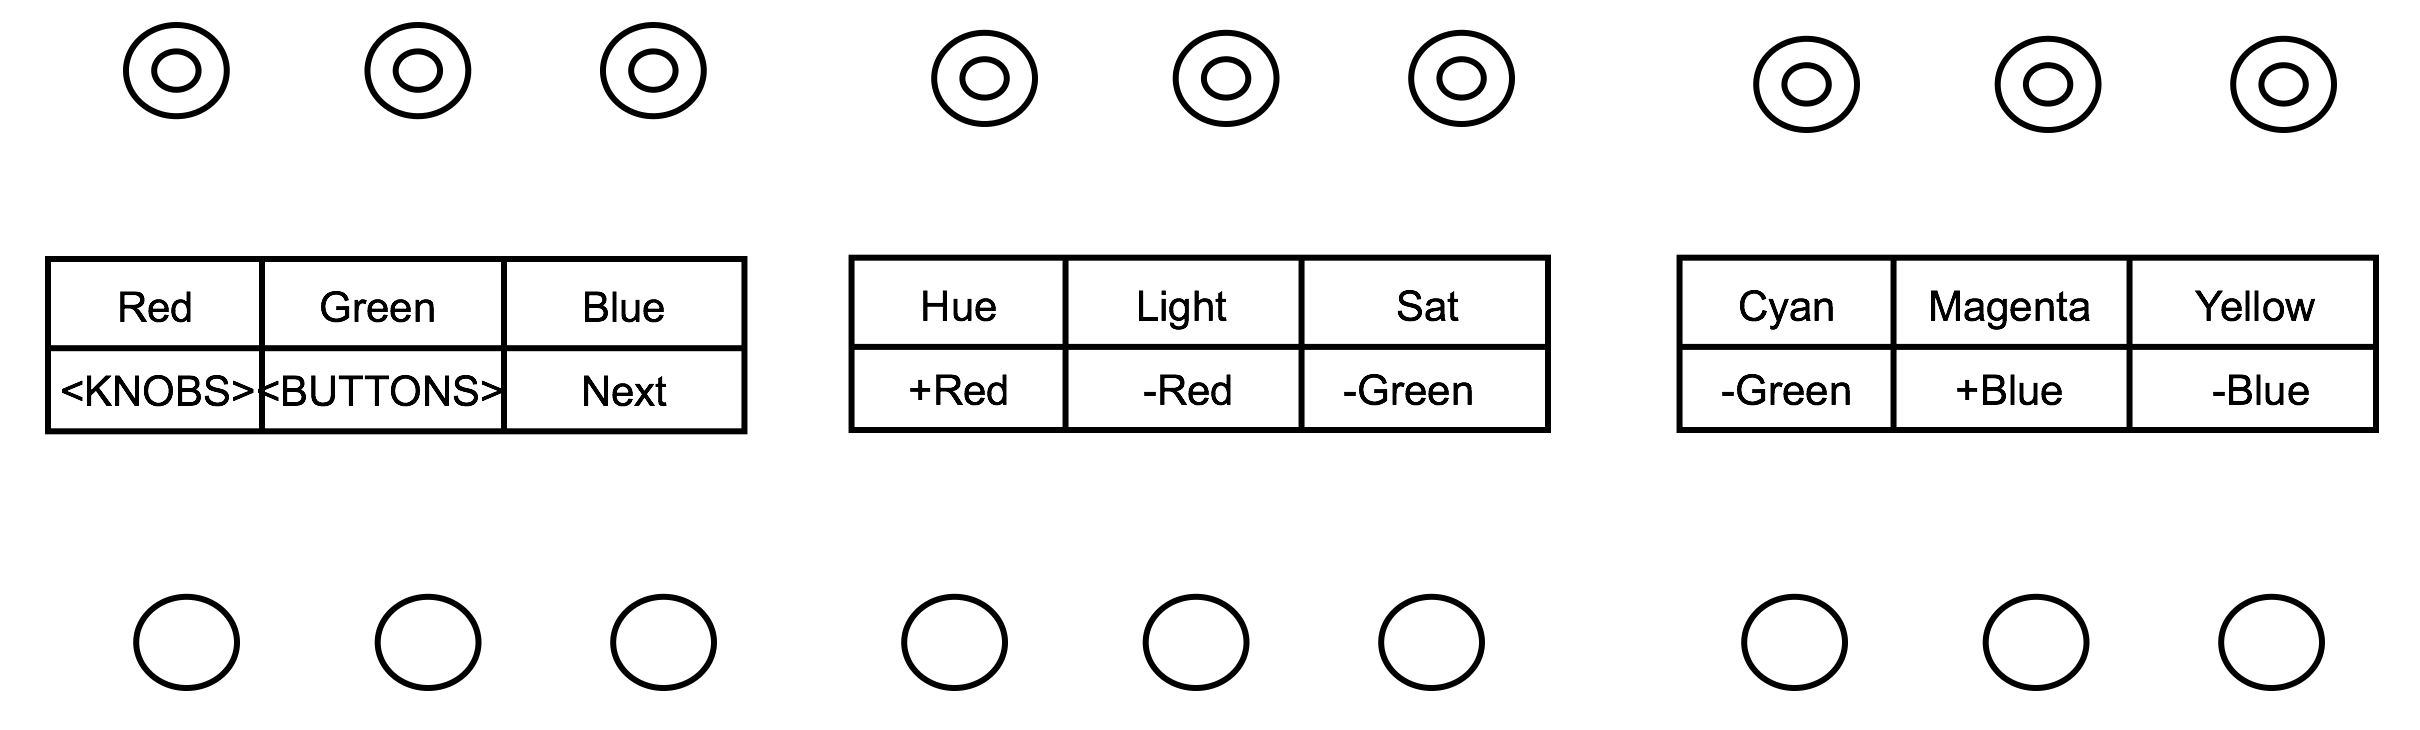
Printer Lights grading mode
In both Linear and Log architecture modes, it is possible to use the Wave panel to grade in Printer Lights grading mode. Navigate to page 4 using the <BUTTONS> and the following controls will be available:
Page 1
- Next: press to navigate to the second page of Printer Lights controls
- +Red: Increase red brightness (log) or Lift (linear) by one step.
- -Red: Increase red brightness (log) or Lift (linear) by one step
- +Green: Increase green brightness (log) or Lift (linear) by one step.
- -Green: Increase green brightness (log) or Lift (linear) by one step.
- +Blue: Increase blue brightness (log) or Lift (linear) by one step.
- -Blue: Increase blue brightness (log) or Lift (linear) by one step.
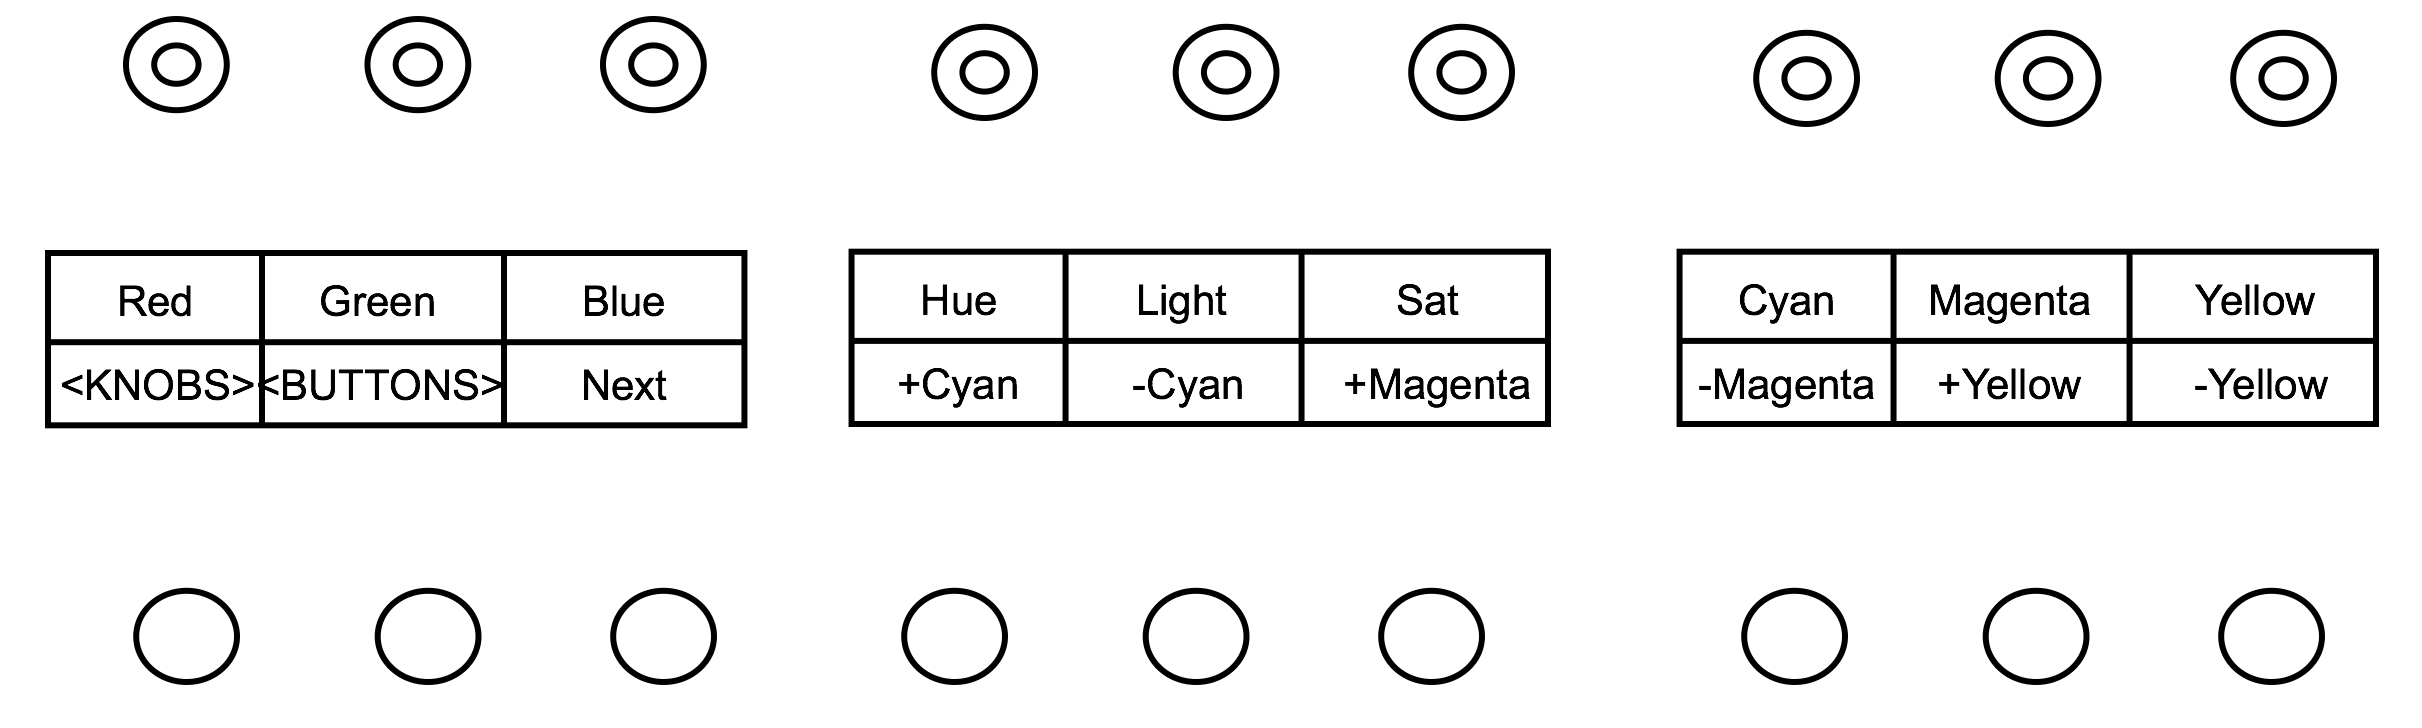
Hold ALT to access Cyan, Magenta and Yellow Printer Lights controls:
- +Cyan: Increase cyan brightness (log) or Lift (linear) by one step.
- -Cyan: Increase cyan brightness (log) or Lift (linear) by one step.
- +Magenta: Increase magenta brightness (log) or Lift (linear) by one step.
- -Magenta: Increase magenta brightness (log) or Lift (linear) by one step.
- +Yellow: Increase yellow brightness (log) or Lift (linear) by one step.
- -Yellow: Increase yellow brightness (log) or Lift (linear) by one step.
Page 2
(press Next to access page 2)
- +Bright: Increase overall brightness by one step (log)
- -Bright: Decrease overall brightness by one step (log)
- +Lift: Increase Lift by one steps (Linear).
- -Lift: Decrease Lift by one steps (Linear).
- Reset: Reset Printer Lights
- Undo: undo the last modification
- Redo: redo the last modification.
Curves mode
When Curves mode is enabled, the nine knobs located at the top of the module are set to the Curves.
- Red: Adjust the red point on the hue, lightness or saturation curve, according to the selected curve.
- Green: Adjust the green point on the hue, lightness or saturation curve, according to the selected curve.
- Blue: Adjust the blue point on the hue, lightness or saturation curve, according to the selected curve.
- Hue: Press on the knob to enable the hue curve. Turning the knob left or right will raise or lower the Hue across the entire spectrum.
- Light: Press on the knob to enable the lightness curve. Turning the knob left or right will raise or lower the lightness across the entire spectrum.
- Sat: Press on the knob to enable the saturation curve. Turning the knob will raise or lower the saturation across the entire spectrum.
- Cyan: Adjust the cyan point on the hue, lightness or saturation curve, according to the selected curve.
- Magenta: Adjust the magenta point on the hue, lightness or saturation curve, according to the selected curve.
- Yellow: Adjust the yellow point on the hue, lightness or saturation curve, according to the selected curve.
If you press the
- L-S: Press on the knob to enable the lightness - saturation curve. Turning the knob left or right will raise or lower the lightness - saturation across the entire spectrum.
- Shadows: Adjust the shadows point on the lightness - saturation curve.
- Midtones: Adjust the midtones point on the lightness - saturation curve.
- Highlights: Adjust the highlights point on the lightness - saturation curve.
Hold ALT to access Cyan, Magenta and Yellow Curves controls:
if you press <BUTTONS>, the second page of Curves controls is displayed.
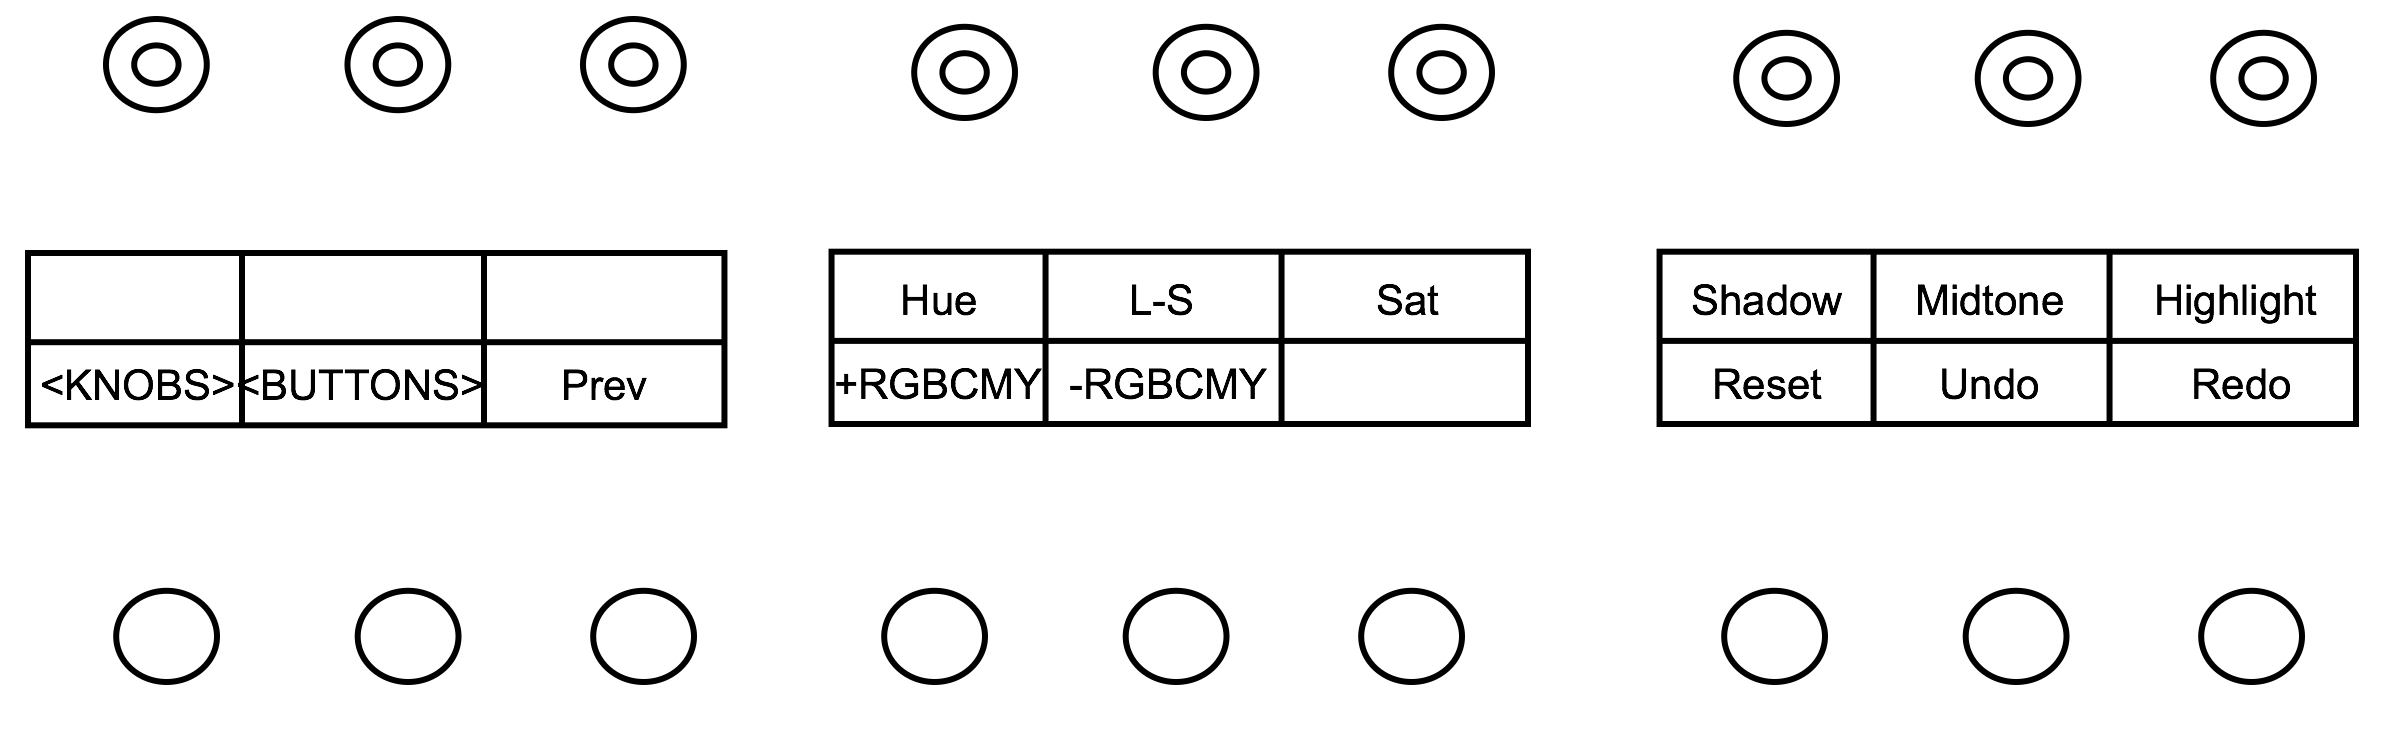
- +RGBCMY: Move up the RGBCMY points
- -RGBCMY: Move up the RGBCMY points
- Reset: Reset the current curve.
- Undo:Undo the last operation performed.
- Redo:: Undo the last operation performed.
Reposition mode
The Reposition mode allows changing the size and appearance of the image.

Reposition controls:
Pos X: Move your image on the X axis.
Pos Y: Move your image on the X axis.
Rotate: Rotate your image.
Scale: Scale your image in X.
Aspect: Scale your image proportionally.
Flip: press to Flip the image
Flop: press to Flop the image
FlipGeom: press to Flip the Shapes
FlopGeom: press to Flop the Shapes
Geometry mode
When a Secondary is activated, it is possible to navigate to the Geometry mode to create shapes. The Function panel will display the available functions.
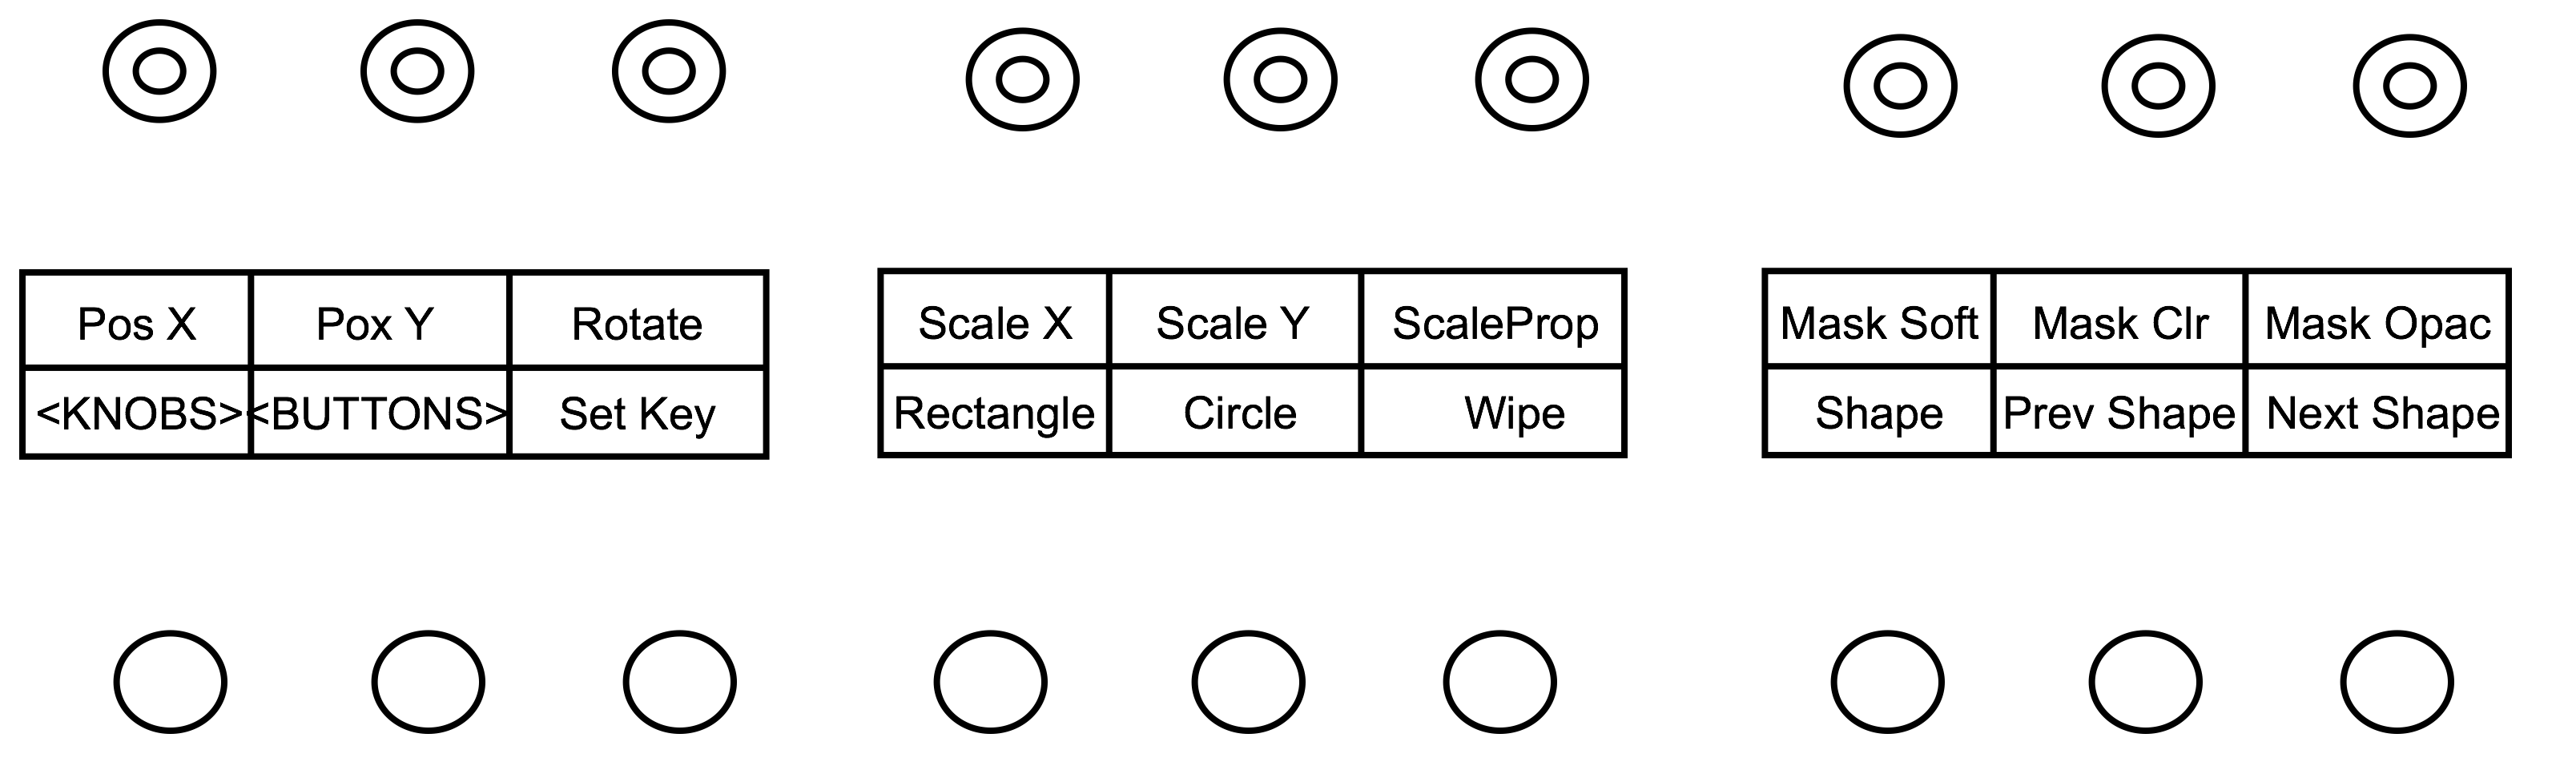
Geometry controls (knobs)
- Pos X: Move your geometry on the X axis.
- Pos Y: Move your geometry on the Y axis.
- Rotate: Rotate your geometry.
- Scale X: Scale your geometry in X.
- Scale Y: Scale your geometry in Y.
- ScaleProp: Scale your geometry proportionally.
- Mask Soft: Set the level of mask softness.
- Invert: Press the knob to invert the Matte of the Shape
- Show: press to toggle Show On/Off
Press
- Mask Clr: Set the level of mask colour.
- Mask Opac: Set the level of mask opacity.
Press <BUTTONS> to access the Geometry controls (buttons)
- Rectangle: Press to create a Rectangle shape
- Circle: Press to create a Circle shape
- Wipe: Press to create a Line shape
- Shape: Press to create a custom shape
- Prev Shape: Navigate to the previous shape in the scene
- Next Shape: Navigate to the next shape in the scene
Grade Bin mode
When Grade Bin mode is selected, the navigation ring allows to navigate the grade Bin. Use the Keypad to select the Grade Bin container to load the Grade Bin from. If you double press one of the F key, the Grade Bin slot matching the keypad will be loaded.
Hold ALT button to enter Save Grade Bin mode. Double pressing one of the F key will save the grade of the current shot in the Grade Bin at the matching Grade Bin slot.
Double pressing ALT button enable the alternate mode. Double pressing it again disable it.
Navigation
Use the following buttons and controls to navigate your sequence.
Ring
Use the ring to shuttle the sequence. Hold Alt to Zoom the viewport.
<-
Backward Play button. Holding Stop button while pressing this button moves the positioner backward by one frame in your sequence..
[]
Stop the playback.
->
Forward Play button. Holding Stop button while pressing this button moves the positioner forward by one frame in your sequence.
I←
Navigate to the previous shot in your sequence.
→I
Navigate to the next shot in your sequence.