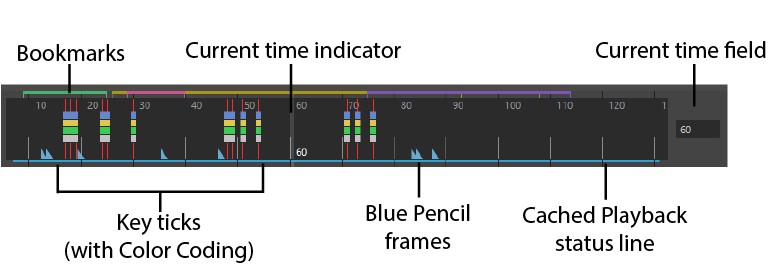
The Time Slider controls the playback range, keys, and breakdowns within the playback range.

- Right-click the Time Slider to access the Animation controls menu, which has options for many elements of the Time Slider.
- Resize the Time Slider to make it taller or more compact by hovering over the top edge of the
Time Slider until the splitter cursor
 appears and dragging it up or down. To reduce the sensitivity or disable the Time Slider splitter bar cursor, see the related sections in the
Customize the Time Slider topic.
Current Time Indicator

Dragging the Current Time Indicator on the Time Slider
The Current Time Indicator is a gray block on the Time Slider. You can drag it to move forward and backward in your animation.
Right-click the Time Slider to access the Animation controls menu, which provides easy access to common operations.
Key ticks
Key Ticks are red (by default) marks in the Time Slider that represent the keyframes you set for the selected object. When keys are selected, they appear white while highlighted blue (see Selecting keys on the Time Slider for an example). Breakdown keys are a special type of key displayed as green marks in the Time Slider.
Set a key on a selected object by pressing s. See Set Keys and Keyframe Animation for more about keying.
- Selecting keys on the Time Slider
- If you need to select a range of keys on the Time Slider, such as when you work with
Time Slider Bookmarks,
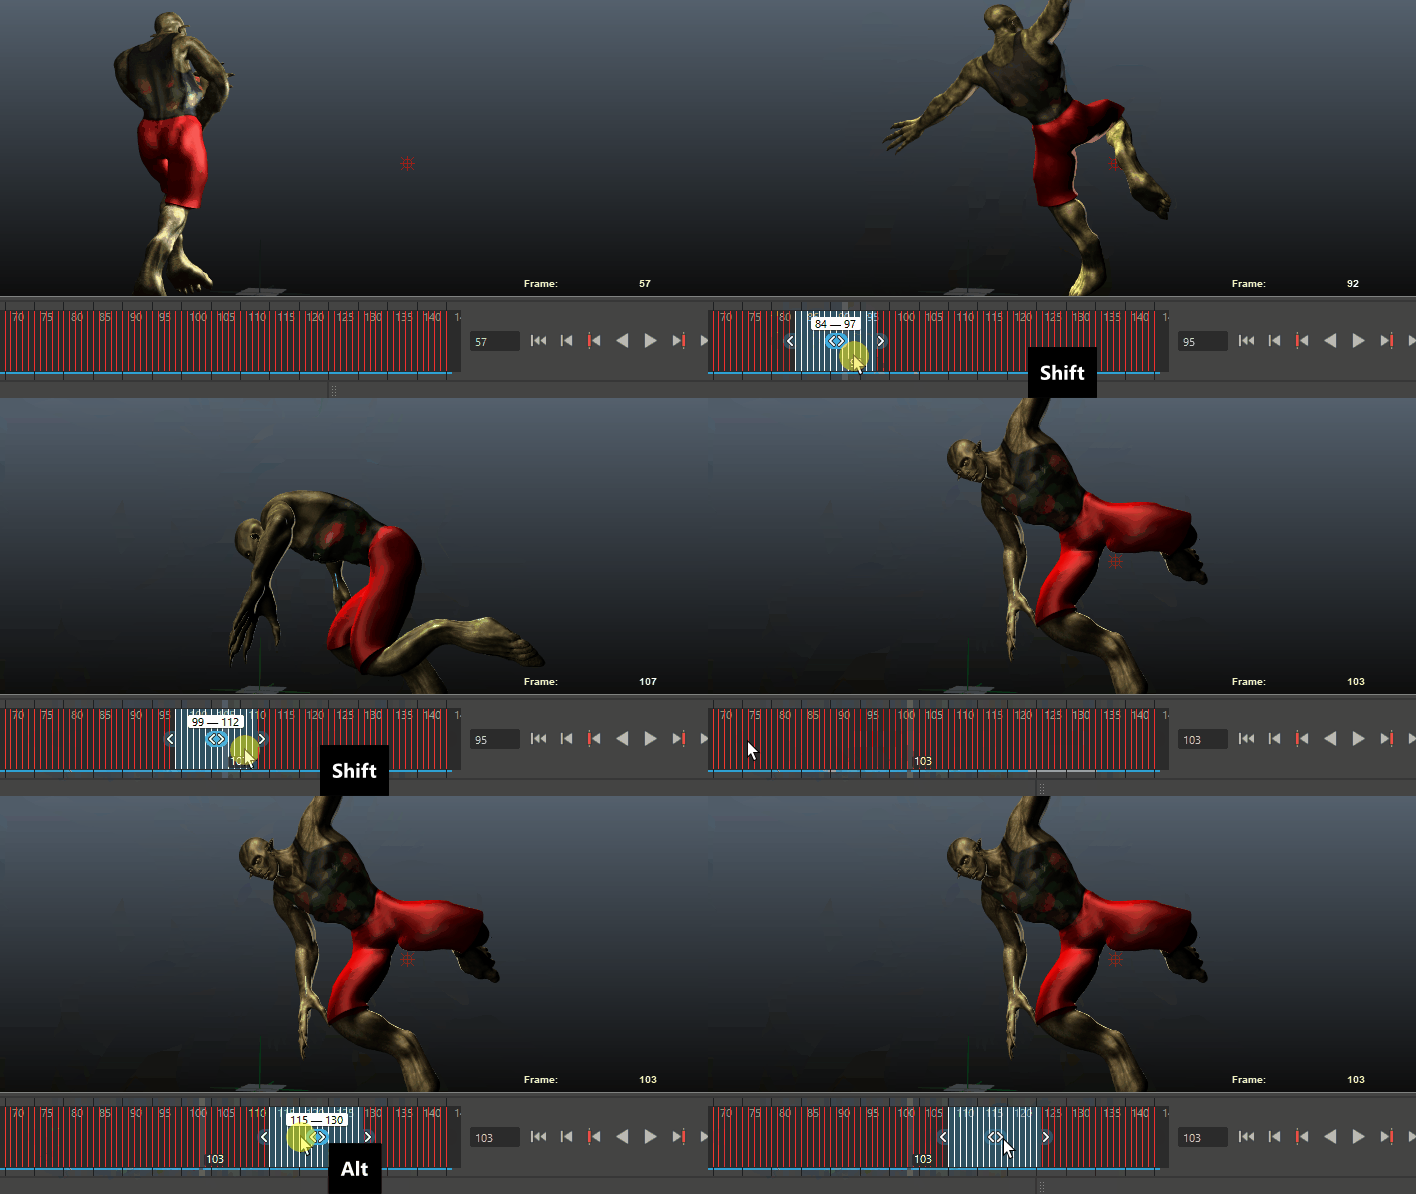
Shift + drag across the Time Slider. You can move the keys as long as the drag cursor
 is highlighted.
Ctrl + drag to copy keys. See
Edit keys.
 Tip: The Viewport updates when you Shift + drag keys across the Time Slider. If you don't want the Viewport to update as the current frame changes when you drag keys, for example when working on a large scene, press Shift + Alt while dragging.
Shift-dragging keys versus Shift + Alt dragging keys.
- You can customize the color of the selection range with the Range setting in the Color Settings window Time Slider section.
- Color coded keys
- You can use Color coded keys to show on which curve the key was set, for example, rotation. Color coded keys show colored "beads" above the key tick.
- To switch from regular key ticks to Color coded keys, right-click the Time Slider and select Color Coded Keys from the Animation Controls menu.
-

-
Tip: You can customize the color of each key curve "bead" in the Time Slider section in the Color Settings window.
Time Slider Bookmarks

Hover over a Time Slider Bookmark to view its name
Time Slider Bookmarks are colored tags along the top of the
Time Slider that flag events in your scene. Bookmarks are a way you can draw attention to specific moments in time which is useful when you want to focus or highlight specific areas or moments in your scene. You can move Bookmarks by
Ctrl (Command)-dragging
 the center of the bookmark.
Ctrl (Command)-drag the left
 or the right
 "leg" of the Bookmark to scale it. The Bookmark cursor changes to show that Move mode is active.
Add a Bookmark to a selected time range by clicking the Bookmark icon
 in the
Range Slider or pressing
Alt (Option) +
T.
See Create a Bookmark for more.
Blue Pencil frames

Blue rectangles on the Time Slider are Blue Pencil frames
Shift + click to highlight one or more Blue Pencil frames on the Time Slider to rearrange them. Once highlighted, drag the arrows at either end of the highlighted area to grow or shrink the timing between the frames.
See Work with Blue Pencil frames for more.
Cached Playback status line

The blue and pink stripes on the Time Slider are the Cached Playback status lines
The blue line is the Cached Playback status for animation and the pink line is the Cached Playback status for dynamics.
Whenever you edit a scene that has been cached, the modified area of the status line temporarily turns dark blue to show the segment of the animation that is out of date before becoming blue again to show that the values have been updated.
When Cached Playback encounters an unsupported node it will enter Safe Mode. While Cached Playback is in Safe Mode, the Cached Playback status line turns yellow and a warning symbol appears on the Cached Playback icon. See the Script Editor for an explanation of what is currently causing Cached Playback to enter Safe Mode. (You can find a list of currently unsupported nodes in Cached Playback unsupported nodes.)
Right-click the Cached Playback status line to turn Cached Playback off and on, flush the cache, or select a new Caching Mode. You can change the color of the Cached Playback status line in the Color Settings and set its width and placement in the Cached Playback Preferences.
See Use Cached Playback to increase playback speed for more information about Cached Playback.
Time units
The ruler markings and associated numbers on the Time Slider display time. To define the playback rate, select the desired Time unit in the Settings preferences (Window > Settings/Preferences > Preferences). Maya defaults to measuring time as 24 frames per second, the standard frame rate for film
Current time field
The entry field to the right of the Time Slider indicates the current time expressed in the current Time unit. You can change the current time by entering a new value. Your scene moves to that location in time, and the Current Time Indicator updates accordingly.
Audio

Audio Waveform in the center of the Time Slider
Right-click the Time Slider to open the Animation controls menu, where you can select the Audio rollout that gives you access to the Audio menu, where you can manage your Maya's audio settings.
When you import an audio file, its waveform shows on the Time Slider. See Display audio on the Time Slider.