Configure a Network license
With the license server configured and the Network License Manager installed, the next step after installing your products, is to configure the software license using the License Configuration tool.
Note: If you don't complete the license configuration following installation, you will see the Autodesk Let’s Get Started when you launch the product. Close the Let’s Get Started dialog and follow the steps below to set up your user environment.
The License Configuration tool can be accessed from the Windows Start menu, located in the Autodesk Moldflow Adviser folder.
| Network License configuration |
|---|
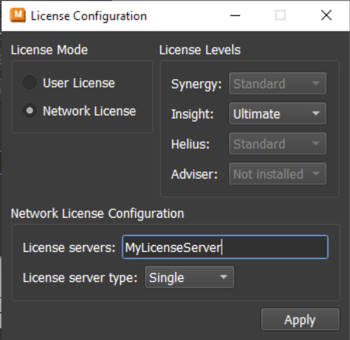 |
Make sure that you have the following information at hand for the Network license configuration:
- Your Network license tier Subscription
- The Name (or IP address) for your Network license server
- Your License server type (Single, Redundant or Distributed)
To activate the Network License
- Select the Network License in the License Mode section.
- Choose the License level depending on your purchased license.
- In the Network License Configuration section, enter the license server name (or IP address)
- Define the license server type. Options include Single, Redundant, and Distributed.
- Click Apply to accept the settings and close the dialog.
Note: Take care when entering the server name and license level - the License Configuration tool does not check for errors.