Use the Delta Transformation item to measure the difference in the translation and rotations between any two selected alignments or best fits.
To create a Delta Transformation item:
- Select the Definition level in the inspection sequence.
- Click Alignments & Datums tab > Special panel > Alignments Delta Transform.
- Enter a Name for the item.
- To include the item in the report, select the Output in report check box.
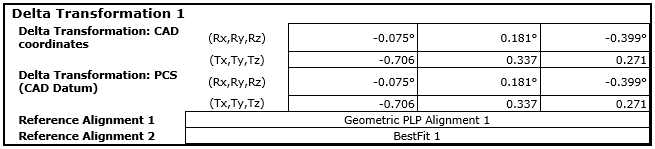
- In the Local Coordinate System list, select the coordinate system in which you want the delta transformation to be reported.
- In the Reference Alignment 1 list, select the alignment you want to calculate the delta transformation from.
- In the Reference Alignment 2 list, select the alignment relative to which you want to calculate the delta transformation.
- To export the delta transformation in PowerMill as a workplane, open PowerMill.
- To export the delta transformation, click:
 to export the delta transformation as NC code using the NC Program dialog.
 to export the delta transformation as a workplane to PowerMill.
When you export the transformation into PowerMill, if a workplane exists and is active, the Delta Transformation is created relative to PowerMill's active workplane. If there is no active workplane, a new workplane is created and the Delta Transformation is created relative to the world coordinate system. The Information dialog is displayed, which includes the details of the transformation.
 to export the delta transformation to an IGES file (.igs, .iges) or to a Matrix file (.mat).
 - Enter any extra information about the item in the Comment box.
- Click OK to close the dialog and add the item to the inspection sequence. The information is displayed in the Info and Report tabs, for example: