PowerInspect supports two methods of importing the results of the inspection from an OMV machine tool. You can import:
- the results for each item as it is measured on the machine tool. This requires a real-time connection between PowerInspect and the machine-tool controller.
- all the inspection results in one file.
The import method depends on the script file you use for the import.
To import the results of an inspection:
- Select the NC Program tab. If you have already specified the import details for this .pwi file, PowerInspect, continue at step 9.
- Click
 to display the
Importer Configuration
dialog.
to display the
Importer Configuration
dialog.

- Choose an import method. Select:
- File
to import the point data from the measurement file created by the machine-tool controller. Enter the location and name of the file you want to import in the adjacent box, or click
 to select the file.
- Serial port to import the point data from the serial port connection of the machine-tool controller. When you first use this option, click Configure and specify the serial configuration settings required by the controller. For more information on the serial configuration settings required, refer to your controller's documentation.
- Script to specify a custom import process. For example, this option enables you to specify a custom method for importing data from sources other than files or serial ports.
Note: Before you can select the Script option, you must complete the Script file name box of the Custom tab. - File
to import the point data from the measurement file created by the machine-tool controller. Enter the location and name of the file you want to import in the adjacent box, or click
- By default, PowerInspect verifies the imported data against the last exported CLDATA (.cxm) file. To use a different CLDATA file to verify the data, deselect the Take latest exported CLDATA file check box, and enter the location and name of the file in the File name box.
- Select the
Custom tab.
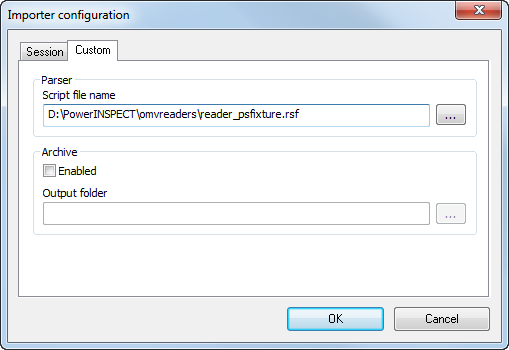
- By default,
PowerInspect uses
reader_psfixture.rsf in the
\omvreaders
folder to import measurement data. If you want to use a different import script:
- Select the Custom tab.
- Enter the location and name of the script file in the Script file name box.
- Select the Script option on the Session tab.
- If you want to save the measurement data to archive files so you can re-import the data:
- Select the Custom tab.
- Select the Enabled check box.
- Enter the location of the folder in which you want to save the files in the Output folder box.
The name of each archive file is created by appending the date and time on which the archive file was created to the name of the .pwi file.
- Click OK to save your changes.
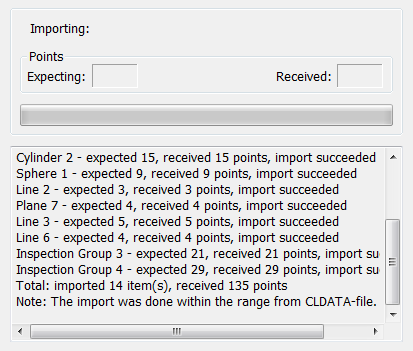
- On the
NC Program tab, click
 to import the measurements. The
NC Program tab displays the details of the import as it progresses.
to import the measurements. The
NC Program tab displays the details of the import as it progresses.

Where:
 shows the name of the inspection sequence item being imported.
 shows the minimum number of points required to measure the item.
 shows the number of points received for the item.
 shows the progress for the current item.
 lists the details of the imported items. When the import is complete, a summary is displayed, for example:
PowerInspect checks for the required information, such as reader script files and input files containing measurement data. When a CLDATA file is used, it also checks the measurements match the information in the CLDATA file. If PowerInspect finds any problems, it displays an error message and the actions you can take.
Some errors, such as problems with the script file or the output file from the machine tool, prevent the import process from continuing. Other errors, allow you to continue. For example, this can happen when the inspection sequence no longer matches the CLDATA file because items have been deleted since the probe paths were exported.