A composite curve is a continuous boundary of objects, such as lines, arcs, curves, and surface edges. You can also create a composite curve along the edges of an open, triangulated symbol (.stl or .dmtfiles).
To create a composite curve:
- Create the items from which you want to create a composite curve.
- Click Wireframe tab > Create panel > Composite Curve to display the
Create Composite Curve toolbar:

- Click one of your items. For example:
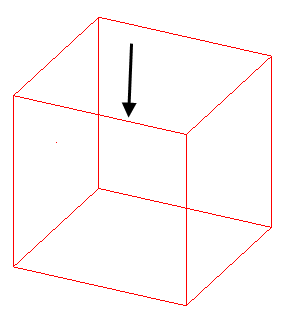
The start of a composite curve is marked with an asterisk. PowerShape automatically continues to select items from the end of the item nearest the click position:
 Note: You may set start and end markers before selecting an item to indicate where the composite curve starts and ends, by clicking the
 button on the toolbar.
- Use the toolbar to specify the composite curve from your group of items.
Each button on the control panel is described below:
 Surface tags — Toggle this button to show or hide surface tags. You can show or hide surface tags at any time while creating a composite curve.
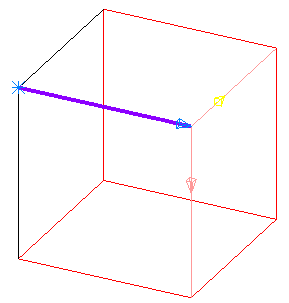
Select Surface tags to automatically mark the selected item with two parallel lines on its underlying surface
 . These parallel lines are the surface tags:

If you want to change the underlying surface for the first item selected, click the Backwards
 button or the
Rewind
button or the
Rewind
 button on the
Composite curve toolbar and then select the surface tag on the required surface.
button on the
Composite curve toolbar and then select the surface tag on the required surface.
When you rewind the composite curve, the item is deselected and all the possible routes for the composite curve are marked with surface tags and arrows:
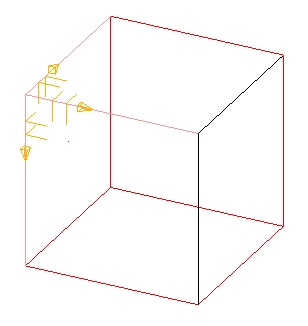
A surface tag exists for each surface along a particular route.
If you click a surface tag, the route is selected and becomes dependent on the surface for the tag.
Note: Composite curves preserve any dependent points when the composite curve is created on a curve.If you click the Forward
 button on the
Composite curve toolbar, the pink item and surface tag are selected.
button on the
Composite curve toolbar, the pink item and surface tag are selected.
 Reset — Click this button to remove all the items from the current selection. This enables you to start creating a new composite curve.
Start marker — Click this button to set the start marker.
Rewind — Click this button to rewind the selection to the last branch or the start (if no branches exist).
Reset — Click this button to remove all the items from the current selection. This enables you to start creating a new composite curve.
Start marker — Click this button to set the start marker.
Rewind — Click this button to rewind the selection to the last branch or the start (if no branches exist).
If you click this button when the first item is selected, the item is deselected, and all the possible routes for the composite curve are marked at the start of the item. If you click it again, all the markers are removed and you can start creating a new composite curve.
If you click this button after clicking Fast forward, the composite curve is returned to its position before the Fast forward was performed.
Backwards — Click this button to remove the last item in the selection.
If you click this button when the first item is selected, the item is deselected, and all the possible routes for the composite curve are marked at the start of the item. If you click it again, all the markers are removed and you can start creating a new composite curve.
Forwards — Click this button to move forward to the next branch point. Choose the next piece of geometry.
When you have a selection of routes, the one that will be selected when you click the Forward button is pink (using the default colour scheme).
You can select an object that is not connected to the current selection. If you do this, a dialog is displayed asking if you want a straight span, or one that preserves the tangents from the end of the last object to the new one.
 Fast forward — This continues selecting items to either the end marker or last item. How
PowerShape continues selecting items is determined by the
Direction Strategy set in the
Composite curves page on the
Options dialog.
End marker — Click this button to set the end marker.
Fast forward — This continues selecting items to either the end marker or last item. How
PowerShape continues selecting items is determined by the
Direction Strategy set in the
Composite curves page on the
Options dialog.
End marker — Click this button to set the end marker.
 Reverse — Click this button add or remove objects from the other end of the composite curve.
 Save — Click this button to save the selection as a composite curve. Alternatively, you can right-click on the curve to save it.
 Branch Point Direction — Choose which direction to go when in
Fast Forward
mode.
Branch Point Direction — Choose which direction to go when in
Fast Forward
mode.
 Options — Raises the
Curve
page of the
Options dialog.
Options — Raises the
Curve
page of the
Options dialog.
 Eject — Closes the
Create Composite Curve toolbar.
Eject — Closes the
Create Composite Curve toolbar.
- When you have created your composite curve, either continue creating composite curves or click
Select
 or
Eject
to remove the toolbar. Alternatively, right-click to close the
Composite curve toolbar.
or
Eject
to remove the toolbar. Alternatively, right-click to close the
Composite curve toolbar.