Use the Stair tool to define a stair run. Refer to these steps to select the appropriate tool and specify initial options, and then refer to the specific procedure for the type of run you are creating.
- Click Architecture tab
 Circulation panel
 (Stair).
- On the Component panel, verify that Run is selected.
- In the Draw gallery, select one of the following tools to create the desired run type:
 (Straight)
 (Full-Step Spiral)
 (Center-Ends Spiral)
 (L-Shape Winder)
 (U-Shape Winder)
- On the Options Bar:
- For Location Line, select the creation path for the run relative to the Up-direction:
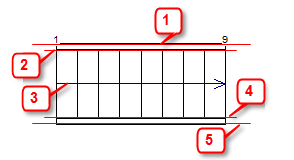
- Exterior Support: Left (1)
- Run: Left (2)
- Run: Center (3)
- Run: Right (4)
- Exterior Support: Right (5)
Depending on the type of run you are creating, it can be helpful to change the Location Line option. For example, if you are creating a winder run and want to snap the left edge to a wall, choose Exterior Support: Left for Location Line.
- For Offset, specify an optional offset value for the creation path. For example, if you enter 3" for Offset and the Location Line is Run: Center, the creation path is 3" to the right of the center line of the stair (in the Up-direction). A negative offset is to the left of the center line.
- For Actual Run Width, specify a value for the run width. This is the value of the run not including supports.
- Automatic Landing is selected by default. If you create 2 separate runs to reach the next level, Revit automatically creates a landing between the 2 runs. Clear this option if you do not want to create landings automatically.
- For Location Line, select the creation path for the run relative to the Up-direction:
- In the Type Selector, select the type of stair you want to create. You can change the type later, if required.
- Optionally, you can specify run instance properties, such as Relative Base Height, and Begin with Riser/End with Riser preferences. On the Properties palette, select New Stairs: Runs, and modify the instance properties as required. See
Run Component Instance Properties.

- Optionally, on the Tools palette, click
 (Railing).
By default, a railing is automatically created when you create a run.
In the Railing dialog:- Select the railing type or select None if you do not want to create a railing automatically. You can also add a railing later, if required. (See Place a Railing on a Host or Create a Railing by Sketching.)
- Select to position the railing on the Treads or Stringer.
- Click OK.
Note: You will not see the railing until you finish creating the stair.
- Follow the procedure for the specific type of run component you are creating.