Create an underlay when you need to understand the relationship of components at different levels for coordination and construction.
Use the Underlay parameters on the Properties palette to set an underlay. For example, you may want to set an underlay for the casework in the kitchen to make it easier to place the light fixtures above.
- In the Project Browser, open a plan view.
- On the Properties palette, for Range: Base Level, select the level you want to underlay.
Range: Top Level is automatically set to one level above the Base Level. When there is an intermediate level, such as a stage, you may want to set Range: Top Level to the level above the stage.
The underlay displays in halftone in the plan view.
- On the Properties palette, for Underlay Orientation, select Look Up or Look Down. When Underlay Orientation is set to Look down, the underlay displays as if you are viewing it from above, like a plan view. When the Underlay Orientation is set to Look up, then the underlay displays as if you are viewing it from below, like a reflected ceiling plan.
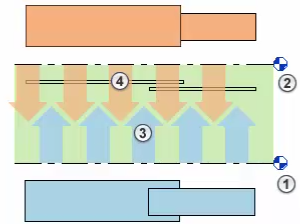
The following illustration represents the settings in the Properties palette where 1 = Range: Base Level, 2 = Range: Top Level, 3 = Look Up, 4 = Look Down