In a building model, you can control the position of a spotlight to achieve the desired lighting effects.
To position a spotlight, use its angle parameters and the Rotate tool.
To aim a spotlight
- Add spotlights to the building model, placing them in their approximate locations.
- Set up views, as follows:
- Leave open (or re-open) the view in which you added the lighting fixtures. (For this procedure, this view is referred to as the placement view.) Zoom in on the fixtures, so you can easily select them for rotating or repositioning. Turn on the display of light sources.
- To close other views, click View tab
 Windows panel
 (Close Inactive).
- Open a second view in which you will be able to see the light cast on surfaces (such as an elevation view, section view, or 3D view). (For this procedure, this view is referred to as the lighting view.) On the View Control Bar, for Visual Style, select Shaded. Turn on the display of light sources.
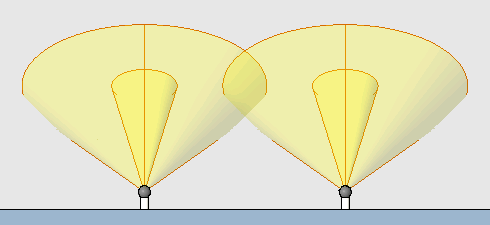
Spotlights in an elevation view with light sources displayed and Shaded turned on
- To tile the windows, so you can see both views at the same time, click View tabWindows panel
 (Tile Views).
- In the placement view, rotate the spotlights to aim their light in the desired direction.
Use the Rotate tool.

Spotlights rotated 30 degrees toward center
- To tilt a spotlight and control the size of its beam, do the following:
- In either view, select a spotlight, and click Modify | Lighting Fixtures tabProperties panel
 (Type Properties).
- Click Duplicate to create a new type.
- Enter a name for the type, and click OK.
- In the Type Properties dialog, scroll down to locate the Tilt Angle, Spot Field Angle, and Spot Beam Angle parameters.
- Enter the desired values for each parameter.
- Click OK.
- Check the results in the lighting view.
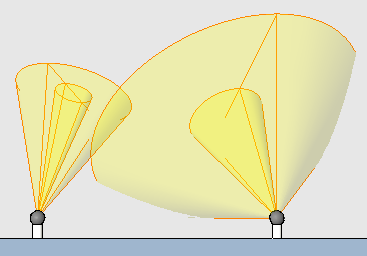
For example, in the following image, the left spotlight has a smaller beam angle and field angle. For the right spotlight, the tilt angle was changed from 60 degrees to 45 degrees.
Repeat this step for each spotlight that needs to be tilted.
- In either view, select a spotlight, and click Modify | Lighting Fixtures tab
- If necessary, make adjustments to achieve the desired result.
For example, you may need to add or remove spotlights, adjust their positions, and change their rotation angles and tilt, field, and beam angles to obtain the desired lighting effects.
Tip: To evenly illuminate a surface, position the lighting fixtures so the beam angles overlap each other slightly.
3 spotlights with beam angles overlapping slightly for even illumination of the wall