You can add or remove conductors, alter the shape and routing, and change the location of tick marks for the wire runs in a project.
Change the number of hot conductors
- Select a wire run in a view.
-
The controls for the wire run display in blue. Use the plus and minus symbols to change the number of conductors in the run.
Click plus to increase the number of conductors.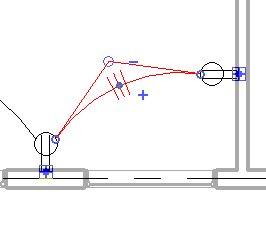
Each click adds a tick mark to the run, representing a conductor.
- Click minus to decrease the number of conductors.
Each click removes a tick mark from the run, representing a conductor. When the minimum number of conductors is reached, the minus control is disabled.
You can also change the number of conductors from the Properties palette when a wire run is selected. Use the following method when changing the number of conductors for several wire runs at a time.
Increase or decrease conductors from the Properties palette
- Select one or more wire runs in the view, and click
 Properties.
 Be sure that only wire runs are selected.
On the Properties palette, under Electrical - Loads, enter a value for Hot Conductors, Neutral Conductors, and Ground Conductors. - Click Apply.
The number of conductors is updated and the number of tick marks indicate the total number of conductors in the run.
Change the shape and routing of a wire run
-
The shape of a wire run is determined by the location and number of vertices along its length. A vertex is displayed as an open circle. You can add and remove vertices from a wire run, and you can change the shape by dragging each vertex.
Select a wire run in a view. - Drag a vertex to change the shape of the wire run.
Insert a vertex
- Right-click the wire run, and click Insert Vertex.
A new vertex control, initially displayed as a solid dot, is placed on the wire run.
- Drag the new vertex control to the desired position on the run, and click to place it.
The new vertex (changes to an open circle) can now be used to change the shape of the wire run.
Remove a vertex
- Right-click the wire run, and click Delete Vertex.
- Move the cursor over the vertex to be deleted, and click when the vertex displays as a solid dot.
The vertex is removed.
Move tick marks
-
You can reposition tick marks on a wire run.
Select a wire run in a view. - Drag the vertex control in the midst of the tick marks to the desired location on the wire run.
Arrange crossing wires
-
When Thin Lines is not selected on the toolbar, Revit displays wires that cross each other with a gap in the wire being crossed. You specify the width of the gap in the Electrical Settings dialog. You can change the display order, moving wires forward or backward to specify how the wires will cross.
Select one or more wires and, on the Modify | Wires tab Draw Order panel, click one of the following tools:

Bring to Front 
Send to Back 
Bring Forward 
Send Backward The wires display in the view according to your selection.