 Clip Maker
Animation > Clip Maker
Use the Clip Maker to create and manage animation sequences using the animation wizard. The wizard guides you through each step of animating a geometry, material, or environment.
For information on using the Clip Maker, see Working with the Clip Maker.
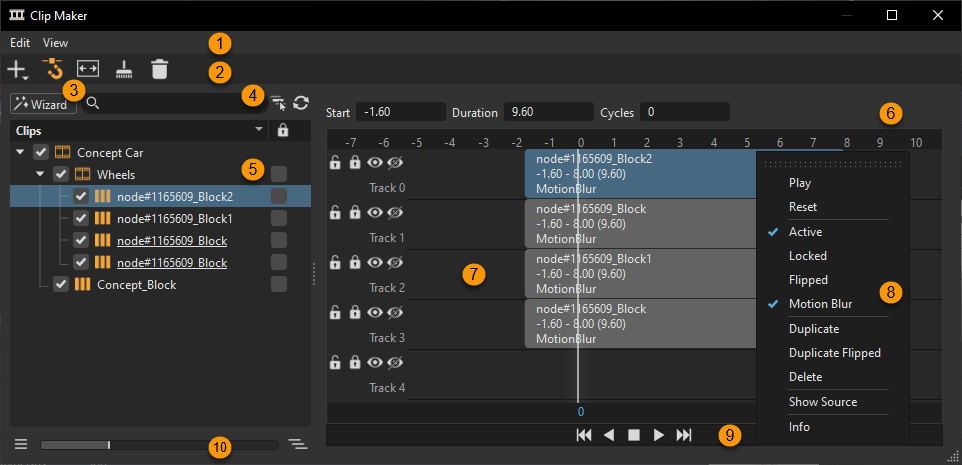
The Clip Maker consists of two fundamental areas. The left side displays a list view of all scene contained clips; when a clip is selected from the list, the right updates, showing a block within the timeline.
 Menus
Menus
There are two menus, Edit and View. Many of their options can also be found in the right-click context menu.
Edit
This menu contains the following options for editing content, such as New Clip, Rename (Ctrl + R), Delete, and Copy/Paste/Duplicate (Ctrl + C/Ctrl + V/Ctrl + D). For using these options, see How to Edit a Clip. Use the Information (Ctrl + I) option for animation information on the selected clip.
View
This menu contains the following options:
- Frame - Frames the selected clip or clips in the timeline, making them visible.
- Lock Objects - Locks the position of the selected clip or clips, adding a lock to the clip. Use this for managing a list of clips.
- Unlock Objects - Unlocks the position of the selected clip or clips, removing the lock and enabling them to be moved along the timeline.
 QuickActions Bar
Icons for commonly used commands in the Clip Maker are easily accessible in the QuickActions Bar.
![]() Create - Creates the selected item. Choose from Clip, Animation, Camera Track, Viewpoint, Variant Set, and Sequence. For use, see How to Add Variants and Other Items. The use of a variant inside the Clip Maker enables the switching to another state of a variant in an appropriate moment within the timeline. Only pre-configured variants from the Variant Sets module are selectable on creation.
Create - Creates the selected item. Choose from Clip, Animation, Camera Track, Viewpoint, Variant Set, and Sequence. For use, see How to Add Variants and Other Items. The use of a variant inside the Clip Maker enables the switching to another state of a variant in an appropriate moment within the timeline. Only pre-configured variants from the Variant Sets module are selectable on creation.
![]() Horizontal Grid Snapping - Snaps clips by one-second units when modifying their start or end points.
Horizontal Grid Snapping - Snaps clips by one-second units when modifying their start or end points.
![]() Frame Objects in View - Displays the full range of a set of clips in the timeline. Select their parent item and click Frame Objects in View or select View > Frame.
Frame Objects in View - Displays the full range of a set of clips in the timeline. Select their parent item and click Frame Objects in View or select View > Frame.
![]() Remove - Removes all unused animation blocks and empty clips no longer referenced in the scene.
Remove - Removes all unused animation blocks and empty clips no longer referenced in the scene.
![]() Delete - Removes the selected clip from the Clip Maker.
Delete - Removes the selected clip from the Clip Maker.
 Wizard
This button is located under the main menu of the Clip Maker and is used to create an animated clip and provides help in three different modes.
- Object
- Material
- Object and Material
Before clicking Next, select the node that should be animated within the Scenegraph and/or Material Editor. If nothing is selected, a warning appears. Once the Animation Wizard window is open, click the name field to rename the animation.
These settings are adopted on duplicated clips.
- Start Time - Sets the moment the animation starts on replay within the Clip Maker.
- Duration - Controls the total length of the animation.
- Interpolation Mode - Determines velocity on animation playback. Linear results in a constant animation; Ease In/Ease Out/Ease In Ease Out reduces velocity on beginning or/and at the end of the animation.
The initial state of the animation is captured, creating a thumbnail, when Capture Start is clicked. The generated thumbnails help to differentiate the different states, at a glance. After either moving the geometry or changing the material, click Capture End to store the final state of the animation.
The Preview button enables replaying the animation within the Render Window. Reset Preview sets the animation to the initial state.
Select Open Clip Manager When Finished to automatically open the Clip Maker on completion.
 Search
The search field provides live-search capabilities for clips. It is helpful for quickly identifying clips in complex scenes without browsing through a vast list. Search by name. Only single search terms and regular expressions are supported. Enter one character to show only materials with that character in their name. Click the X to clear the search and return to the tree.
Use the following tools to aid your search:
![]() Selected Hierarchy - Restricts the search to a selected hierarchy. It searches the selected branch for nodes containing the search string. You can also use the shortcut,
Selected Hierarchy - Restricts the search to a selected hierarchy. It searches the selected branch for nodes containing the search string. You can also use the shortcut, Ctrl + F (Find) to set the search bar in focus, where you can enter a string, and click Enter, enabling ![]() and searching the selected branch only for content matching the string.
and searching the selected branch only for content matching the string.
![]() Update - Synchronizes the search, updating the animation tree. Once you've added a string, press
Update - Synchronizes the search, updating the animation tree. Once you've added a string, press ![]() to refresh the tree and your search.
to refresh the tree and your search.
 List View
The List View is on the left and lists all animation clips, including camera animations.
To activate/deactivate a clip, click the check box in front of the clip.
To select and show a clip within the timeline, click the clip in the list.
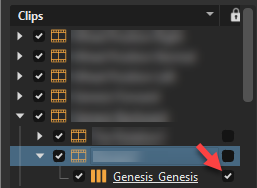
To rename a clip, double-click it.
To rearrange clips, drag then within the list.
To lock settings against any change, select the check box in the Lock column to the right of the clip or block name.
Context Menu (List View)
Right-click within the Clips pane to access the context menu options. Here you will find options that are also in the main menus or QuickActions Bar.
Play - Plays the selected clip in the viewport.
Reset - Sets animated objects to their initial state.
New Clip - Creates a sub clip below the selected existing clip. If no clip is selected, upon execution, the new clip appears at the top level.
Copy - Copies the selected clip to the clipboard.
Paste - Pastes copied clips into the desired location.
Duplicate - Creates an independent copy of the clip.
Duplicate Flipped - Creates an independent copy of the clip, but reverses the animation.
Delete - Removes the selected clip.
Rename - Enables the renaming of the clip.
Information - Provides further clip information.
 Animation Parameters
Above the timeline are these animation parameter numeric input fields:
- Start - Adjusts the animation start time.
- Duration - Sets the length of the animation.
- Cycles - Sets how often to repeat playing the animation.
 Timeline
The Timeline displays the frames along the top, with track below. Clips and variant sets live on these tracks and can be reposition, squashed, and stretched.
What are Clips
Clips contain multiple animations. An example of a clip would be an animation of a door handle, the lock, and door open/close. Since you don't want these to play at the same time, you can move your clips in time, stretching or squashing them to slow or speed up the animation. However, before doing this, the curves (animation curves) have to be convert into block elements. This is done in the Curve Editor.
The Timeline View
Use the Timeline View to arrange clip, using its several tracks. Every block represents one animation sequence. In the timeline, drag them to rearranged them. Areas at the beginning and end of every block enable you to shift the related moment within the timeline. Use the mouse wheel to zoom in and out of the timeline.
See How to Edit a Clip for instructions.
 Timeline Context Menu
Right-click a clip to access its context menu, containing the following options:
Play - Plays the animation starting from the cursor position.
Reset -
Active - Makes the selected clip active when enabled and deactivates it when disabled.
Locked - Locks the selected clip as locked when enabled and unlocks it when disabled.
Flipped - Flips the selected clip when enabled and unflips it when disabled.
Motion Blur - Adds motion blur to the selected clip when enabled and removes it when disabled.
Duplicate - Creates a duplicate of the selected clip.
Duplicate Flipped - Creates a duplicate of the selected clip and flips it.
Delete - Deletes the selected clip.
Show Source -
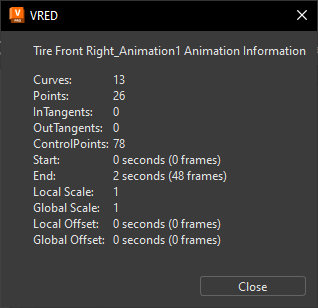
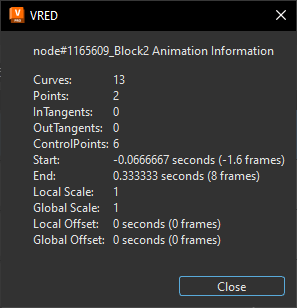
Info (Ctrl + I) - Opens a dialog, which provides information about the selected clip, such as the number of curves, points, in and out tangents, etc.
 Playback Controls
Below the tracks are the playback controls for playing animation forwards and back, jumping to the beginning or end, and stopping or pausing a clip.
 Slider
The slider and its buttons are a fast way to expand or collapse the sub-structure of the selection or multi-selection. With nothing selected in the tree, all nodes are expanded or collapsed. With something selected, only that node and any sub-nodes are expanded or collapsed.
Click ![]() to collapse the hierarchy of the selected node or
to collapse the hierarchy of the selected node or ![]() to expand it.
to expand it.
Keyboard Shortcuts
There are several hotkeys available for the Clip Maker:
Ctrl + ASelect AllCtrl + CCopy Clip/BlockCtrl + DDuplicate Clip or Clone BlockCtrl + IShow Clip/Block InformationCtrl + RRename Clip/BlockCtrl + VPaste Clip/BlockCtrl + XCutDelDelete Clip or BlockFFrame Clip