Import Files Dialog
Use File > Import to access Import File(s) and Edit > Preferences > Import/Export > File Type to change its preferences.
For the latest supported file formats, see File Import/Export.
Bring a model into VRED to review the data to get a different perspective and see things that might have been missed.
During import, consider tessellation quality and whether to keep surface data. When working with VR or in realtime, a lower tessellation quality provides a lighter mess and reduces calculations. Getting rid of surface data that isn't needed also makes the model lighter and faster, which is recommended for VR and realtime.
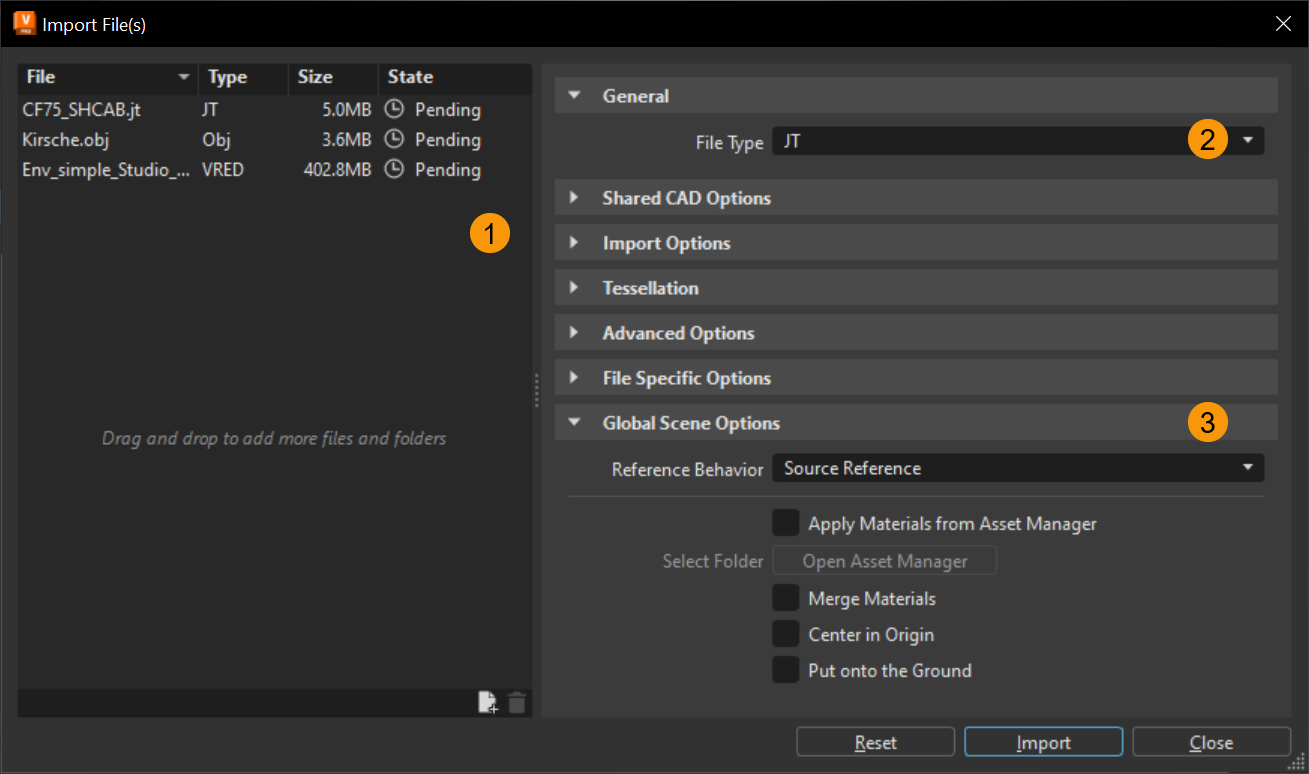
Select File > Import, then one or more files to access the Import File(s) dialog. For supported file formats, click the field in lower right corner. Use Import File(s) (formerly Import Options) to define how VRED converts and processes imported data. Set parameters of imported files for tessellation and scene location. Only options specific to the file format appear. Get file type, size, current import state, and file conversion process information.
For instruction on using Import File(s), see the following:
For videos on importing from Alias, see the following:
The Import File(s) Dialog
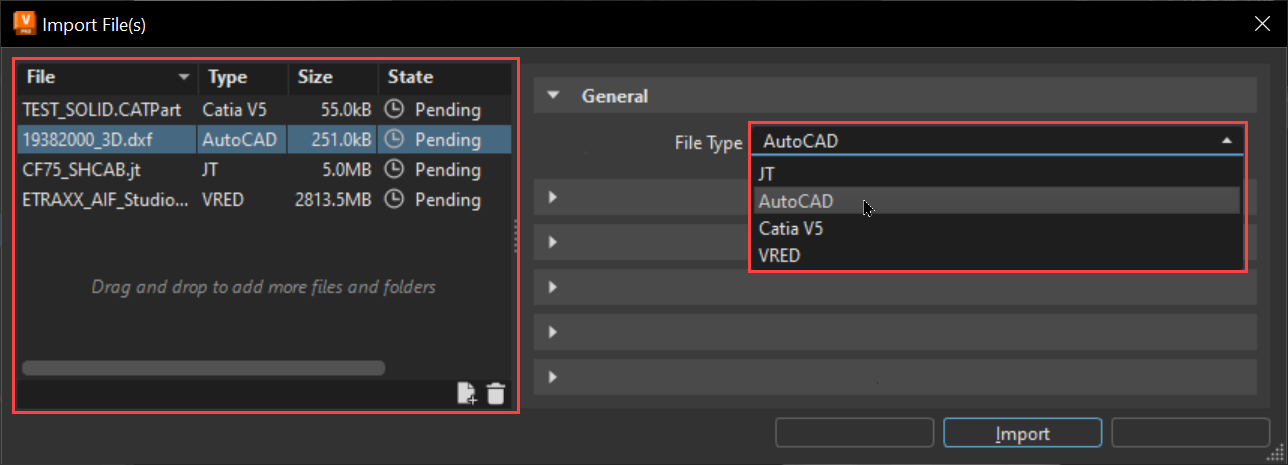
Import File(s) consists of two areas, the Import File List on the left and the File Type Parameters on the right. Drag and drop files into the Import File List or add them using the Add button. Select a file from the list, then click File Type and select the file type associated with your selection. This loads import parameters for that specific file type.
 Import File List
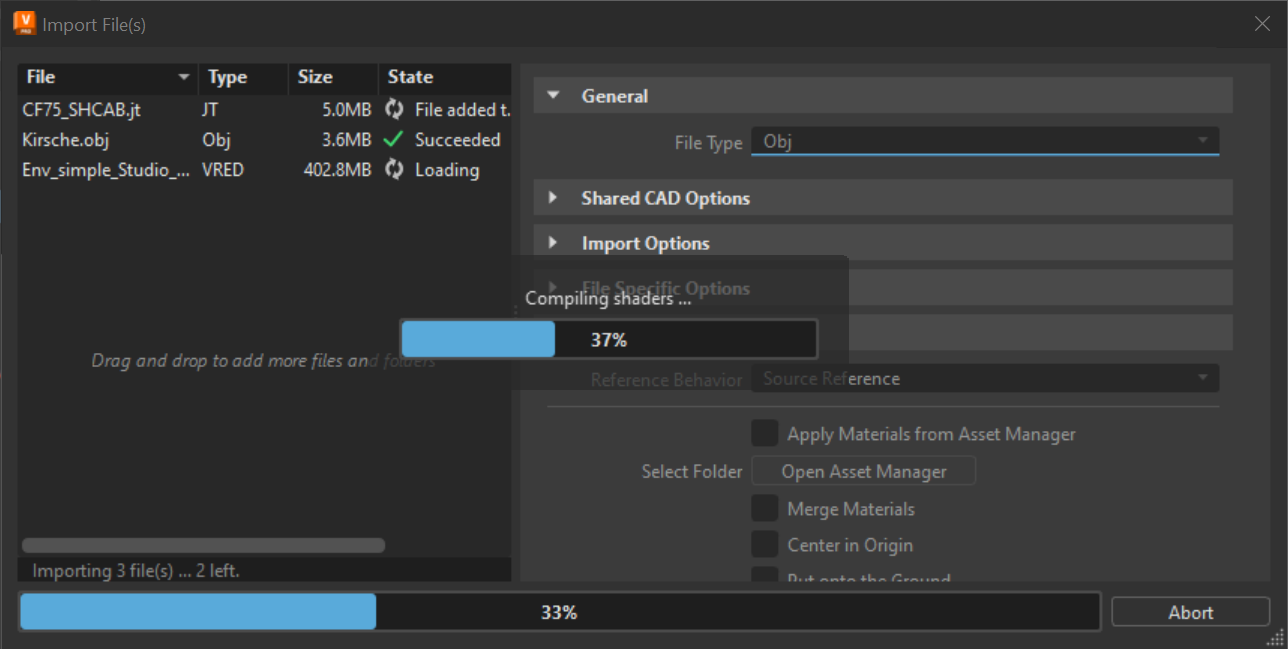
Once the Import File(s) dialog opens, the files for import appear on the left. Drag and drop more files and folders into the list. Check the State column to see if they have been added, are pending or loading, have been successful, or failed.
Use the right-click menu to add or remove files from the imported file list. Use other right-click options to show a file location in an explorer window or view the import logs.

How the Import Dialog Works
Enable and set the parameters you want. Use the Shared CAD Options > Mode option to batch convert CAD to OSB without loading files into VRED and ATF to import native Rhino .3dm files. Features like surfaces, meshes, curves, etc. are supported.
Once you click Import, you can check the state of files during import. In the State column, check the importing status. Messages like pending, importing, converted, merged, and stitched appear to indicate the current ATF (Autodesk Translation Framework) conversion state. Since logfiles tracks several ATF tasks, during import, these need more time.
If the Temporary Path preference option has been set, which changes the import temporary path of a file, the change is applied to the Import dialog the next time it is opened. However, if the Import dialog is open during the change, the path will NOT update immediately. For more information, see Temporary Path.
Keep in mind, when importing an ATF file, if the Import/Export > File Options > Options tab > Base > Temporary Path preference contains an incorrect path, the import will fail. However, when importing only non-ATF files, the path will not be validated; therefore, even if the path is invalid, the import will succeed, and no warnings will be written to the terminal.
 Import File Parameters
General
Shared CAD Options
Use the Shared CAD Options > Mode option to batch convert CAD to OSB without loading files into VRED and ATF to import native Rhino .3dm files. Features like surfaces, meshes, curves, etc. are supported.
Mode - Sets what to do with CAD files. Batch convert them to OSB without loading them into VRED.
Import - Imports the file into the scene; however, any conversion data is removed.
Import & Keep Files - Import the file into the scene and keeps the conversion data in the specified File Output folder.
Convert - Converts only the files, then stores the data in the specified File Output folder. Nothing is imported into the VRED scene.
Max Parallel Processes - Chooses the number of imports VRED can perform simultaneously. Define the maximum number of parallel file conversion processes, based on your machine's the number of CPU cores. Depending on the type of data, there are times when more processes are faster; however, these extra processes use more memory.
File Output Path - Sets the output path for the shared CAD options. Click
 to browse to the output location.
Import Options
Surface - Sets the type of surface data imported into the scene.
Meshes - Sets the type of mesh data imported into the scene.
Curves and Poly Lines - Sets the type of curve and polygon line data imported into the scene.
Import none - Excludes all curve and polygon line data from import.
Import visible - Imports only visible curve and polygon line data.
Import all - Imports all visible and invisible (hidden) curve and polygon line data.
Tessellation
Sets how the imported data will be tessellated, using the quality, deviations, and tolerances set. The higher these values, the more accurate and dense the model.
Tessellation Quality - Defines preset values for Chord Deviation, Normal Tolerance, and Max Chord Length.
Chord Deviation - Shows the tolerance of the distance from the NURBS surface to the tessellated surface in mm. Lower values result in more accurate polygon models, but also increase the number of triangles.
Normal Tolerance - Displays the normal tolerance of adjacent triangles in degrees. Lower values result in more accurate polygon models, but also increase the number of triangles.
Max Chord Length - Displays the maximum length of a triangle edge in mm. Lower values result in more accurate polygon models, but also increase the number of triangles.
Enable Stitching - Enables stitching of adjacent edges.
Stitching Tolerance - Sets the tolerance in mm where two adjacent edges are considered touching and should be stitched together.
Advanced Options
Keep Source Data - Sets the default behavior to keep NURBS data instead of deleting it. This option will increase memory usage. When disabled, the source data is removed during import. Allows for re-tessellation later or for direct NURBS rendering. However, more memory is used.
Unify Surface Normals - Sets the default behavior to ensure all surface normals point in the same direction (out or in). Merges all tessellated surfaces into one (stitched) mesh during import, when enabled. When disabled, surface normals are not changed during import. Only available when Import File(s) > Import Options > Surfaces is set to either Import visible or Import all.
Merge Geometries - Sets the default behavior to merge the geometries to create one single (stitched) mesh during import, when enabled, since a single shell can have many NURBS surfaces. If not checked, the result is one mesh per surface.
Create Groups for Layers - Organizes items originally organized in layers, for example, in Autodesk Alias, into groups; otherwise, the objects are placed under the same parent node.
Remove Empty Groups - Removes group nodes without children.
Unshare Nodes - Converts shared node instances are into independent nodes. When selected, more memory is consumed.
Flush Transformations - Resets the transformations of each node. Transformation values are flushed to the vertices. If, for example, a node has been moved 100 mm in the X direction, flushing the transformations leaves the node where it is, but changes the X value from 100 to 0.
File Specific Options
Import Group Materials - Doesn't create additional MaterialGroup nodes for part files, assemblies, or instances, and simple discards the materials, when disabled. For some Inventor workflows, you may want this enabled to create these MaterialGroup nodes.
Import Associative Meshes - Imports data associated with your meshes, rather than excluding it.
Import Invisible Instances - Toggles the import of invisible instances on or off. When enabled, invisible (hidden) instances are imported into VRED, rather than excluded.
Import Coordinate Systems - Toggles the import of the Axis Systems from CATIA into VRED. Since CATIA files can have multiple coordinate systems, VRED see these, import them, and create transformation groups with a coordinate cross for a better representation in the viewport.
Note:There is also an Import Coordinate Systems preference in the FileIO > Catia V5 > File Specific Options preferences.
Import Cameras - Imports cameras from the Alias .wire file, instead of excluding it.
Import Lights - Imports lights from the Alias .wire file, instead of excluding it.
Import Variants - Imports variants from the Alias .wire file, instead of excluding it.
Import Template Geometries - Imports template geometries from the Alias .wire file, instead of excluding it.
Import Switch Materials - Imports an Alias switch shader as switch material from the Alias .wire file, when enabled. However, when disabled, only the active shader in the Alias switch shader is imported, eliminating the import of any unwanted shaders.
Import Metadata - Imports the metadata from the file, instead of excluding it.
Import Animation - Imports animation from the Alias .wire file, instead of excluding it.
Reduce Constant Keyframes - Reduces the number of keyframes from the Alias .wire file by removing adjacent keyframes with identical values.
Import Sub-Referenced Files - Imports all part files, sub-assemblies, and sub-references contained within an imported file.
When disabled, only the structural information (tree) appears in the Scenegraph, not geometry. All sub-assemblies are imported, with their part files in an unloaded state.
When enabled, all sub-referenced files are imported in their loaded state.
Merge Sub-Reference Materials - Controls how duplicate materials are handled when importing CAD assemblies and PLMXML files. They are either merged or instances of the duplicates are created.
When disabled, duplicate materials will NOT be merged. If an identical material is referenced by sub-referenced files, an additional instance of the material is created for every occurrence of the material in the import.
When enabled, duplicated materials are merged, referenced by sub-referenced files. This option is enabled by default.
Model State - Sets the Inventor model state used when importing an Inventor file into VRED. This is an either/or option, so the ATF API doesn’t allow the import of multiple, both, or a specific model state, at this point.
Choose either the Primary or Last Active Inventor model state for the Model State option in the Import Files > File Specific Options section.
To set a default Inventor model state, see the Edit > Preferences > Import/Export > File Type > Inventor > File Specific Options section, choose a state for the Model State option.
- Import as Smart Reference - Imports a native VRED file as a smart reference.
Reference Behavior - Choose a reference behavior when importing. Either keep or remove references.
Importer - Choose one of the following methods for importing Catia V5 files. There should be no differences in tessellation quality, structure, material import, or naming conventions between these methods.
Import Mesh LODs - Imports Static Mesh Levels of Detail (LOD) into VRED from 3D modeling applications, such as 3ds Max or Maya. Choose from Lowest, Highest, and All. All imports all currently selected FBX files with specified VRED settings.
Toolkit - When Legacy Import is activated, this option is disabled.

Sets the toolkit used by VRED. Choose one of the following options:
Max Parallel Import Tasks - This feature is only for Autodesk Alias WIRE files. Sets the maximum number of import tasks. Changing this value increases memory usage.
Import Layer Folders - This feature is only for Autodesk Alias WIRE files. Imports any Alias layer folder from an older version of VRED, converting it into a VRED group and layers within the folder into a subgroup as they are imported into VRED 2021.3. This changes the scene hierarchy. To keep the scene hierarchy unchanged, toggle this option off.
To set a default behavior when importing Alias files, go to Edit > Preferences > Import/Export > File Type > Alias > Import > File Specific Options, and either check or uncheck Import Layer Folders.
- Import Empty Layers - Toggles the import of empty layers on or off. When enabled, empty layers are imported into VRED.
 File Type Parameters
Project Merge Options
Select the elements to import or merge.
- Import Variants - Imports variant data, rather than excluding it.
- Import Touch Sensors - Imports touch sensors, rather than excluding them.
- Import Sequences - Imports sequences, rather than excluding them.
- Import Animations - Imports animations, rather than excluding them.
- Reduce Constant Keyframes - Reduces the number of keyframes by removing adjacent keyframes with identical values.
- Import Clips - Imports clips, rather than excluding them.
- Import Annotations - Imports annotations, rather than excluding them.
- Merge Materials - Compares the materials of both scenes and eliminates duplicates.
Environments - When merging environments, there are four options:
Use From Scene - Uses the existing environments from the current scene remain. Environments from the imported file are only added if they directly reference a material in the common tab of the Material Editor. Added materials, using the default environment switch from file, use the existing scene environment default switch.
Use From File - Adds environments from the file and removes environments from the existing scene (unless the existing environments directly reference a material in the common tab of the Material Editor.) Otherwise, all materials use the new environments.
Add From File - Adds the environments switch (from the file) as a new switch to the scene and maintains the default switch. All materials keep their environment assignment.
Note:This may result in duplicate environments and switches.
Merge - Adds the child environments of the default environment switch to the existing default environment switch. Duplicates are excluded. When merging projects, viewpoints are preserved.
Project Merge Options
Import Touch Sensors - Imports touch sensors, when enabled, instead of excluding them.
Environments - Provides environment import options. Choose from:
- Use From Scene - Uses the default scene environment.
- Use From File - Uses the environment from the imported file.
- Add From File - Uses the environment from a selected file.
- Merge - Uses the environment from the file and merges it into the default scene environment.
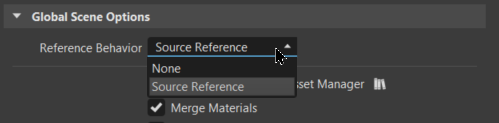
Global Scene Options
Reference Behavior - Determines what happens to references upon import. Choose one of the following:
Source Reference - Imports the references as source references.
None - Combines all references into the project and removes the file/reference information.
- Apply Materials from Asset Manager - Replaces imported materials with similar materials from the Asset Manager. Click the icon to the right to access the Asset Manager.
- Merge Materials - Merges materials when importing a CAD file.
- Center in Origin - Places imported geometry in the center of the VRED environment.
- Put onto the Ground - Places imported geometry on the ground plane.
- Import Animations - Only available for OSB and VPB files. Imports animations contained within the file.