Menu Changes
Create/Convert has been split into two menus and the Scene menu was renamed to Selection, with many options added to it, as a result of the Material Editor decoupling project. See the sections that follow for a complete list of these changes.
File Menu Changes
These are the changes to the File menu:
Render Preview Images has been removed from the File menu.
Improved Load Materials. It allows the selection of multiple files at the same time within your Windows browser for a bulk load. You can load all formats, including Substance, AXF, or HDR.
After a bulk load, you can filter for HDR environment, Substance, X-Rite, and OCS materials, using the Filter Selection menu. Materials are created using the original filename.
To create these materials, assign a texture file, like an AXF or HDR file. If you select multiple files containing any supported texture format, the Material Editor will create corresponding materials and assign textures to them automatically.
Edit Menu Changes
The following were added to the Edit menu:
 Rename (Ctrl+R) - Renames the selected material.
 Paste Attributes - Pastes all settings from the clipboard contained material to the selected.
 Paste Texture Size - Pastes the copied texture size onto the selected material to resize it.
 Create Light Source - (Only available when Environment materials are selected) Opens the Create Light Sources from HDR module to add lights to your environment. Once the module opens, click the Create New Light Source button.
 Boost Light - (Only available when Environment materials are selected) In some outdoor HDRs, the sun is too dark compared to the sky. This leads to incorrect lighting that's bluish looking, with shadows that aren't contrasted enough, etc.
Use the Boost Light dialog to repair an HDR. All values in the HDR above a threshold (e.g., 95% of maximum value) are scaled up by a user-defined boost. Use this to make the sun brighter, compared to the rest of the HDR.
Important:If you choose to apply your boost settings to the environment, this action is not undoable, as the pixel values in the HDR are actually modified (overwritten).
 Inline Image Sequence - Inlines the image sequence into the .vpb file. When selected, loaded image sequences are packaged within the .vpb file. If the .vpb is moved to another computer, the image sequence does not need to be moved separately.
We made changes to following:
Scroll to Selected (see the new Selection options) and Compress/Uncompress Textures were removed from the Edit menu.
Remove Unused Materials not only removes all unassigned materials from the Material Graph, but also assigns materials not assigned to any object in the Scenegraph to individual layers in a render layer and renames them as overrite materials.
When you select Optimize Materials, switch and X-Rite materials can only be merged if the name is the same. Only materials that have been merged are removed. If the material switch name is different after the optimize is applied, the material switch is kept.
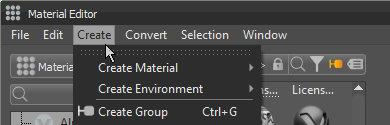
Create Menu
We separated Create and Convert to create two menus. Create Group from Selection is now Create Group, and Create Switch from Selection is now Switch and is listed under Create Material.
Convert Menu
There are different classes of materials supported within VRED. Truelight materials provide a photorealistic representation; this type of material is required for ambient occlusion calculation. Geometry that has been newly imported to VRED contains a standard OpenGL Phong material that doesn't support ambient occlusion calculation. Convert helps to convert either a type of Truelight material into another type of Truelight material or it helps to convert standard OpenGL Phong materials into Truelight Phong materials.
For an environment, if a skylight is selected, you can convert it to a sphere environment and vice versa.
Selection Menu
The Scene menu was renamed to Selection. It contains options for dealing with selecting things within a scene. Many options have been added.
 Select Nodes (Ctrl+N) - Selects the geometry nodes assigned to the currently selected materials.
 Select Material - Selects the original material used in the grouped hierarchy (a switch, multi pass, or layered material). Select a child material within a switch, multi pass, or layered material, then right-click and choose Select Material to select the original material.
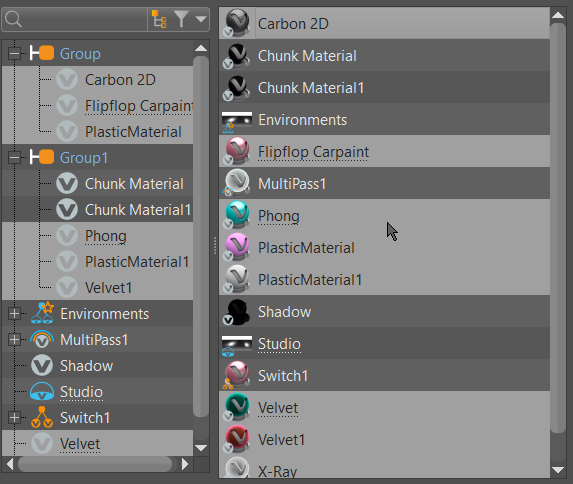
 Select all Occurances - Selects all occurances of the selected underlined material, expanding group hierarchies and highlighting the parent text blue, to indicate where a material is used. Now, with one or more materials selected, use Select all Occurrences to select all examples of its or their use.
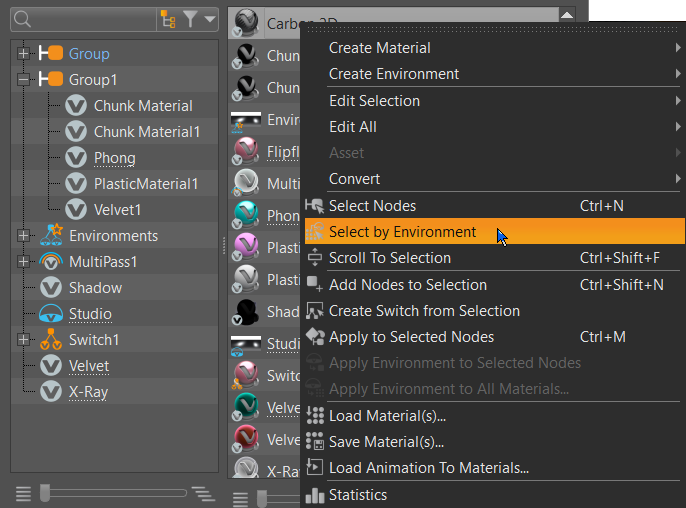
 Select by Environment - Selects all materials with the same environment as the selected material in the Material Graph or Group Preview. Use it when there are different environments used for different materials and you want to select all materials assigned to a specific environment.
When one or more environments or environment switches is selected with this option, all materials in the Material Editor with this environment assignment are also selected. If no materials have that environment assignment, nothing is selected.
With a material selected, right-click and choose Select by Environment or from the menu bar, choose Selection > Select by Environment.
 Scroll to Selection (Ctrl + Shift + F) - Scrolls to the selected material. This is useful when working with large lists of materials.
 Add Nodes to Selection (Ctrl + Shift + N) - Extends the selection in the Scenegraph to include nodes with the currently selected material.
 Group Selection - Creates a group from the selected materials, switches, or environments.
 Create Switch from Selection - Creates a switch material node and applies selected materials to it.
 Apply to Selected Nodes (Ctrl+M) - Applies the currently selected material to the selected geometry nodes in the Scenegraph.
 Apply Environment to Selected Nodes - Applies selected environment to the selected nodes.
 Apply Environment to All Materials - Applies selected environment to all materials. Material types, such as Plastic, Brushed Metal, and Carpaints, use the environment for image-based lighting. Use the dialog that appears to assign the environment to only materials with a certain name.
For example, if you select an environment called “Skylight” and enter nothing in the dialog, all materials are assigned the Skylight environment. However, if you enter “Studio”, all materials currently assigned the Studio environment, now are assigned to Skylight.
By default, all materials are assigned to the default environment switch. This means they use the environment that is currently active in the switch. When assigning a specific environment to a material, they will always use that environment, instead.