Example–Creating Cascading Combo Boxes for the Data Standard Dialog
Create multiple combo-boxes (also known as selection lists) for your Data Standard dialogs, where the next combo box depends on the selection made in the first combo box.
When a value is selected in the first box, the next box should show values based on the first selection. For example, you have two combo boxes: one shows car company names (BMW, Mercedes, Ferrari, etc.) and the second shows car types for the selected company (for BMW: 1, 2, 5, X2, X5...; for Mercedes: A, B, C, CL, CLS...).
Create a Combo Box
There are four parts to creating a combo box.
Create a Data Source
You need a source where the data should come from to populate the combo box. As WPF comes with a native XML engine, you can create an XML file that contains the data. The XML file has the first level content for the first selection. Every entry has child entries for the second selection. These second entries could have even more children in case you need a third level or even more nested selection list.
This is how it looks:
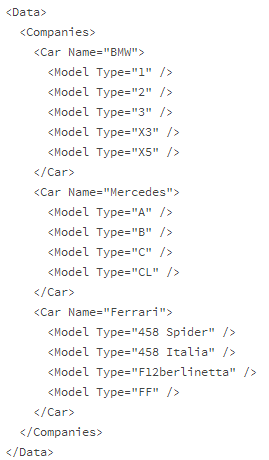
Create a data.xml file, copy this content into the file, and save the file to the desired location. (For this example, save the Data.xml file to C:\Temp).
Add the data.xml as a resource to the Data Standard .xaml file. This enables that the combo boxes can use the data.
Add the following lines to the Resource section in your .xaml file:
<XmlDataProvider x:Key="comboDataSource" Source="C:\Temp\data.xml"/>This is how the whole resource section might look:
<WPF:DSWindow.Resources xmlns:prop="clr-namespace:dataStandard.UI.View;assembly=dataStandard.UI">
    ...
    <XmlDataProvider x:Key="comboDataSource" Source="C:\Temp\data.xml"/>
</WPF:DSWindow.Resources>
The new resource is named
comboDataSourceand the path points to the data.xml.Create the combo boxes and have them point to the first level of data in the XML and to the corresponding second level.
Here is an example of the first combo box:
<ComboBox x:Name="ComboCarCompanies" Grid.Column="1" Grid.Row="6"
    ItemsSource="{Binding Source={StaticResource comboDataSource}, XPath=Data/Companies/Car}" Text="{Binding Prop[CarType].Value}"
    DisplayMemberPath="@Type" SelectedValue="{Binding Prop[CarType].Value}" SelectedValuePath="@Type"/>
The
Sourceof the first combo box is set to theStaticResource-comboDataSourcethat we have defined earlier.The second combo box looks like this:
<ComboBox x:Name="ComboCarType" Grid.Column="1" Grid.Row="7"
    ItemsSource="{Binding SelectedItem, ElementName=ComboCarCompanies}" Text="{Binding Prop[CarType].Value}"
    DisplayMemberPath="@Type" SelectedValue="{Binding Prop[CarType].Value}" SelectedValuePath="@Type"/>
Most attributes in our example play the same role as in the first combo. The real difference is in the
ItemSource. In this example, theItemSourcecomes fromSelectedItemof the first combo calledComboCarCompanies.Define the property definitions
CarTypeandCar: In the Inventor.cfg or AutoCAD.cfg depending what tool you are using for this example, add the property definitions forCarTypeandCar. See here for adding property definitions in the configuration file.Note: From VDS 2019 and onwards, this step can be avoided as the VDS internally creates a property definition for those that do not exist.Save your changes and review the dialog.