Configure Vault Options for the Vault Client
The Options dialog box in the Vault stand-alone client allows you to customize as well as streamline your workflow by suppressing certain dialog boxes and prompts.
You can also enable the document previewer. The document previewer allows you to preview a document in the preview pane without launching the application associated with the document.
Access the Options Dialog
From within Autodesk Vault, select Tools > Options.
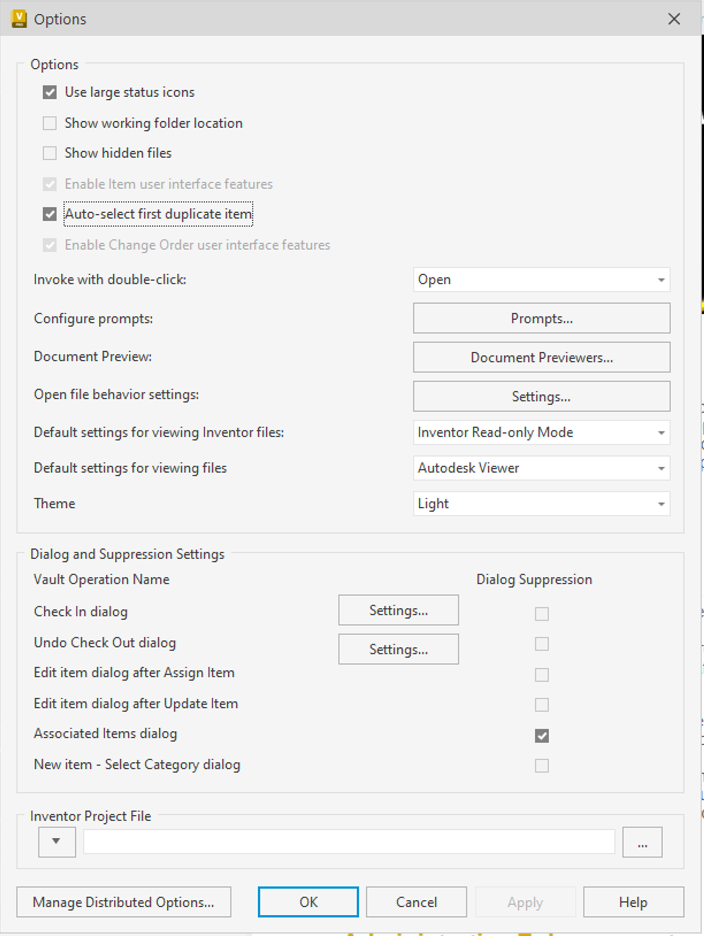
Options
Use large status icons
By default, small icons are used to indicate status. Turn on the Use large status icons check box to display large icons.
Note: The Vault client must be restarted to see the large status icons.Show working folder location
By default, the location of the working folder is not displayed. Turn on the Show working folder location in title bar check box to display the location of the working folder in the interface.
Show hidden files
You can choose whether or not to display the automatically generated .dwf files. By default, they are hidden in the file list. Turn on the Show hidden files check box to display the hidden files in the file list.
Enable Items user interface features
If the administrator has authorized overrides, you can enable the Items interface by selecting the Enable item user interface features check box.
Auto-select first duplicate item
When selected, Vault automatically selects one item to assign to a selected file when it finds two of the same items. If turned off, Vault creates and assigns a new item instead.
Administrators can decide whether or not to allow a user to override auto-assignment on the Configure Assign Item dialog.
Note: The Auto-select first duplicate item option can be disabled or enabled on the Configure Assign Item dialog as well.Auto-select first duplicate item must be turned to use the Group BOM Rows feature.
Enable Change Order user interface features
If the administrator has authorized overrides, you can enable the Change Orders interface by selecting the Enable change order user interface features check box.
Invoke with double-click
Configure the default behavior for double-clicking a file with the Invoke with double-click setting. When you double-click a file in the vault, the default action is View in Windows. If Open is selected as the default, the file is checked out of the vault and opened in the associated application for editing. To change the default action, select an action from the drop-down list.Note: Inventor .dwg files are opened in Inventor for editing. If Inventor is not installed, the .dwg file is opened in AutoCAD.
When you double-click a component in Product View, the default action is performed on the associated file.
Configure Prompts
You can specify the default response for common dialogs so that every time certain dialogs are displayed, your preferred response is the default selection. You can also specify which commands are automatically performed without prompting you for input, reducing the number of times you need to directly interact with the vault.
Document Preview
A list of applications installed on your current system are listed in the Document Previewer Options dialog. Here you can enable certain applications for previewing documents in the Preview Pane.
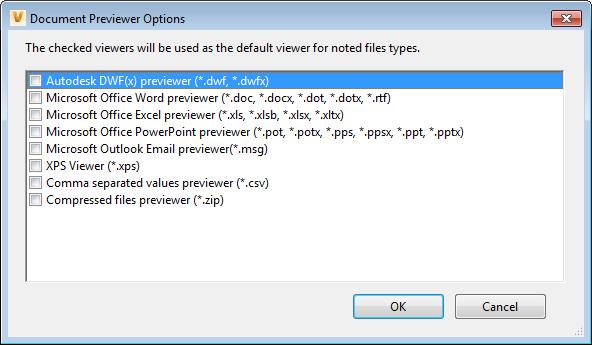
By default, the Autodesk Vault preview carousel view is used.
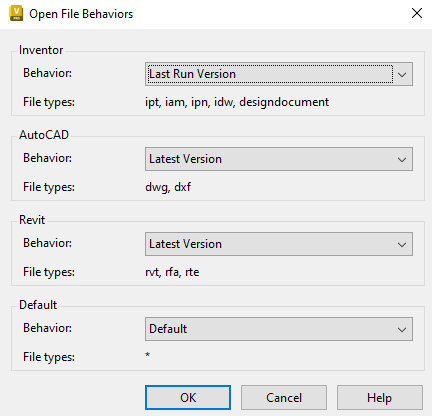
Open file behavior settings
Lets you determine whether Inventor, AutoCAD, and Revit files are opened by the latest version, the last run version, or the version of the CAD application that saved the file.
For example, if AutoCAD 2017 and AutoCAD 2018 are both installed on a machine, and you want files that were saved in AutoCAD 2017 to always open with AutoCAD 2018, you can configure Vault to always launch AutoCAD 2018 for all .dwg and .dxf files.
Default settings for viewing Inventor files
Inventor Read-only Mode
Inventor Read-only Mode is the default setting for viewing Inventor files.
Note: Only available if Inventor Professional is installed.See Inventor Help to learn more about Inventor read-only mode.
Always use Inventor Read-only Mode
Only available if Inventor Professional is installed.
You need to register Inventor Read-only mode in order to work with Vault Client.
This option is always available regardless of whether the DWF file is available or not.
Default settings for viewing files
Specify the default settings for viewing previews of Inventor, AutoCAD, and other supported file types. By default, the Autodesk Viewer is set to view the files.Select the default settings for viewing files:
Autodesk Viewer
Select Autodesk Viewer to set as the default viewer. The Autodesk Viewer is directly integrated into the Vault Client.
Autodesk Design Review
Select Autodesk Design Review (adr) to set as the default viewer.
Note: Ensure adr is installed. You can go to www.autodesk.com for a free download of adr.
Theme
The user interface theme controls the color of the application icons, frame, background, property panels, and dialogs. Select the color theme from the list of available themes.
- Dark: Choose the Dark color theme.
- Light: Choose the Light color theme. By default, the Light theme is used.
- Classic: Choose the old Classic theme.
Dialog Suppression
Suppress any of the following dialogs to streamline your workflow.
Check In dialog
The Check In dialog has settings associated with it. You can specify default values for the dialog and choose whether or not the dialog actively prompts you while working with files in a vault.
Undo Check Out dialog
The Undo Check Out dialog has settings associated with it. You can specify default values for the dialog and choose whether or not the dialog actively prompts you while working with files in a vault.
Edit item dialog after Assign Item
When turned on, the Edit Item dialog does not open after selecting Assign Item.
Edit item dialog after Update Item
When turned on, the Edit Item dialog does not open after selecting Update Item.
Associated Items dialog
When turned on, the Associated Item dialog does not display when a Go To Item action is performed on files with more than one associated item.
New item - Select Category dialog
When turned on, the Select Category dialog does not display when a new item is created. Instead, the default category is automatically used to create the new item.
Inventor Project File Field
When working with Autodesk Inventor files in Vault, Inventor project files are involved in path change operations for Inventor files (such as renaming a file, moving a file, copy design or replace). You can select whether to use the default Inventor Project File configured by your Administrator, or if you want to use the last Vault controlled project file checked into the Vault with the Inventor Vault add-in.
Manage Distributed Options
Use the Manage Distributed Options dialog define, distribute and manage all the defined options.
Distributed Options – Vault Client
Select Tools > Options from the toolbar menu
Configure Vault Options
Click Apply to save the changes.
Click Manage Distributed Options to select the options to distribute.
You can distribute:
- Use large status icons
- Show working folder location
- Show hidden files
- Invoke with double-click
- Configure prompts
- Document Preview
- Open file behavior settings
- Default setting for viewing Inventor files
- Default settings for viewing files
- Theme
- Dialog and Suppression Settings
Click the checkbox beside the option you want to distribute.
Click Apply to distribute the options.
Reset Distributed Options
- Click Reset will switch to reset mode.
- To exit Reset mode, you can click on Exit Reset Mode.
- Click on the check box beside the option you want to reset
- Click on Reset... to System default or Reset... to Distributed option to immediately trigger the reset action and return to non-reset mode.
- Reset to System default: Restore the system default options
- Reset to Distributed option: Reset the settings to the distributed option level.
- Click on Apply to save and distribute the current distributed options. This option is only available for Administrator and Configuration Administrator.
- Click OK to apply and close the dialog.