Camera Editor
The Camera Editor lists the properties of all the orthographic and perspective camera views in your scene.
Use the Camera Editor to:
- Rename cameras.
- Change the angle of view of a perspective camera to create wide-angle or telephoto views.
- Lock a camera so that the view cannot be changed interactively.

To view and modify a perspective camera as an object in the scene, see View windows > Camera menu.
To animate a camera using the Animation Editor, see Animate Cameras.
Camera
Camera
Use the drop-down menu to select a camera to display its properties in the Camera Editor.
A single scene may contain several cameras. For example, by default a scene contains four cameras corresponding to the four modeling windows: top, front, right, and perspective (camera).
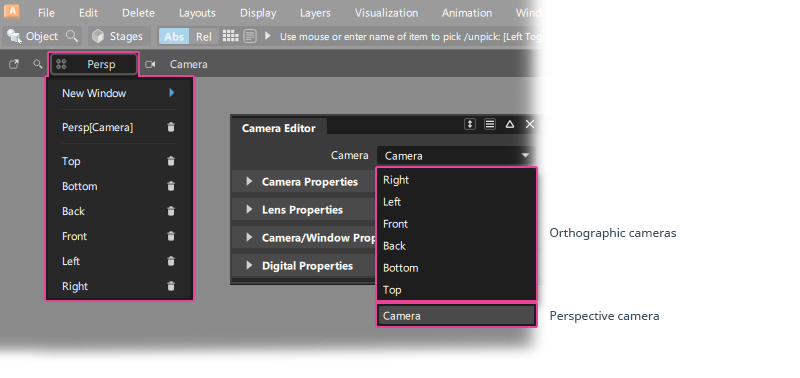
Orthographic cameras have limited settings in the Camera Editor, and they can't be viewed or manipulated as an object in the modeling windows.
Perspective cameras are used to create the view in a perspective window. They are also objects, but by default, they are not displayed in the scene.
Use Show > Cameras on the viewport window title bar to display a perspective camera in view windows other than the one created by that camera.

Perspective cameras have the following elements:
- Eye - the camera's position
- Up - the up vector end point
- View - view point or focal point
- Focal Distance
- Near Clipping Plane
- Far Clipping Plane
Camera Properties
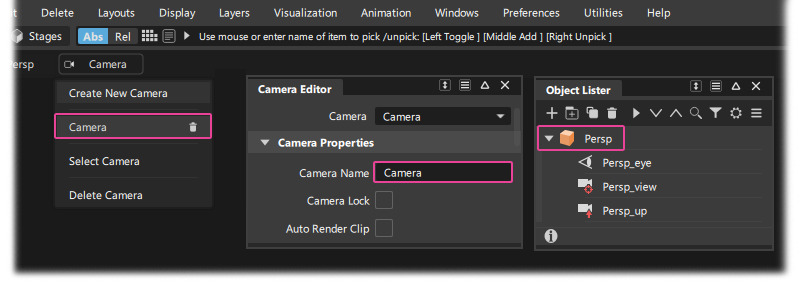
Camera Name
Type in this field to change the name of the camera as displayed in the view windows title bar menus. The name defaults to 'Camera' or 'Camera#1, 2, 3' etc.
Camera Lock
Locks the camera position so that you can't zoom, pan, or tumble the camera interactively in the scene using the ViewCube or Shift + Alt viewing.
This can be useful to maintain a consistent view for visualizing and comparing models or design revisions.
Typically, you will create an additional perspective camera. One can be used as a locked view, and one can be used for interactive viewing and modeling. Switch cameras using the Camera menu on the window pane title bar.
Auto Render Clip
The near and far clipping planes are set based on the bounding boxes of the objects in your scene so that they include all visible objects in the current view frame.
The distance between near and far clipping plane defines the accuracy of the depth buffer. That means a very large distance leads to incorrect depth buffer behavior - so for example you might see curves that should be hidden by a surface..
By turning on Auto Render Clip, you can prevent these image quality problems:
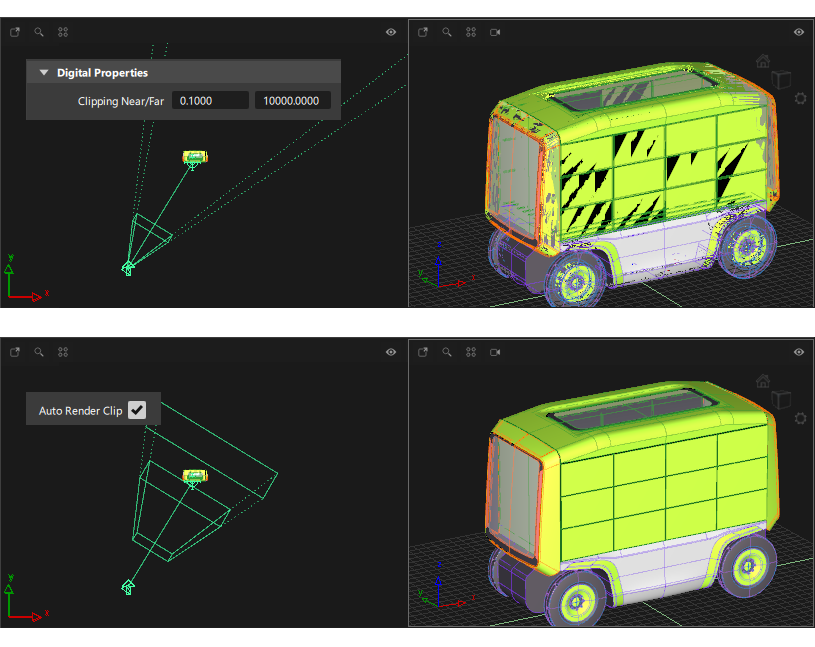
Turning on Auto Render Clip disables the display of the clipping plane near and far values in the Digital Properties section below. When you turn off Auto Render Clip, the manual settings update and can be adjusted if needed. For example, the Auto Render Clip settings may be too close to the surfaces and obscure CV display for example. So, you may want to increase the space around the objects.
Eye, View, Up
Displays the camera's view by defining the camera's position (Eye), view point or focal point (View), and up vector end point (Up). Each parameter has three fields, corresponding to the XYZ coordinates for that parameter.
Positioning a camera by editing these parameters may be difficult, and is not recommended for positioning orthographic cameras. If you do edit these parameters, display the camera in the orthographic windows to help visualize the changes.
Twist
Perspective cameras only.
Twist is the tilt of the camera (from side to side) in degrees.
The Up and Twist parameters define the same camera property in different ways. Changing one alters the other. For example, if you change the X Up value to 2, the Twist value automatically changes to -63.435. The slider range is -180 to 180. The default value is 0.
Perspective Gain
Perspective cameras only.
Controls the speed at which you can zoom a perspective camera. For example, doubling the Perspective Gain value doubles the speed at which you can zoom the camera. The valid range is 0 to infinity. The slider range is 0 to 25. The default value is 10.
Perspective gain is also adjusted when the View > Look At tool or the NavBar Look At tool is used to make interactive viewing easier and more responsive. If these tools are used when an item is selected, the perspective gain is adjusted to match the size of the object. If nothing is selected the perspective gain is adjusted for the volume taken up by all objects in the scene.
Lens Properties
The Lens Properties are only available for perspective cameras.
Focal length and angle of view
Focal length and angle of view are two different methods of defining the same lens property. The effect is to create a 'wide-angle' or 'telephoto' view.
When changing these values, you also need to zoom the view in or out to fit the scene into the perspective viewport.
Focal Length (mm)
Lets you set the camera's focal length either from a list of standard, real world focal lengths (between 15mm and 200mm), or by entering a value in the User Focal Length field (user). If you set Focal Length to user, the User Focal Length parameter becomes available. The default setting is user.
User Focal Length (mm)
Lets you set the camera’s focal length by typing in any value. The valid range is 1 to infinity.
Angle of View
The horizontal angle of the view seen by the film. It represents the width of the film back as seen through the lens expressed as an angle. The valid/slider range is 0.2 to 179.
![]()
Depth of Field and Autofocus
Depth of Field is a legacy setting that calculated a post-processing effect for software renders. It can be used in Hardware Shade, but its effect generates less realistic results.
Depth of Field
Performs a depth of field calculation to vary the focus of objects based on their distance from the camera. If Depth of Field is ON, the following parameters become available: F-Stop, and User F-Stop. The default setting is OFF (no depth of field calculation is performed; all objects are in focus).
Because depth of field changes with distance, if you want the F-stop values to be realistic your scene should reflect its real world size. Alternatively just modify the values until you get the blurring effect you want in the scene.
F-Stop
Lets you set the camera's f-stop either from a list of standard, real world f-stops (between 1.4 and 32), or by entering a value in the User F-Stop field (user). The default setting is user.
Small F-Stop values (such as 1.4) tend to give a very small depth of field. That means that the region at the specified distance from the camera that is in focus(the region between near and far) is small. Large F-Stop values (such as 32) tend to give a larger depth of field.
User F-Stop
Lets you set the camera f-stop by typing in any value. The valid range is 0.5 to infinity.
Auto Focus
Automatically focuses the camera on the camera's View point. If Auto Focus is OFF, the Focal Distance parameter becomes available, and the camera focuses at the Focal Distance value. The default setting is OFF.
If the View point is not between the near and far clipping planes, Auto Focus focuses the camera at either the near clipping plane, or at the far clipping plane, whichever is closer to the View point.
Focal Distance
The distance from the camera at which the camera focuses. The valid range is 0.001 to infinity. The slider range is 0.001 to 100. The default setting is automatically set to the Auto Focus value based on the View point when you set Auto Focus OFF.
If the Focal Distance value is not between the near and far clipping planes, the Focal Distance value is automatically set to either the near clipping plane distance or the far clipping plane distance, whichever is closer to the Focal Distance value.
Scaling Factor
A scaling factor applied to the Focal Distance value. This parameter lets you define the Focal Distance value in units other than feet (for example, meters) by setting the Scaling Factor value to the number of units in one foot. For example, if you wanted to define the Focal Distance value in meters, you would set the Scaling Factor value to 0.3048 because there are 0.3048 meters in one foot. The slider range is 0 to 100. The default value is 1.
Camera/Window Properties
The Camera/Window Properties are only available for perspective cameras.
Aspect Ratio Fit
Controls how the camera’s window displays the camera’s view. The default setting is Fill which automatically fits the camera view in the camera window (in either the horizontal or vertical direction) so that the camera view fills the window
Offset
Offsets the camera view in the camera window. The direction of the offset is determined by the padding created by the Aspect Ratio Fit setting, either horizontally, if Aspect Ratio Fit is Vertical or Fill, or vertically, if Aspect Ratio Fit is Horizontal or Fill. The valid slider range is -1 to 1. The default setting is 0 (no offset).
Digital Properties
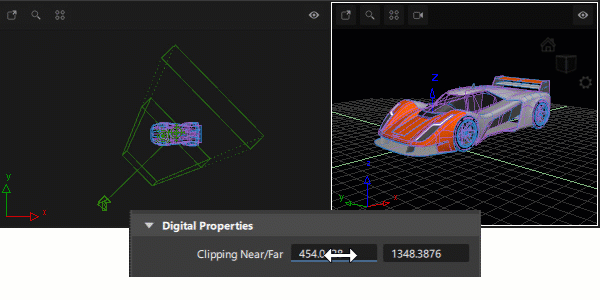
Clipping Near/Far
The distance to the camera's near and far clipping planes. The default values are 0.1 and 200.
For perspective cameras, the Clipping Near/Far values are distances from the camera.
For orthographic windows, the Clipping Near/Far values are distances along the axis that points into the screen. For example, if the Back window shows the YZ plane, then the Clipping Near/Far values are distances along the X axis.

You cannot enter a Clipping Near/Far value less than 0.1 within Alias.
Make sure the Clipping Near/Far values are set so that the clipping planes comfortably contain the contents in your scene. Setting the Clipping Near value very low or the Clipping Far value very high may produce image quality problems during visualization.